I decided to take the RHCSA within a few months and decided to prep using Sander’s video and books that are available via an O’Reilly Subscription. I’ll provide more details as I go, and how I did on the exam.
Red Hat Certified System Administrator (RHCSA), 3/e
by: Sander Van Vugt year: 2020
top
Module Table of Contents
- Module 1: Performing Basic System Management Tasks
- Module 2: Operating running systems
- Module 3: Performing Advanced System Administration Tasks
- Module 4: Managing network services
Module1
Performing Basic System Management Tasks
Lesson Table of Contents
- Lesson 1: Installing RHEL Server
- Lesson 2: Using Essential Tools
- Lesson 3: Essential File Management Tools
- Lesson 4: Working with text files
- Lesson 5: Connecting to a rhel server
- Lesson 6: Managing users and groups
- Lesson 7: Managing permissions
- Lesson 8: Configuring networks
- Lesson 9: Managing Processes
- Lesson 10: Managing Software
- Lesson 11: Working with systemd
- Lesson 12: Scheduling Tasks
- Lesson 13: Configuring logging
- Lesson 14: Managing storage
- Lesson 15: Advanced storage
- Lesson 16: Basic kernel management
- Lesson 17: Managing the boot process
- Lesson 18: Essential troubleshooting skills
- Lesson 19: Introducing bash shell scripting
- Lesson 20: Managing ssh
- Lesson 21: Managing http services
- Lesson 22: Managing selinux
- Lesson 23: Managing network security
- Lesson 24: Automated installations
- Lesson 25: Configuring time services
- Lesson 26: Accessing remote file systems
- Lesson 27: Running containers
Lesson1
Installing RHEL Server
Learning Objectives
- 1.1 Understanding Server Requirements
- 1.2 Performing a Basic Installation
- 1.3 Installing with Custom Partitions
- 1.4 Logging into the Server
- 1.5 Deploying RHEL in Cloud
1.1 Understanding Server Requirements
- On physical server
- In a virtual machine
- As a container
- As an instance in cloud
Requirements depend on the type of installation
- Physical, cloud or virtual?
- With or without GUI
- What are you going to do with the server
- For installation of a virtual machine in this class
- 2 GiB of RAM
- 20 GiB of disk space
- Wired Network Connection
- Optical Drive or access to DVD ISO
1.3 Installing Custom Partitions
- Able to install LVM partitions during install process via GUI
- Use xfs file system
1.4 Logging into the server
- Use
su -, to open root shellsu -ensures all the environment variables are loaded with the shell promptexitwill close out the current shell session
Lesson2
Using Essential Tools
Learning Objectives
- 2.1 Getting started with Linux Commands
- 2.2 Working with the bash shell
- 2.3 Understanding I/O redirection and piping
- 2.4 Using I/O redirection and piping
- 2.5 Understanding the linux file system hierarchy
- 2.6 Using man
- 2.7 Finding the right man page
- 2.8 Understanding vim
- 2.9 Using vim
- 2.10 Using globbing and wildcards
- 2.11 Using Cockpit
2.1 Getting started with Linux Commands
pwd print working directory
whoami shows current user name
ls list files and directories within the current directory
Options/flags change the behavior of a command
ls -l the option shows a long list of files and directories
ip addr show three part command, shows current ip address
free -m available memory, -m option shows in MiB
df disk free, shows storage devices
-h for human readable format
cat shows the contents of files
findmnt shows mount points and devices
2.2 Working with the bash shell
is the default shell interpreter
tab command completion - start typing a command and select tab to finish the command
history shows previous commands run
!1 will run the prior command
!f will run the last command that started with an f - you can use any letter, the letter will correspond the the last command run beginning with the letter
!+r reverse-1-search will search recent commands based on string
piping | uses the output from command as the input to the next command
wc word count
redirection < > sends output to another file
> or >>single redirection will write over whereas a double redirect appends
2> to redirect error messages
common to redirect errors to /dev/null for example, ls richard 2> * /dev/null will write the error from the first command to the /dev/null directory (basically nowhere)
env environment variables shape the environment you are working in within the bash shell
changing an environment variable will change the behavior of your bash shell
environment variables must be in all caps
assign environment variables by HOME=/home/richard
aliases create custom names for commands
create new alias h=history, but this is limited to the current runtime, you will need to set in config file to persist sessions
scripts add one to many commands in a file. for example, script.sh
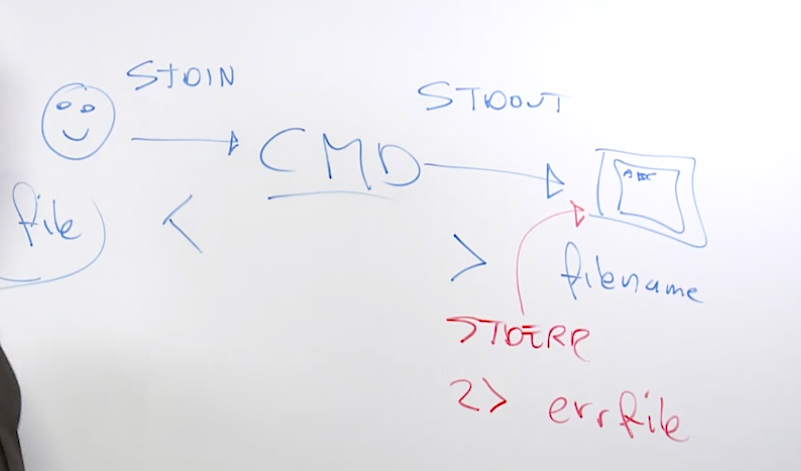
2.3 Understanding I/O redirection and piping

stdin information coming in, keyboard, mouse
stdout what gets posted after processing, most stdout will readout to the terminal
stderr where the command will send any error messages
2.4 Using I/O redirection and piping
Examples
>output redirection>>output redirection2> /dev/nullredirectstderr<redirectstnin
2.5 Understanding the linux file system hierarchy
FHS is maintained by the Linux Foundation
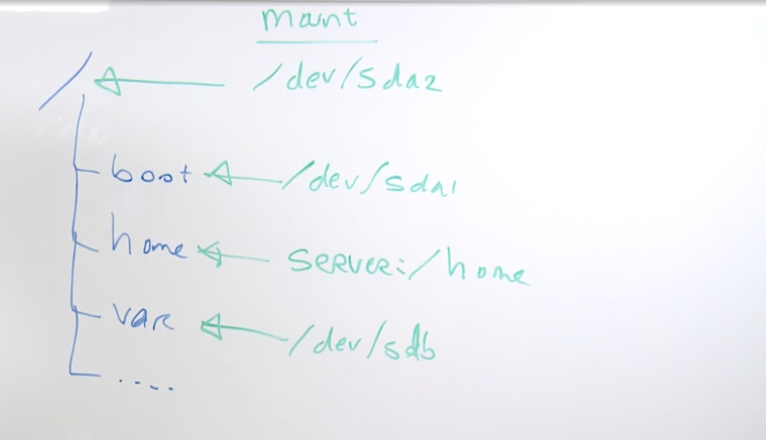
/ is the starting point in any FHS
cd change directory
cd .. take me up one directory
most important directories
/boot used to boot the system
image below shows the content of /boot, the highlighted file is the linux kernel

/dev devices are interface files that allow you to connect hardware devices
/etc etcetera directory is for configuration files
/home/ user account directories
usr similar to program files on windows, where all the binaries are stored
/use/bin ordinary binaries that can be used by normal users
/usr/sbin system binaries, need to be the root user
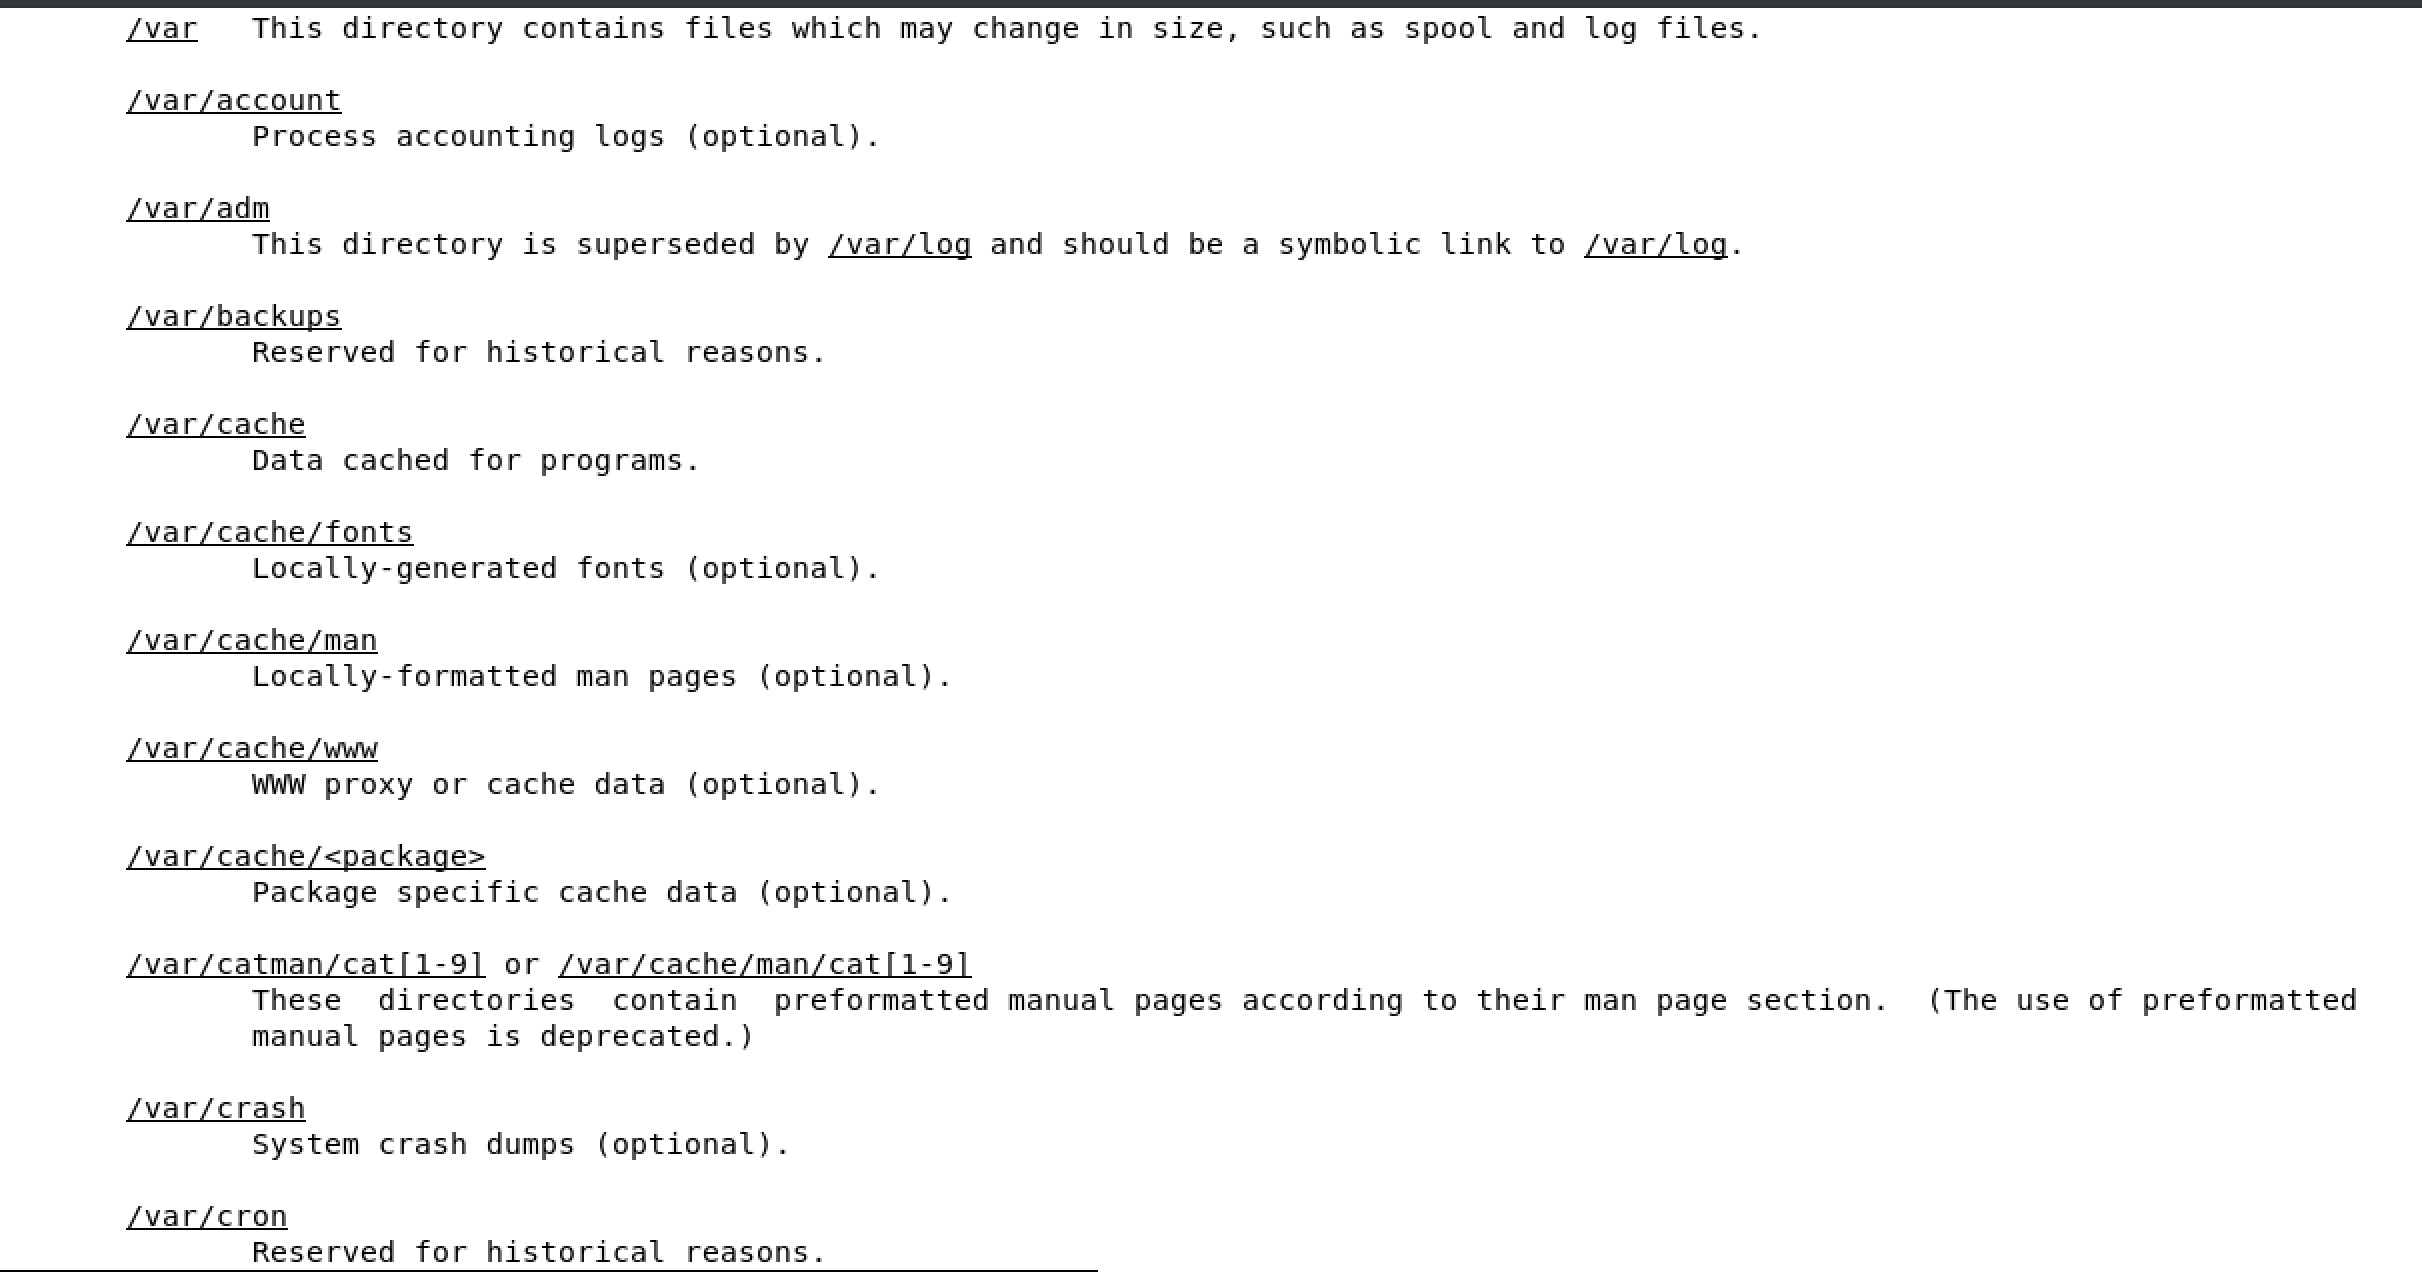
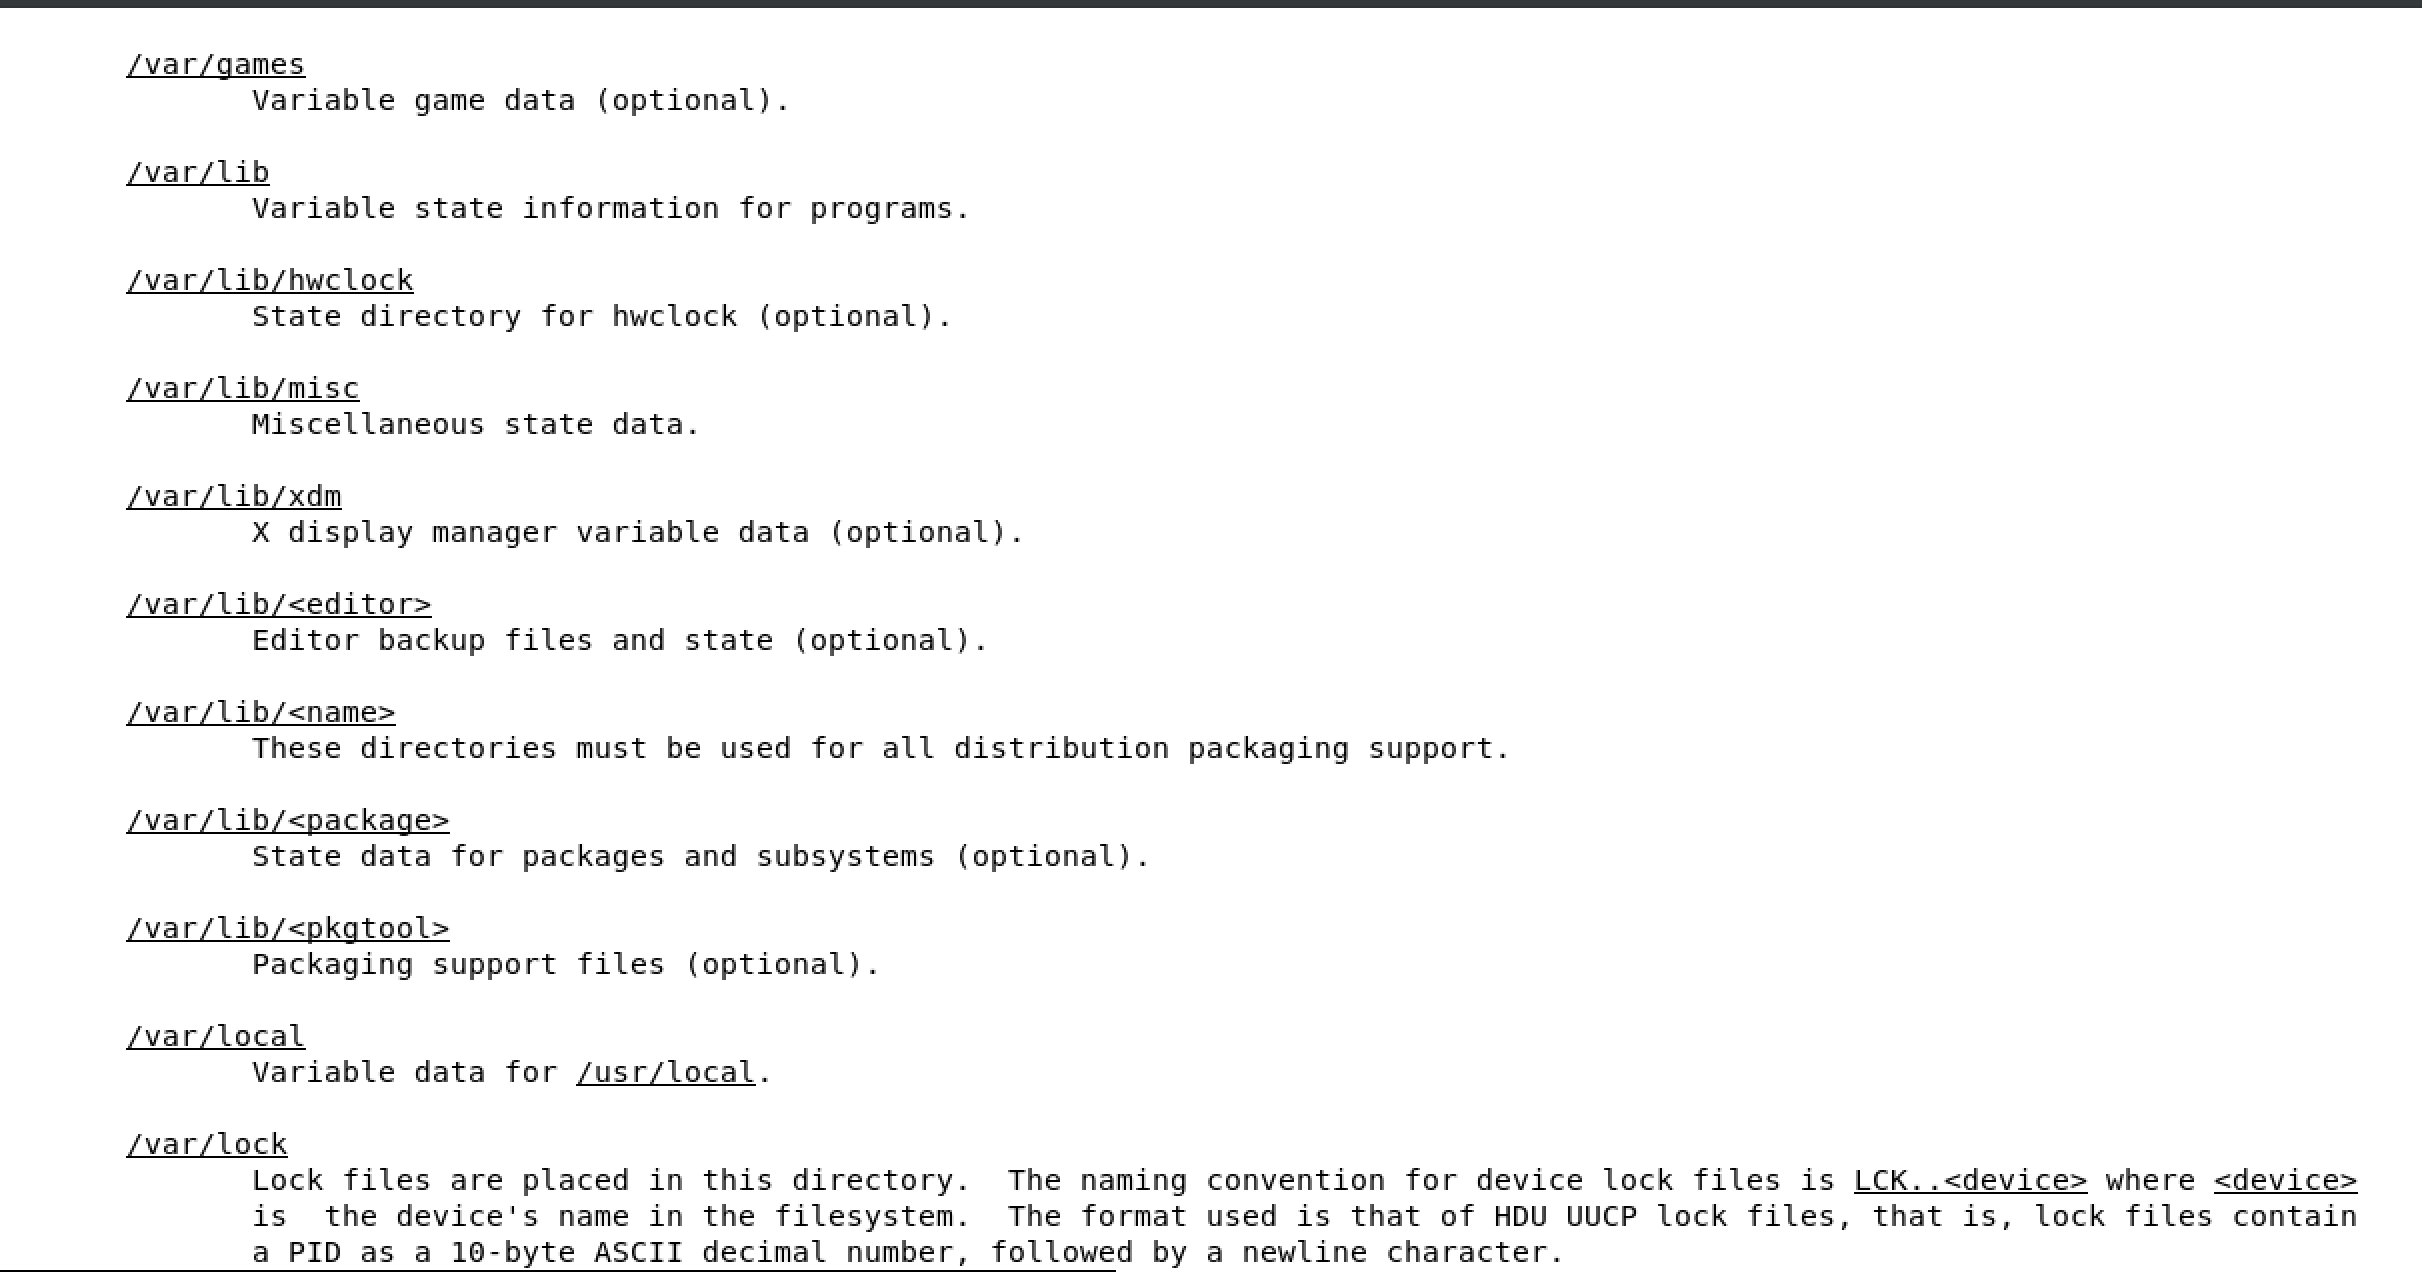
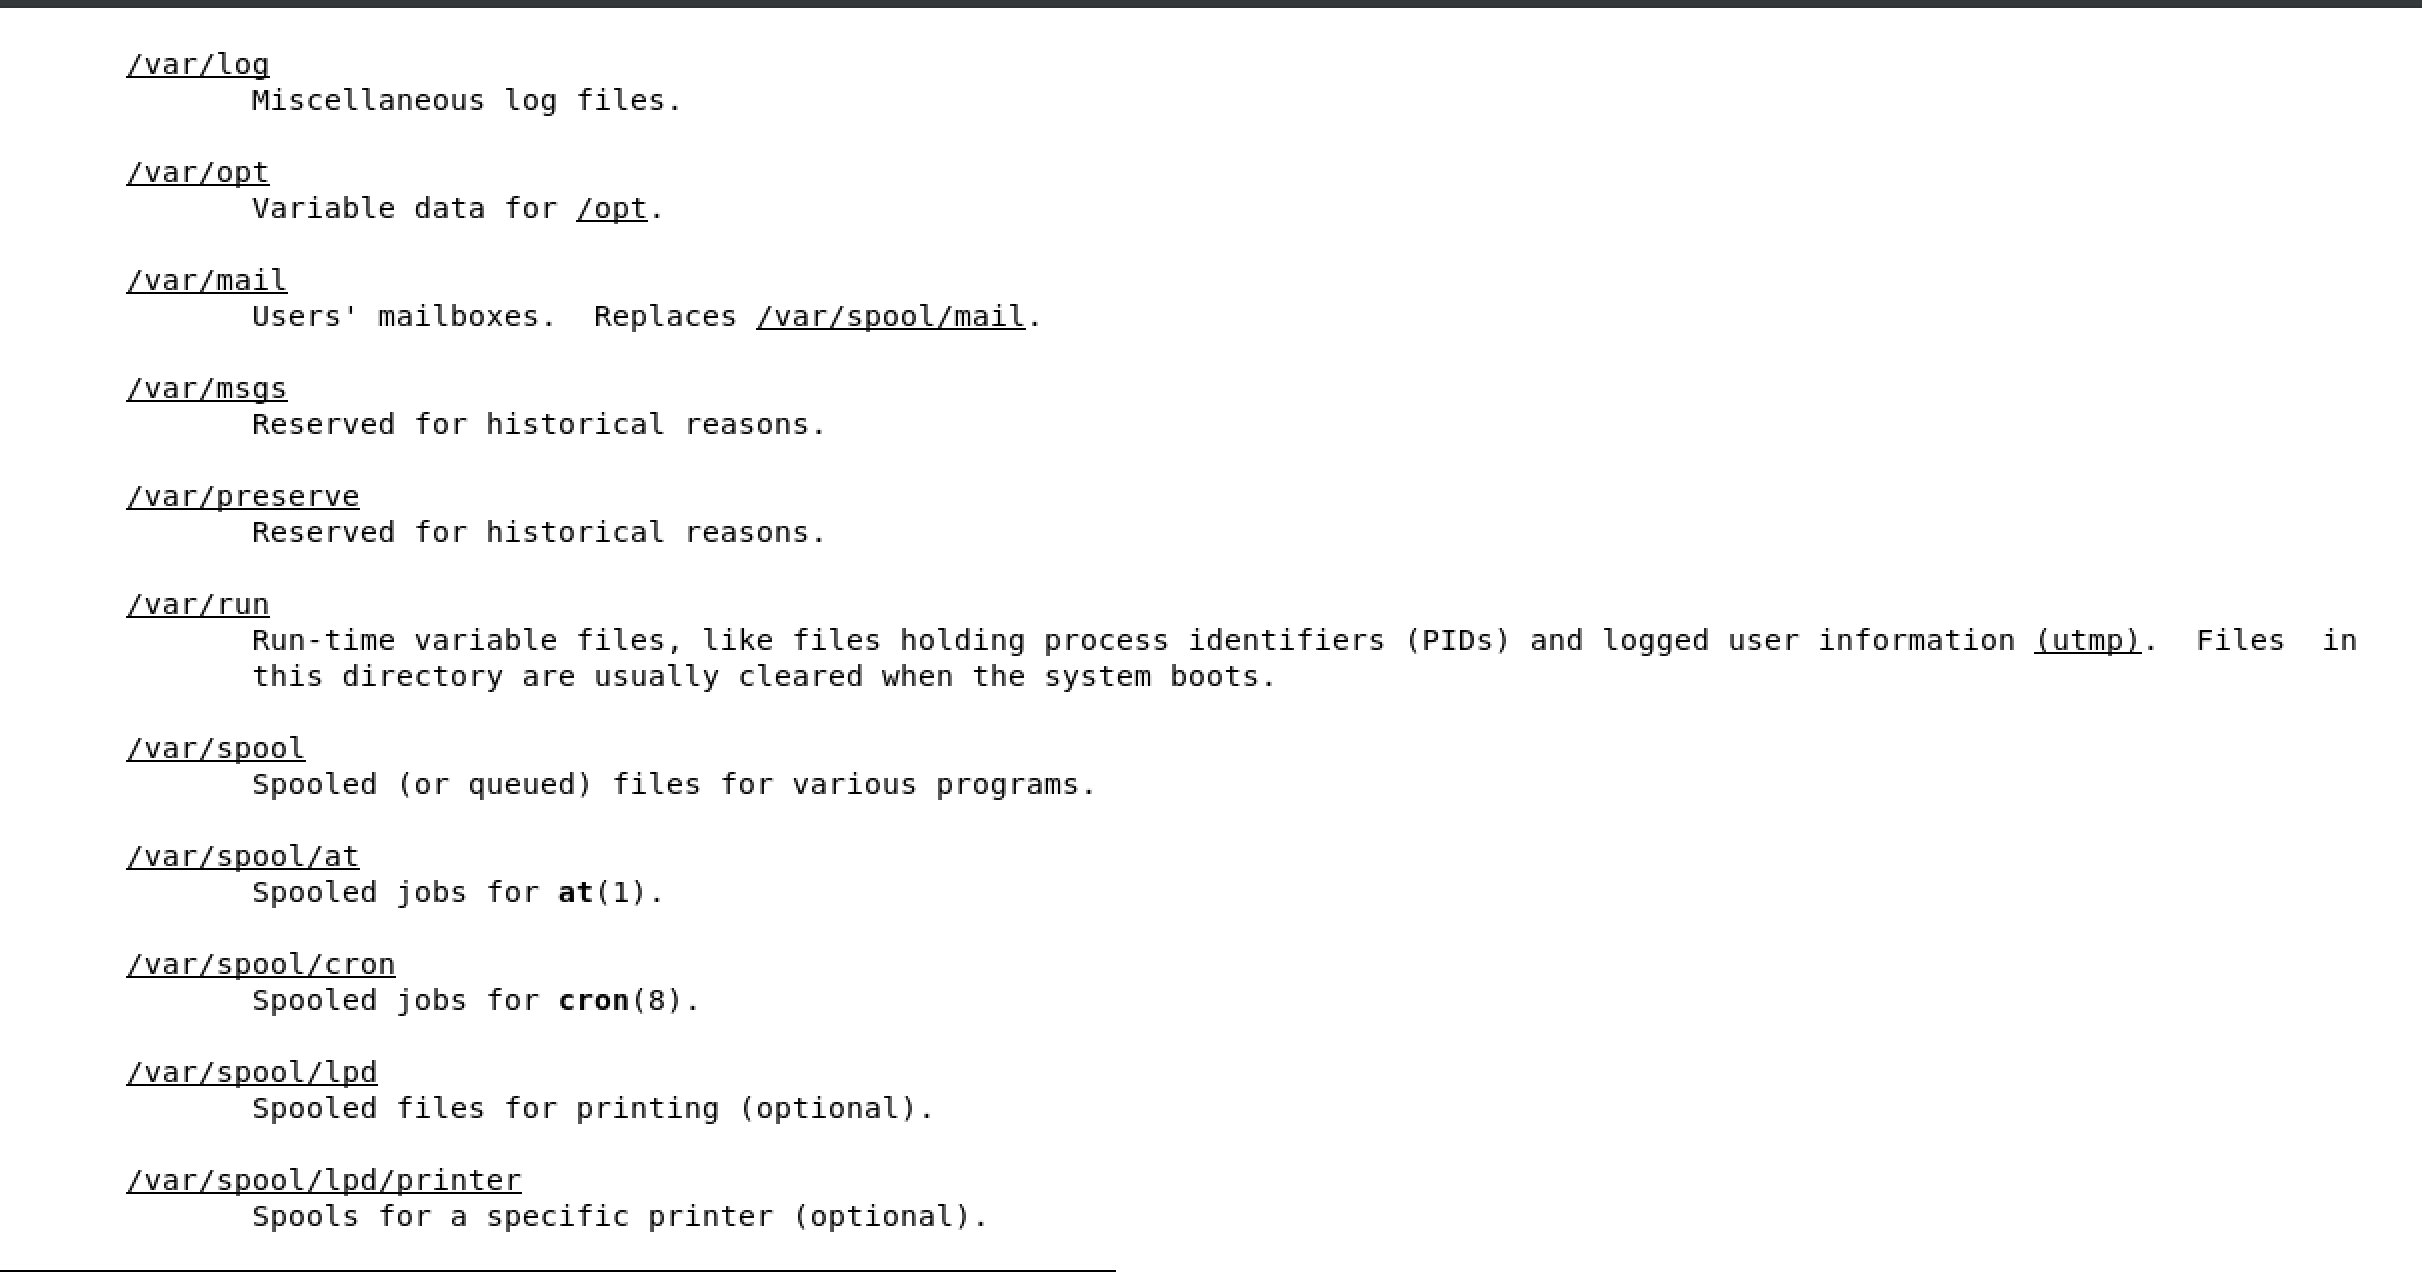
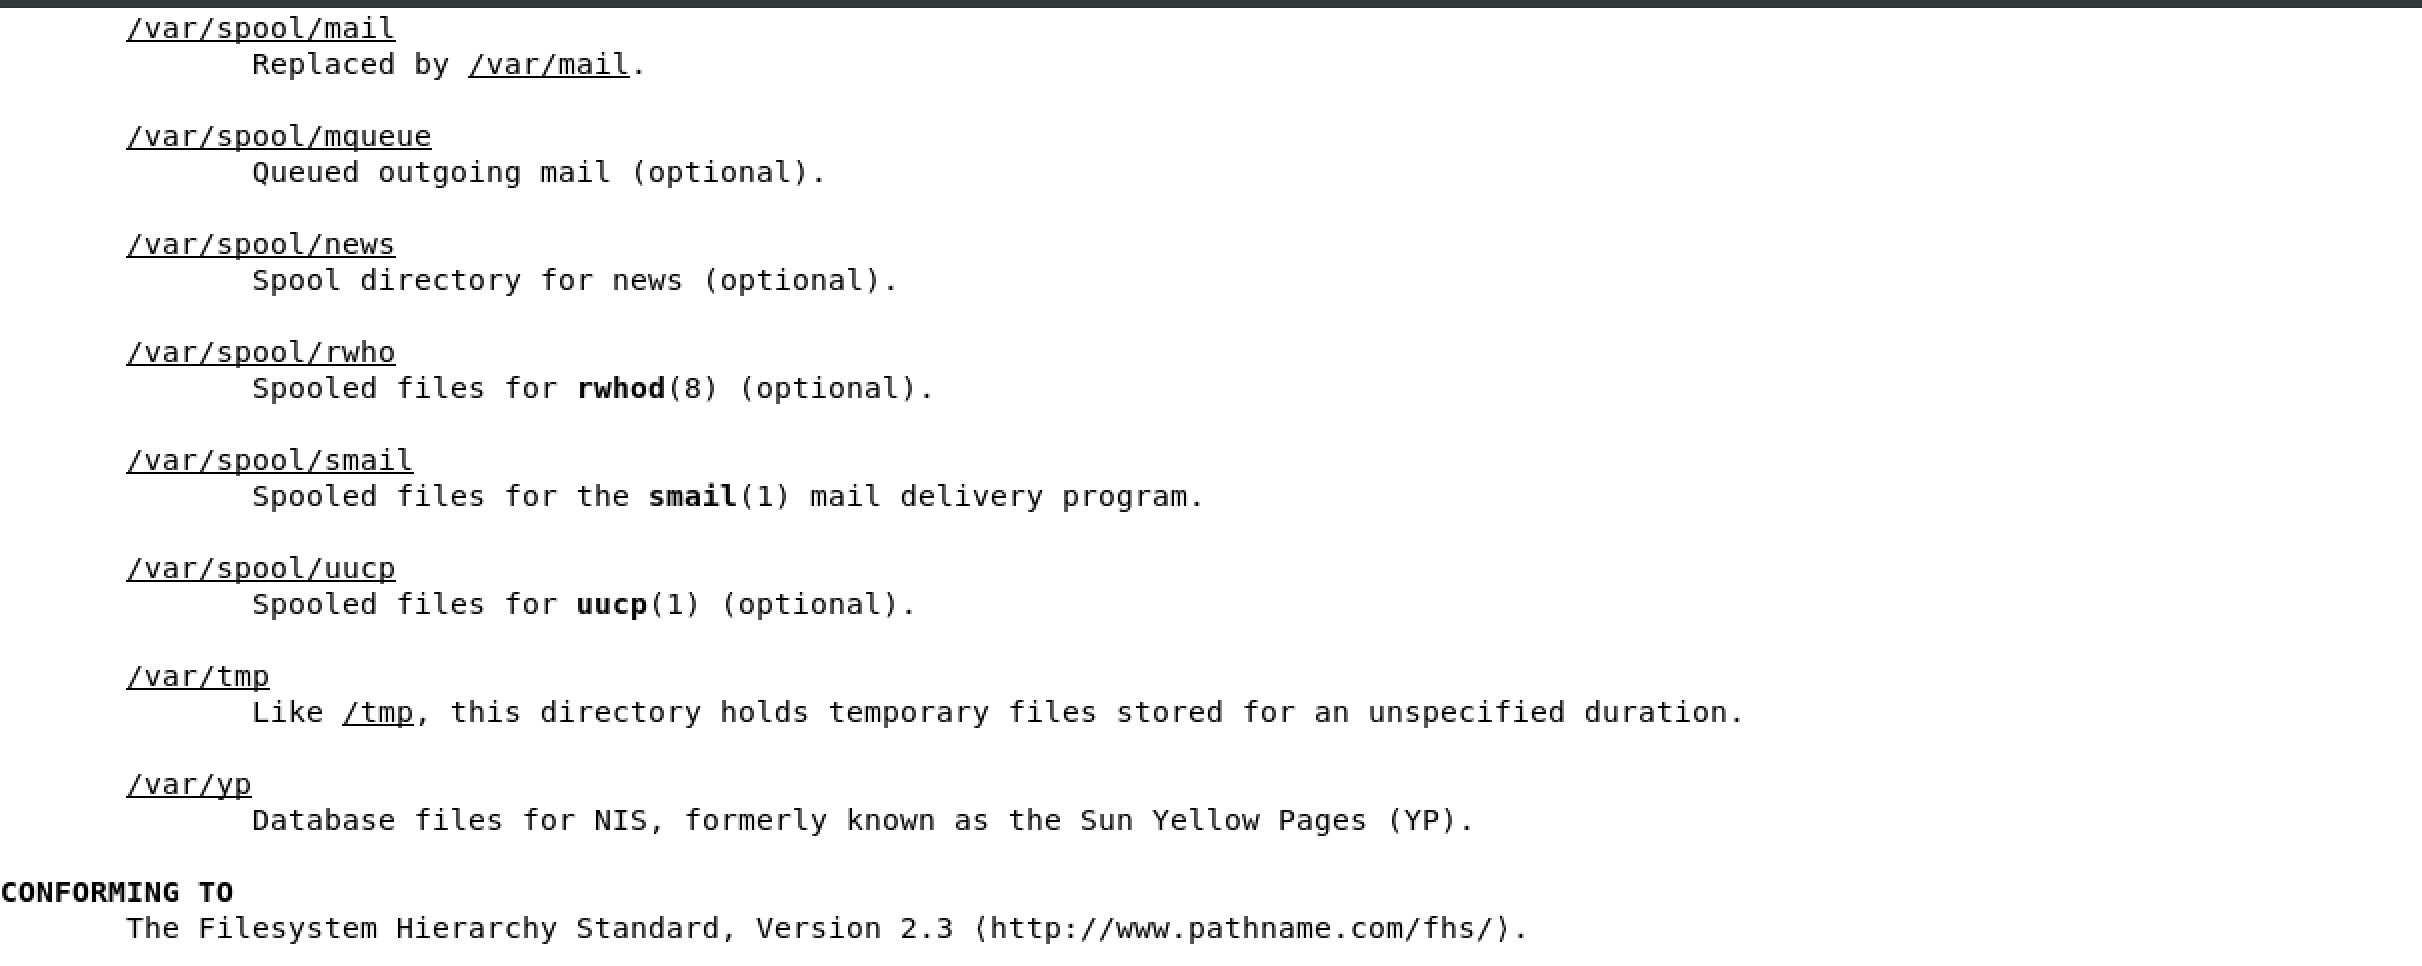
var variable directory, used to write dynamic data, such as log files
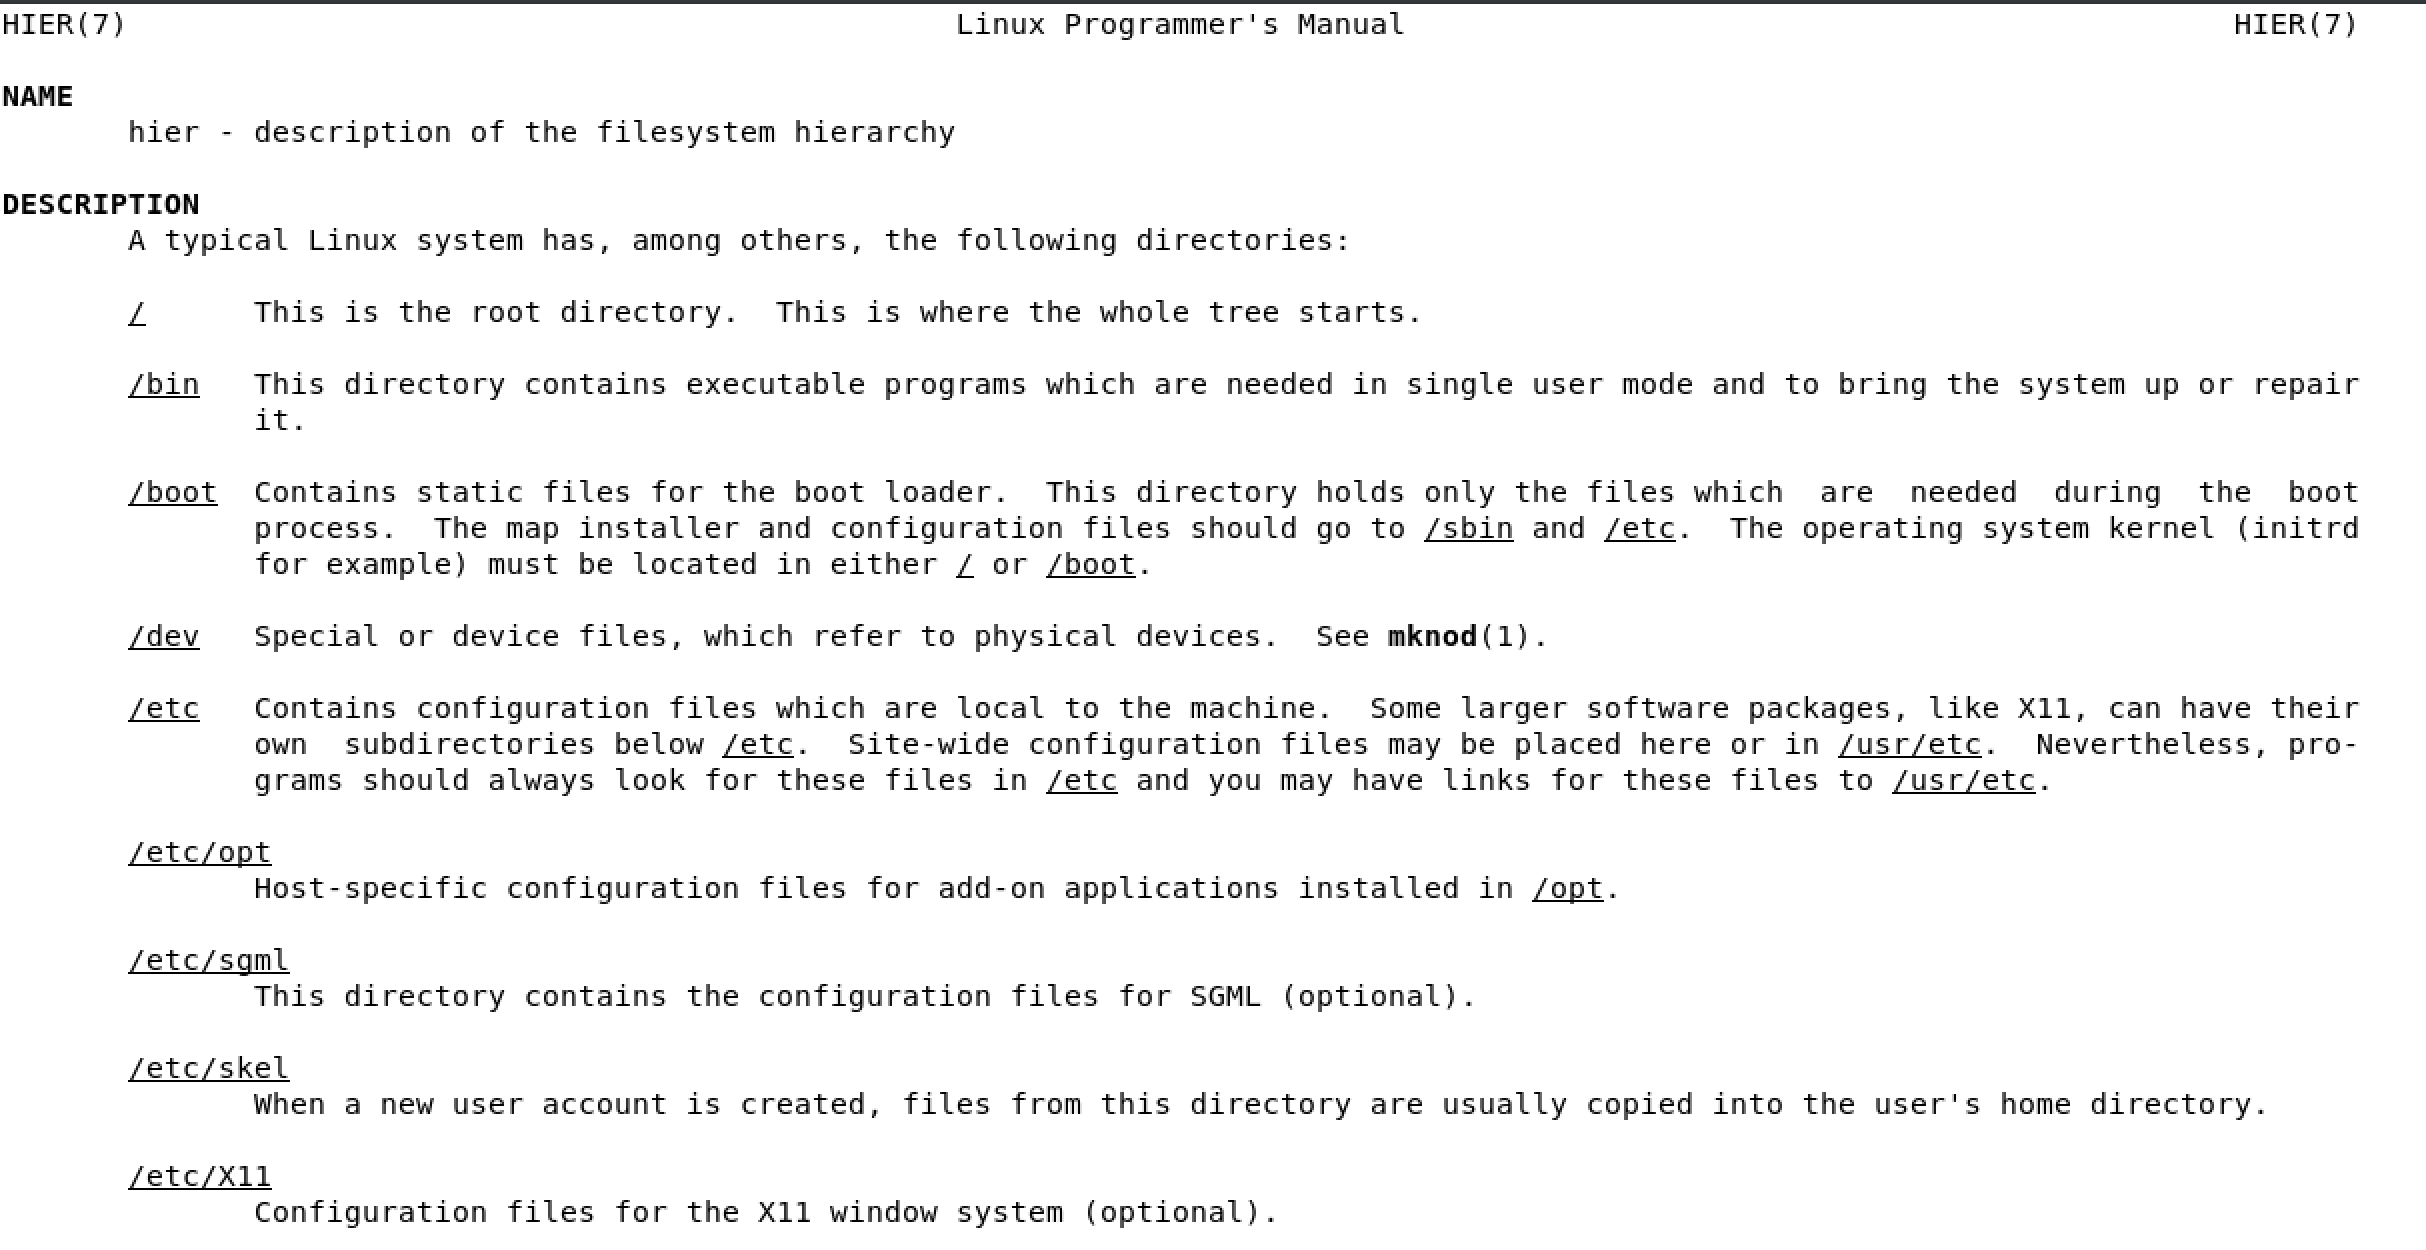
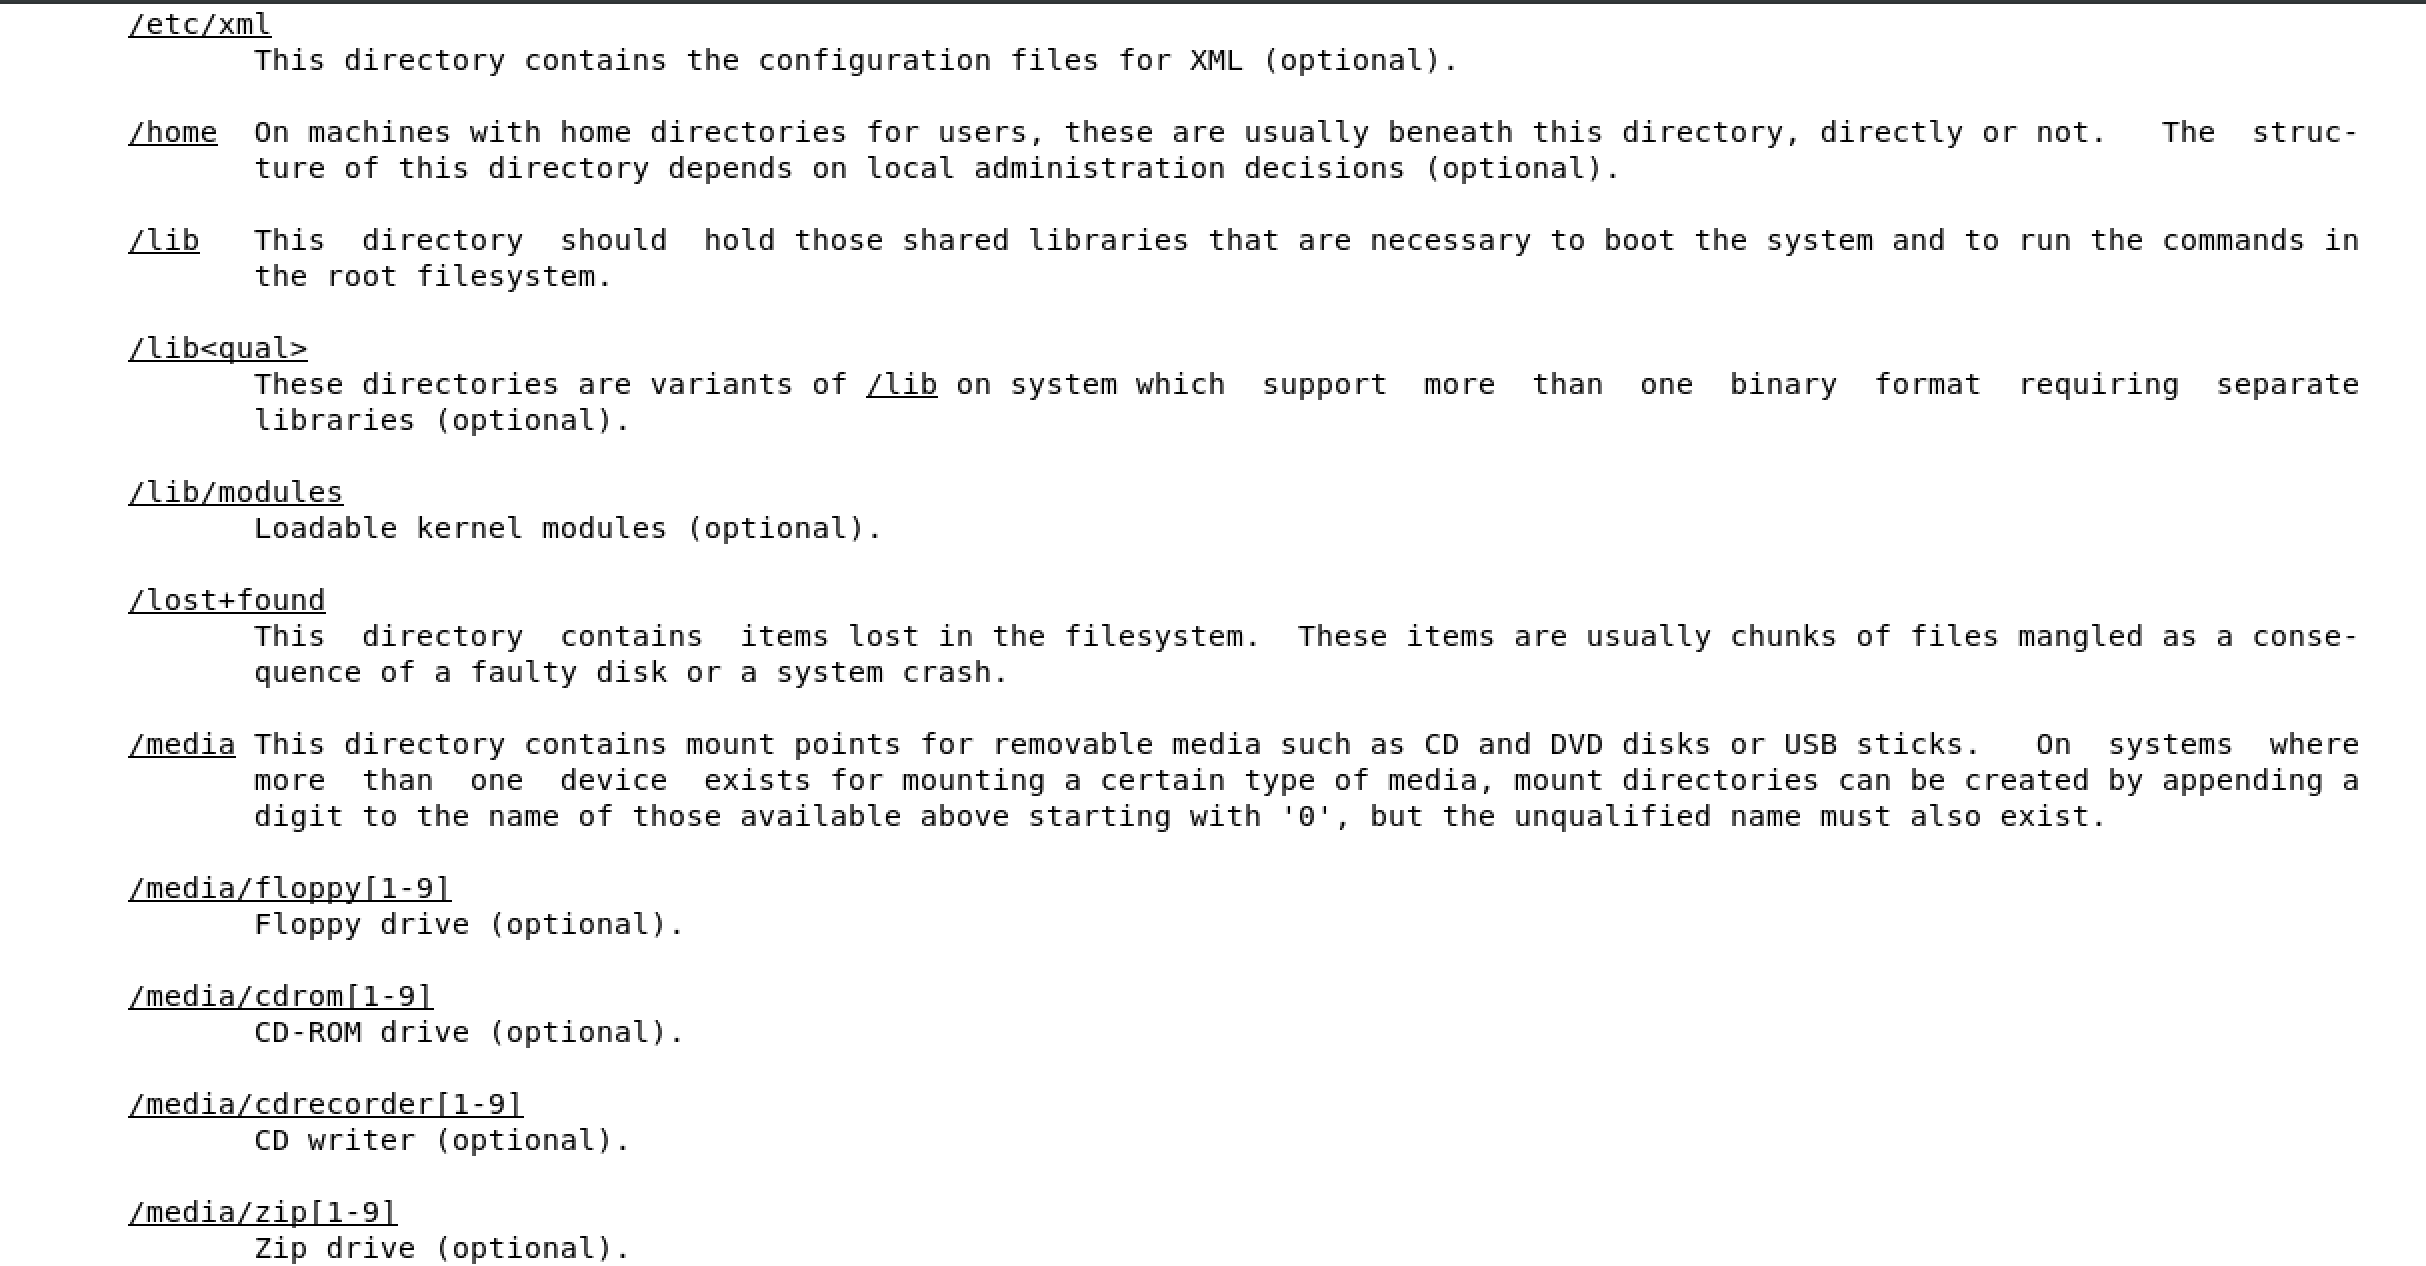
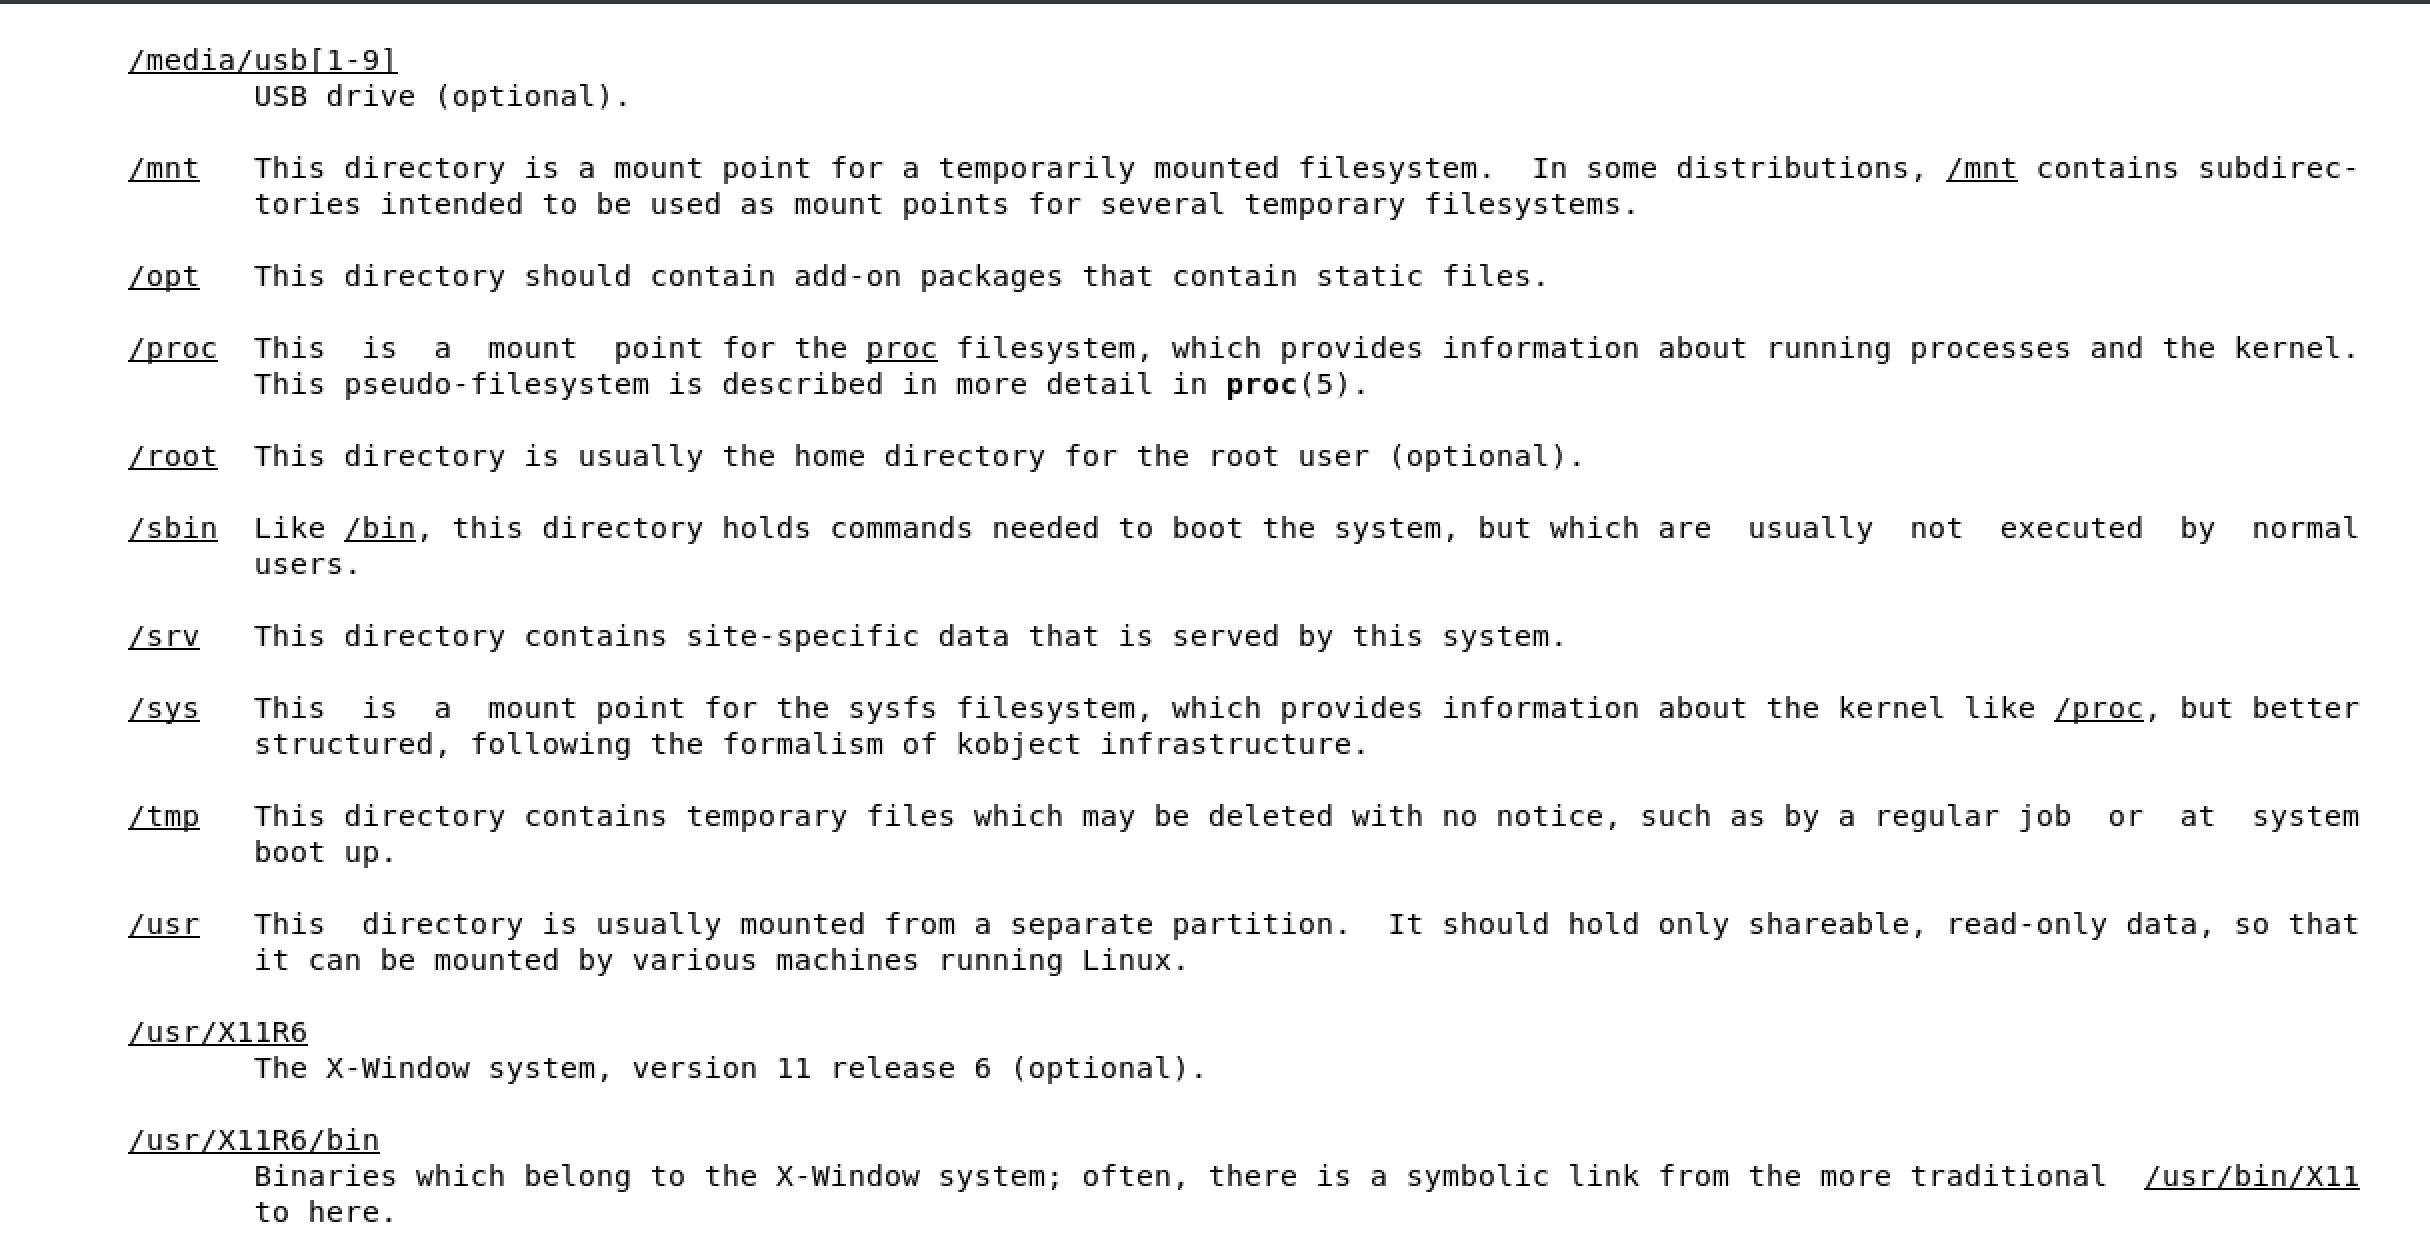
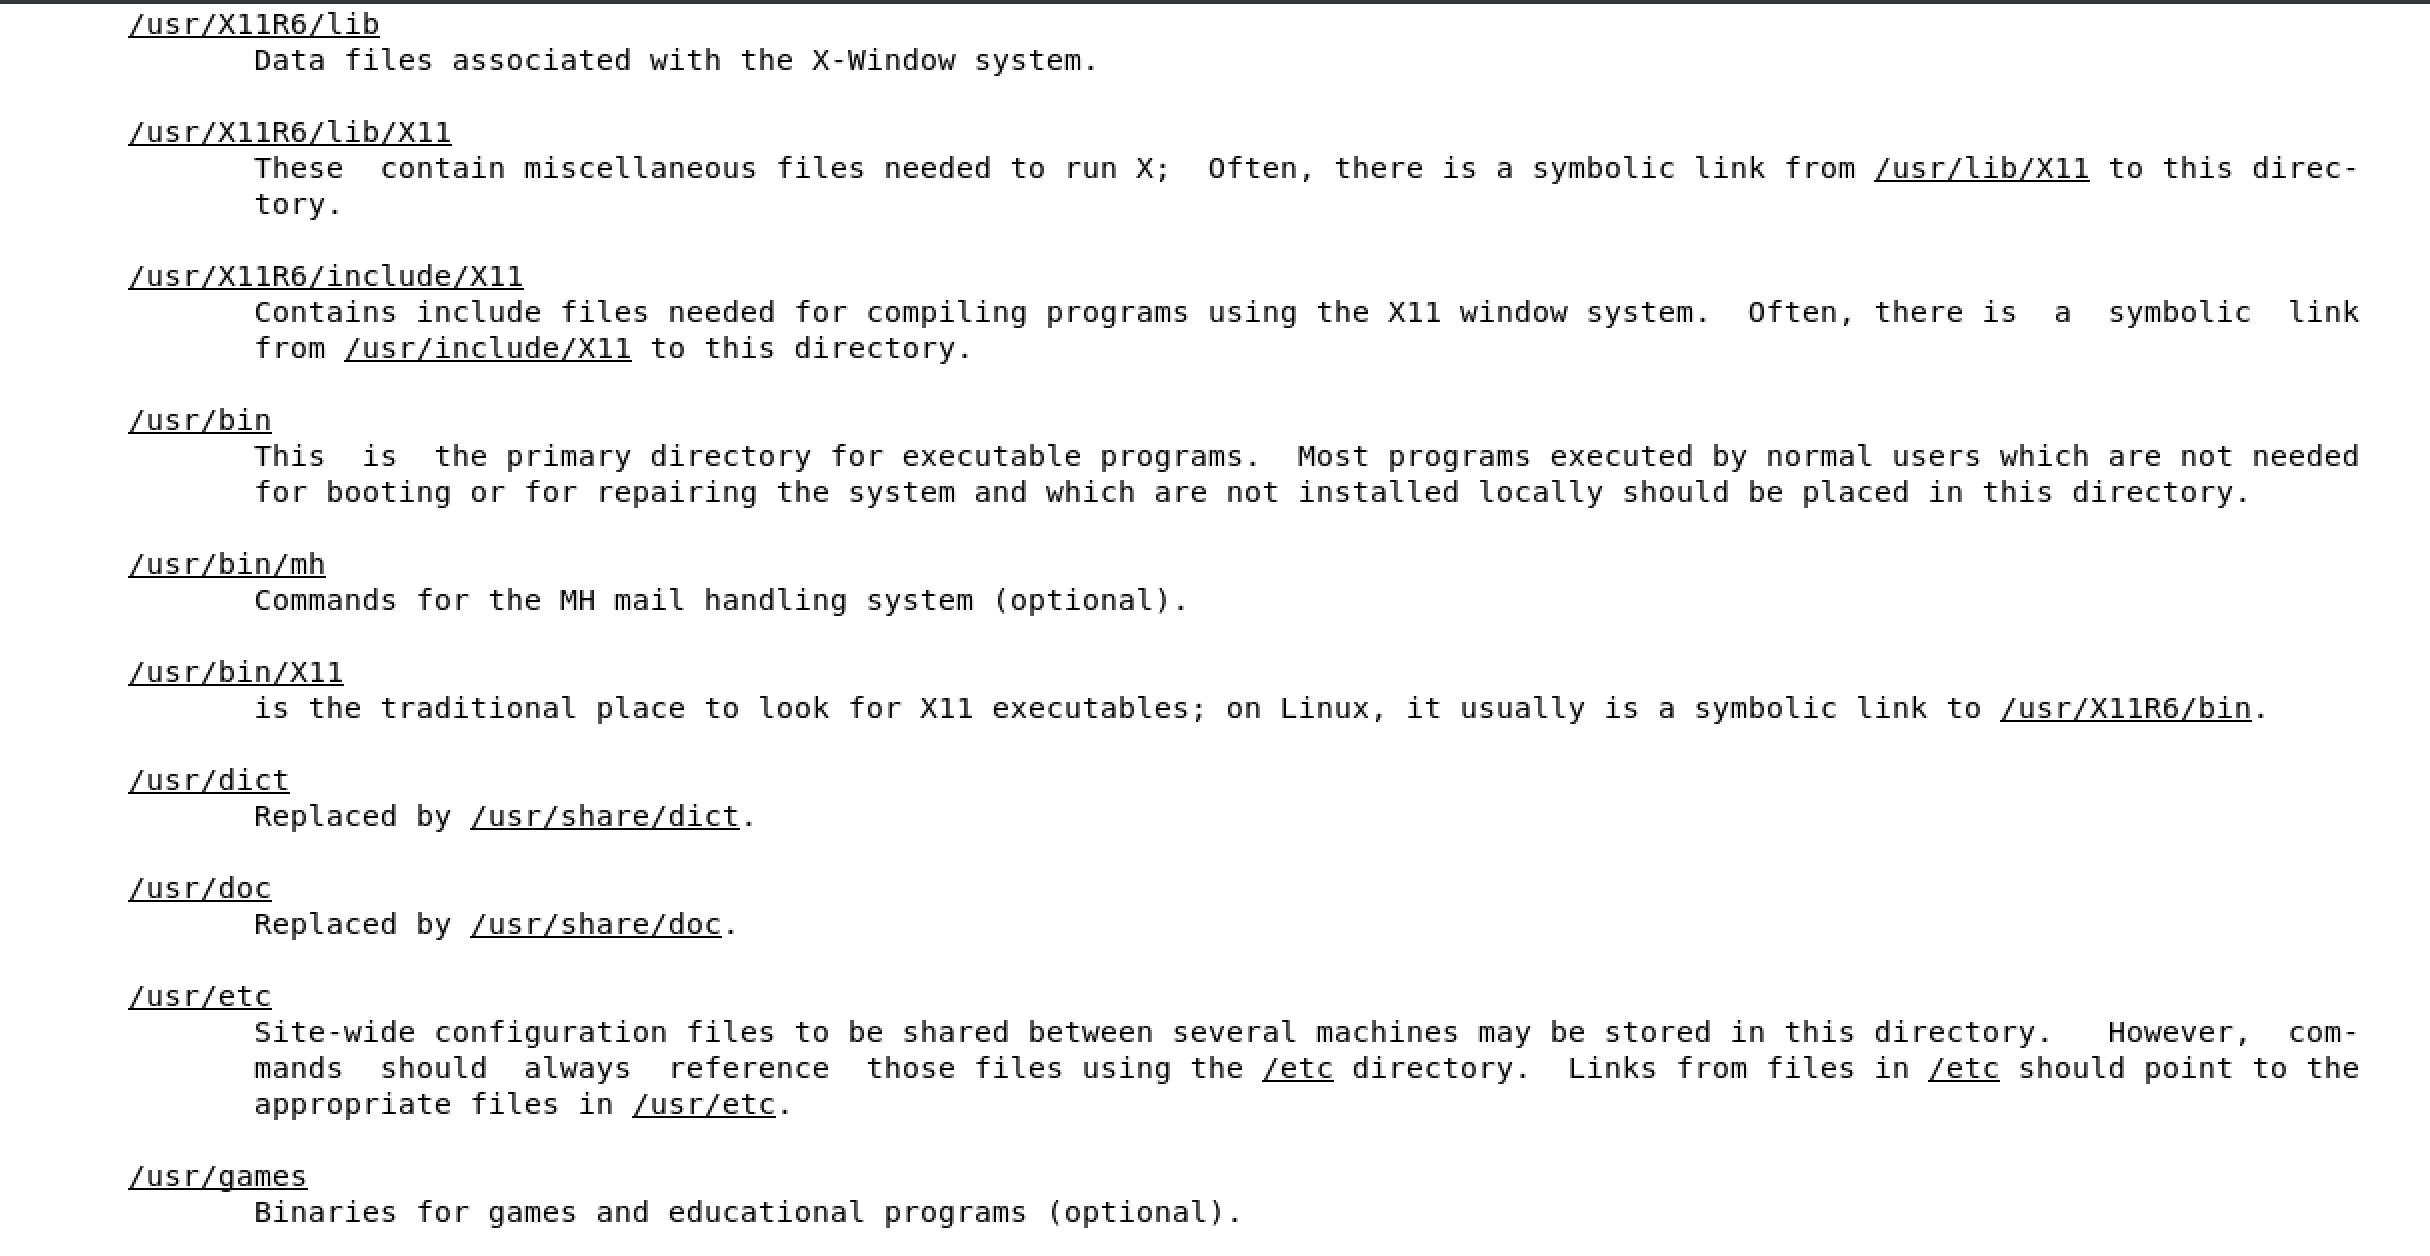
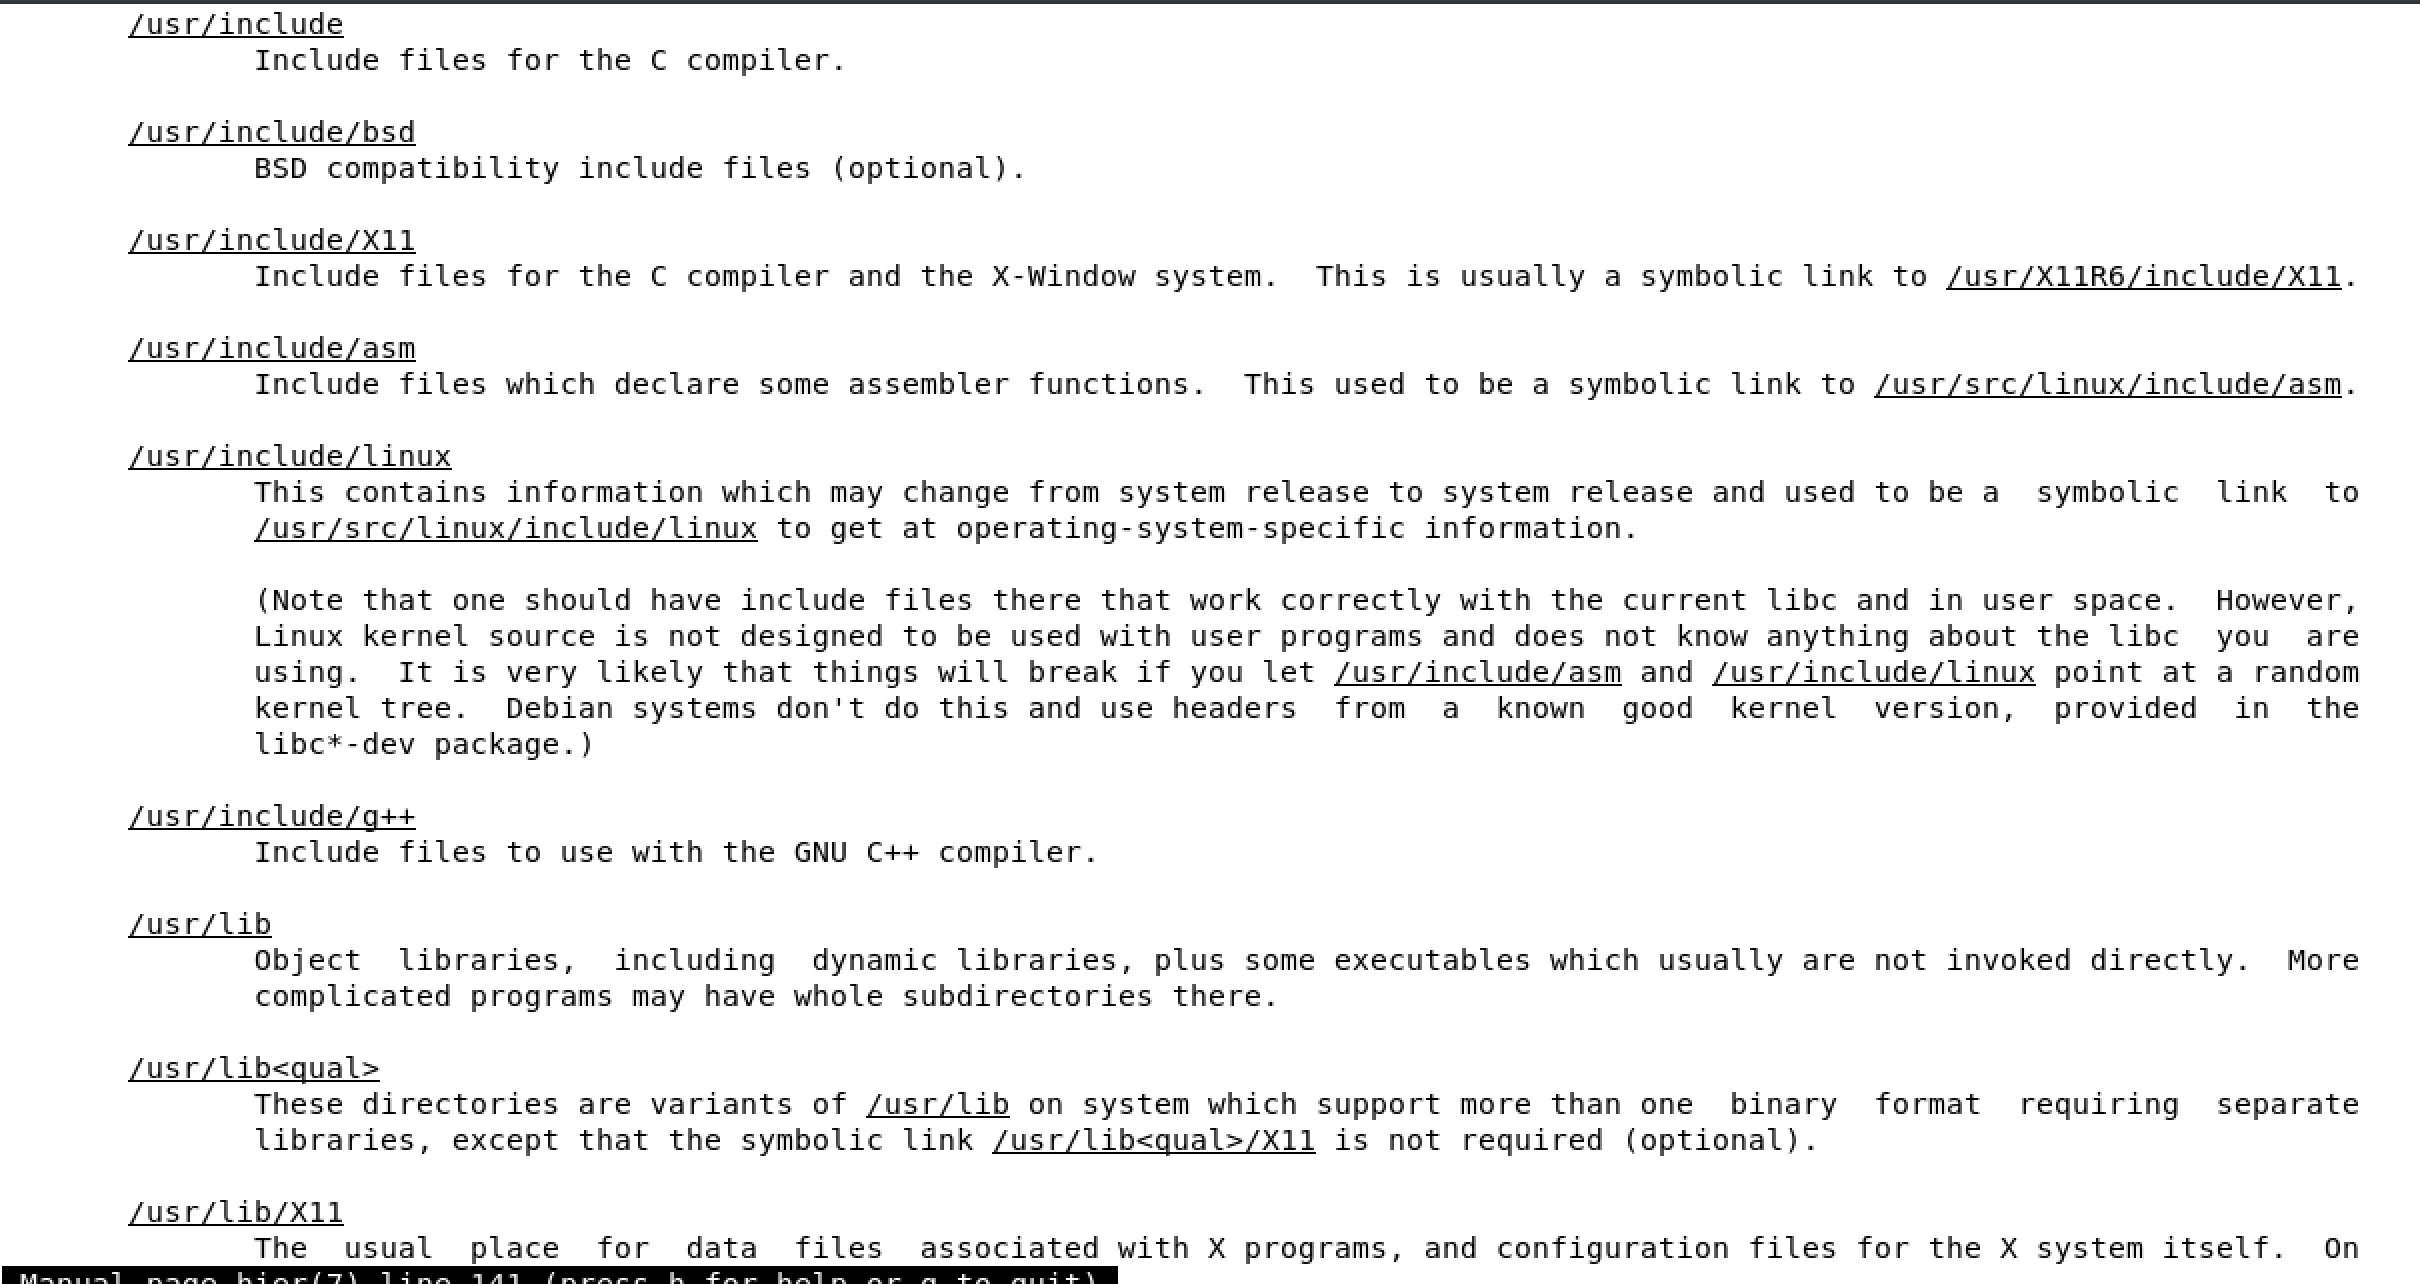
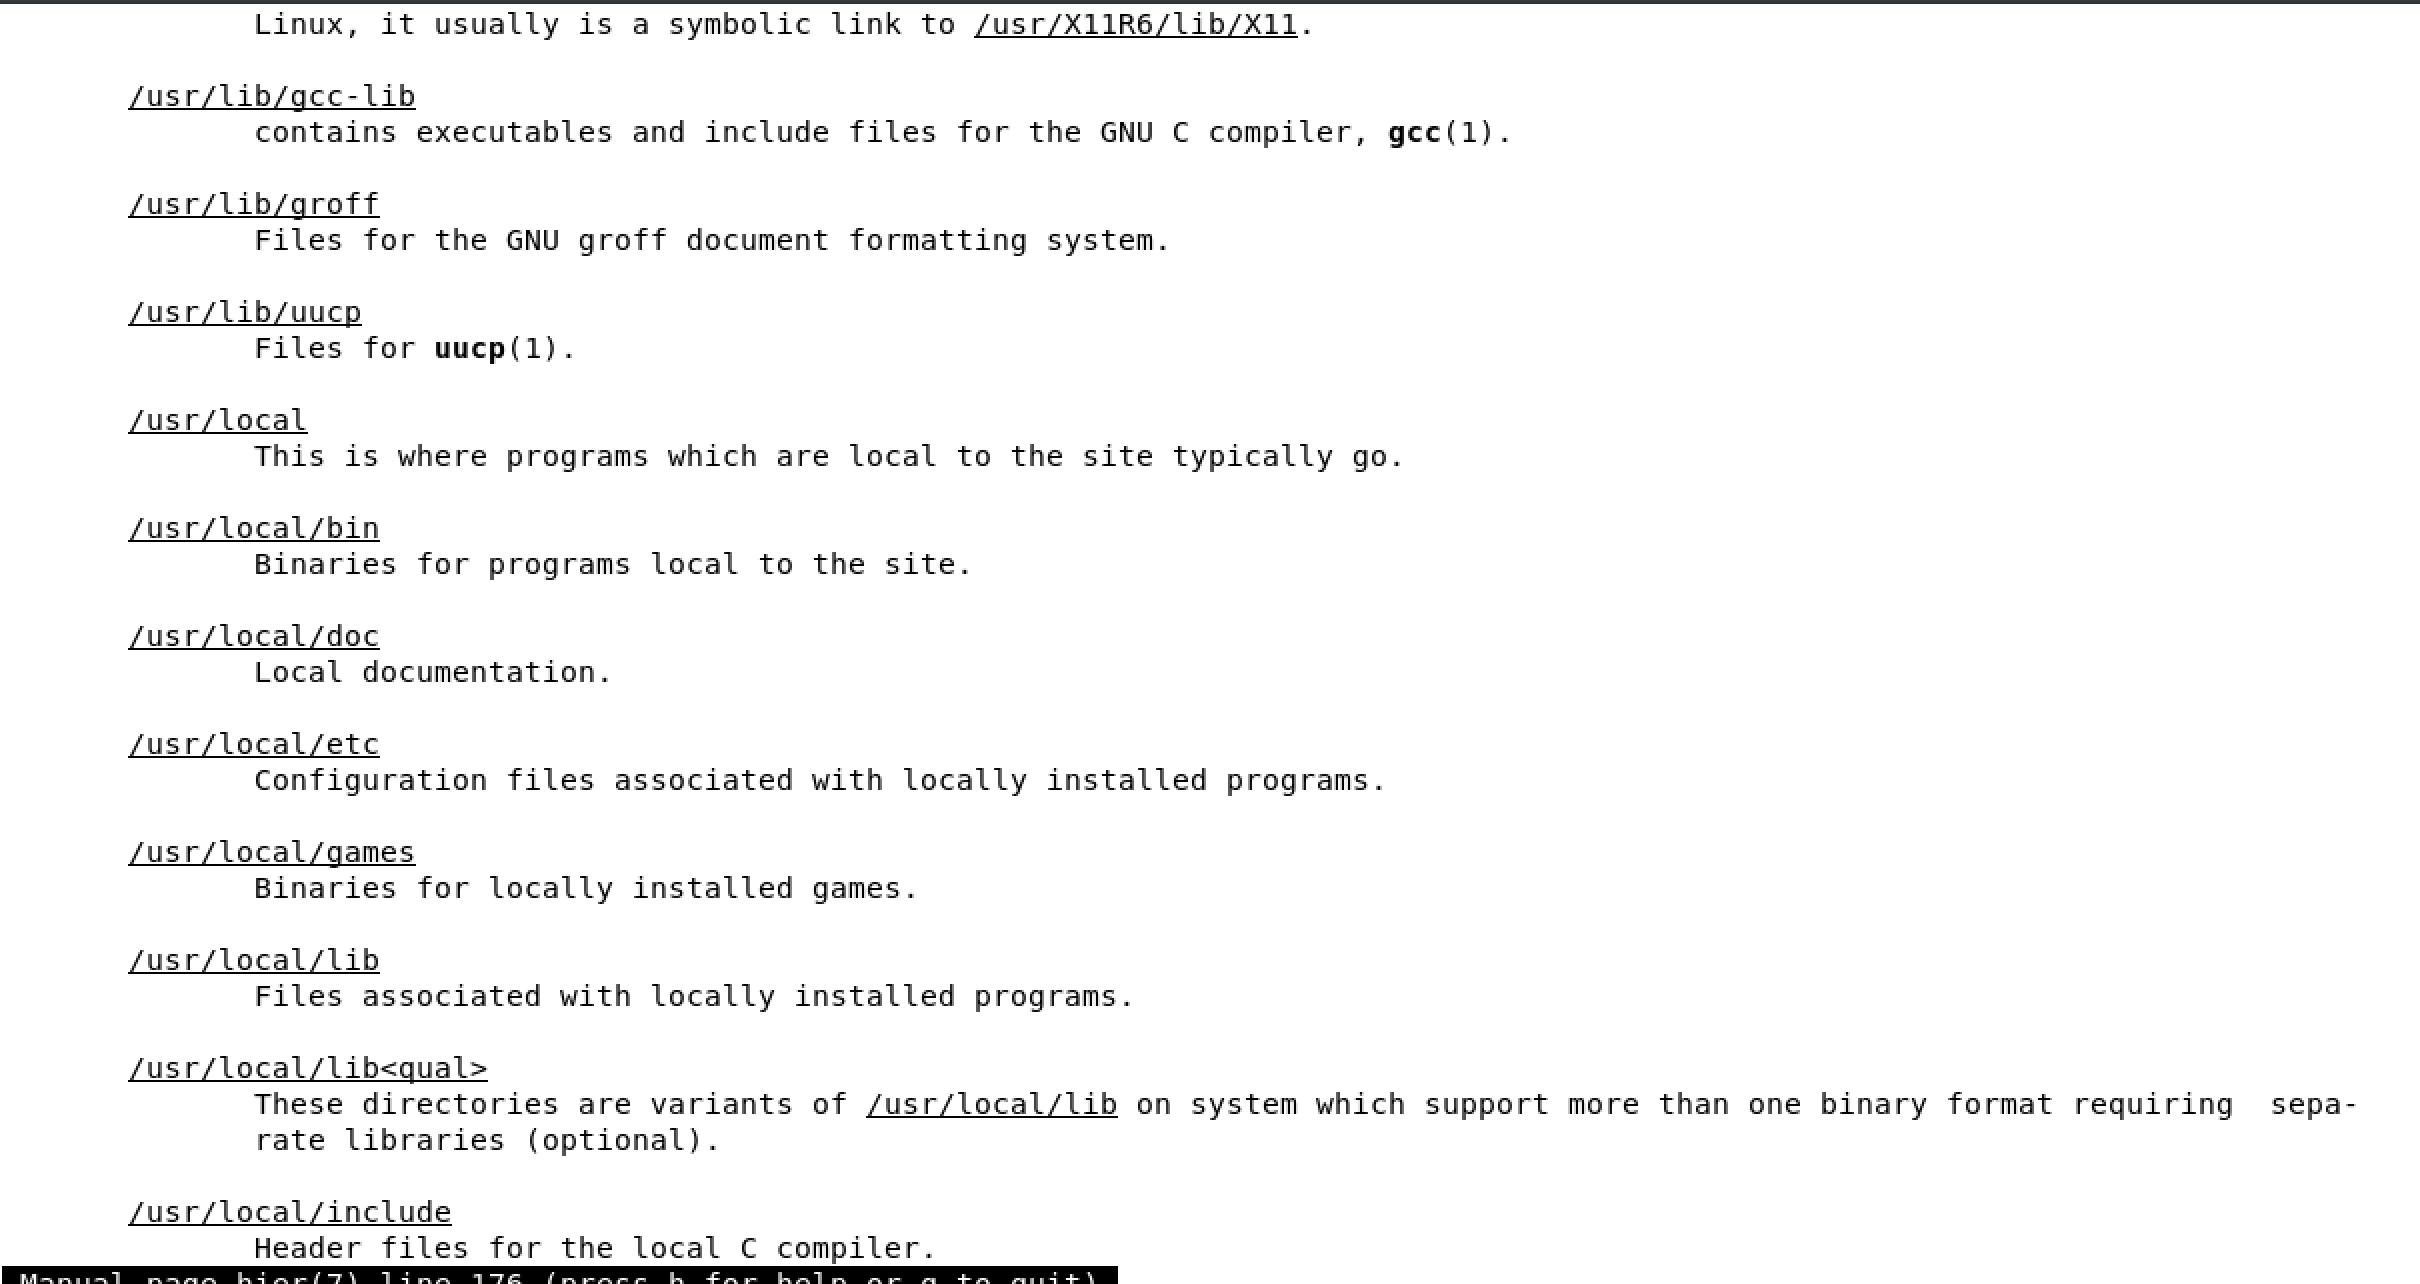
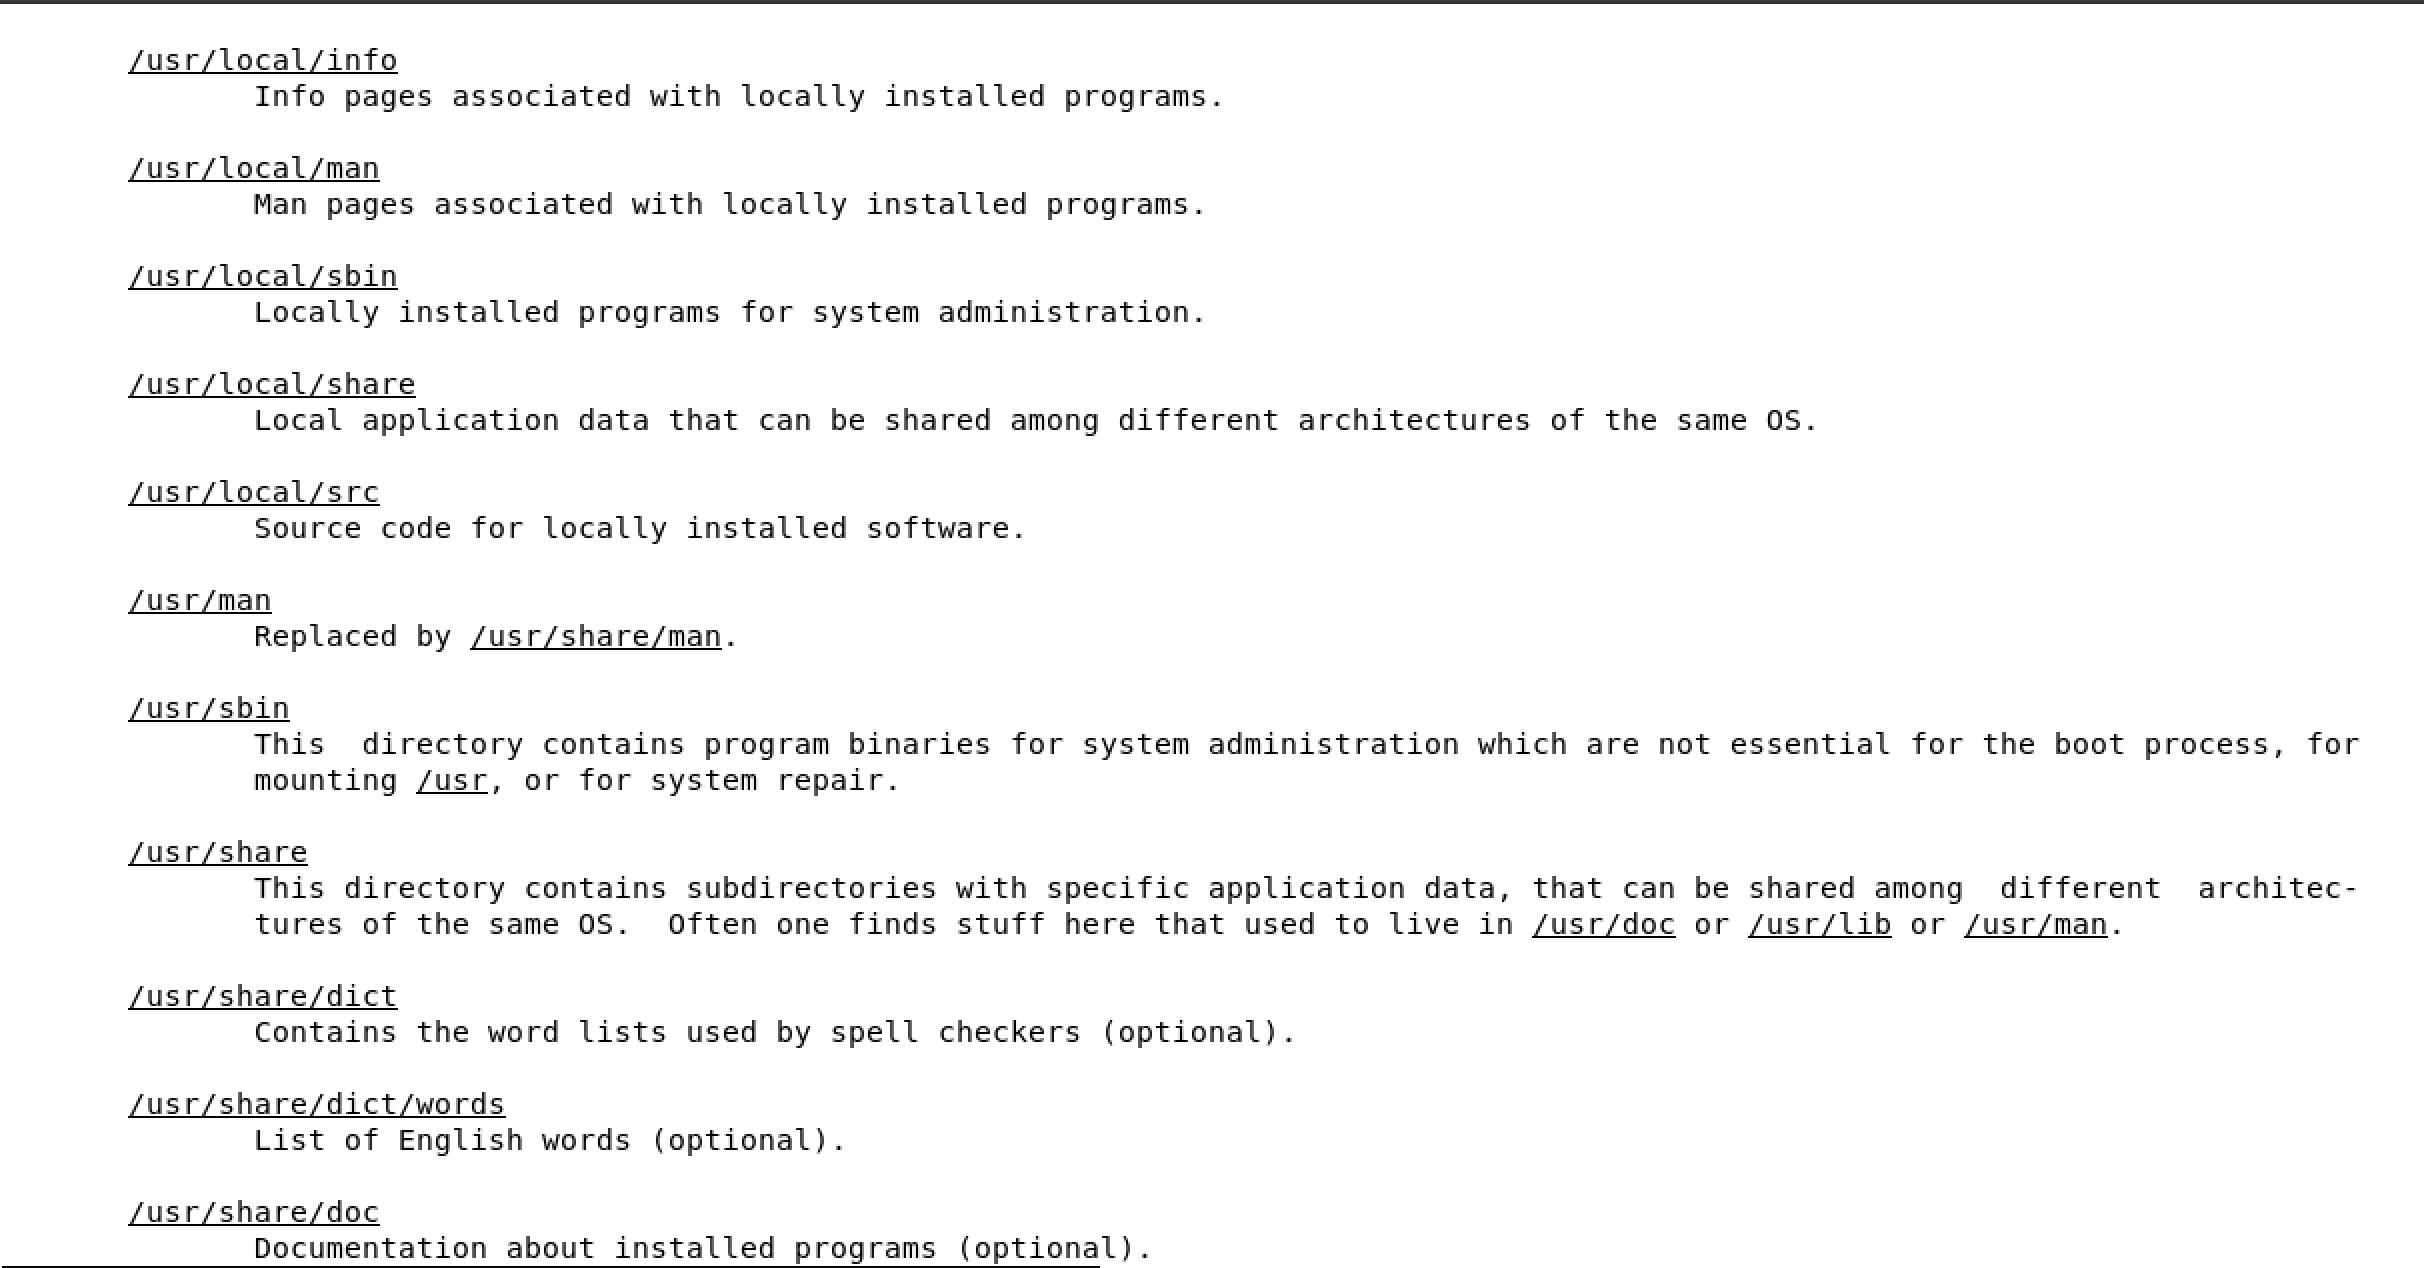
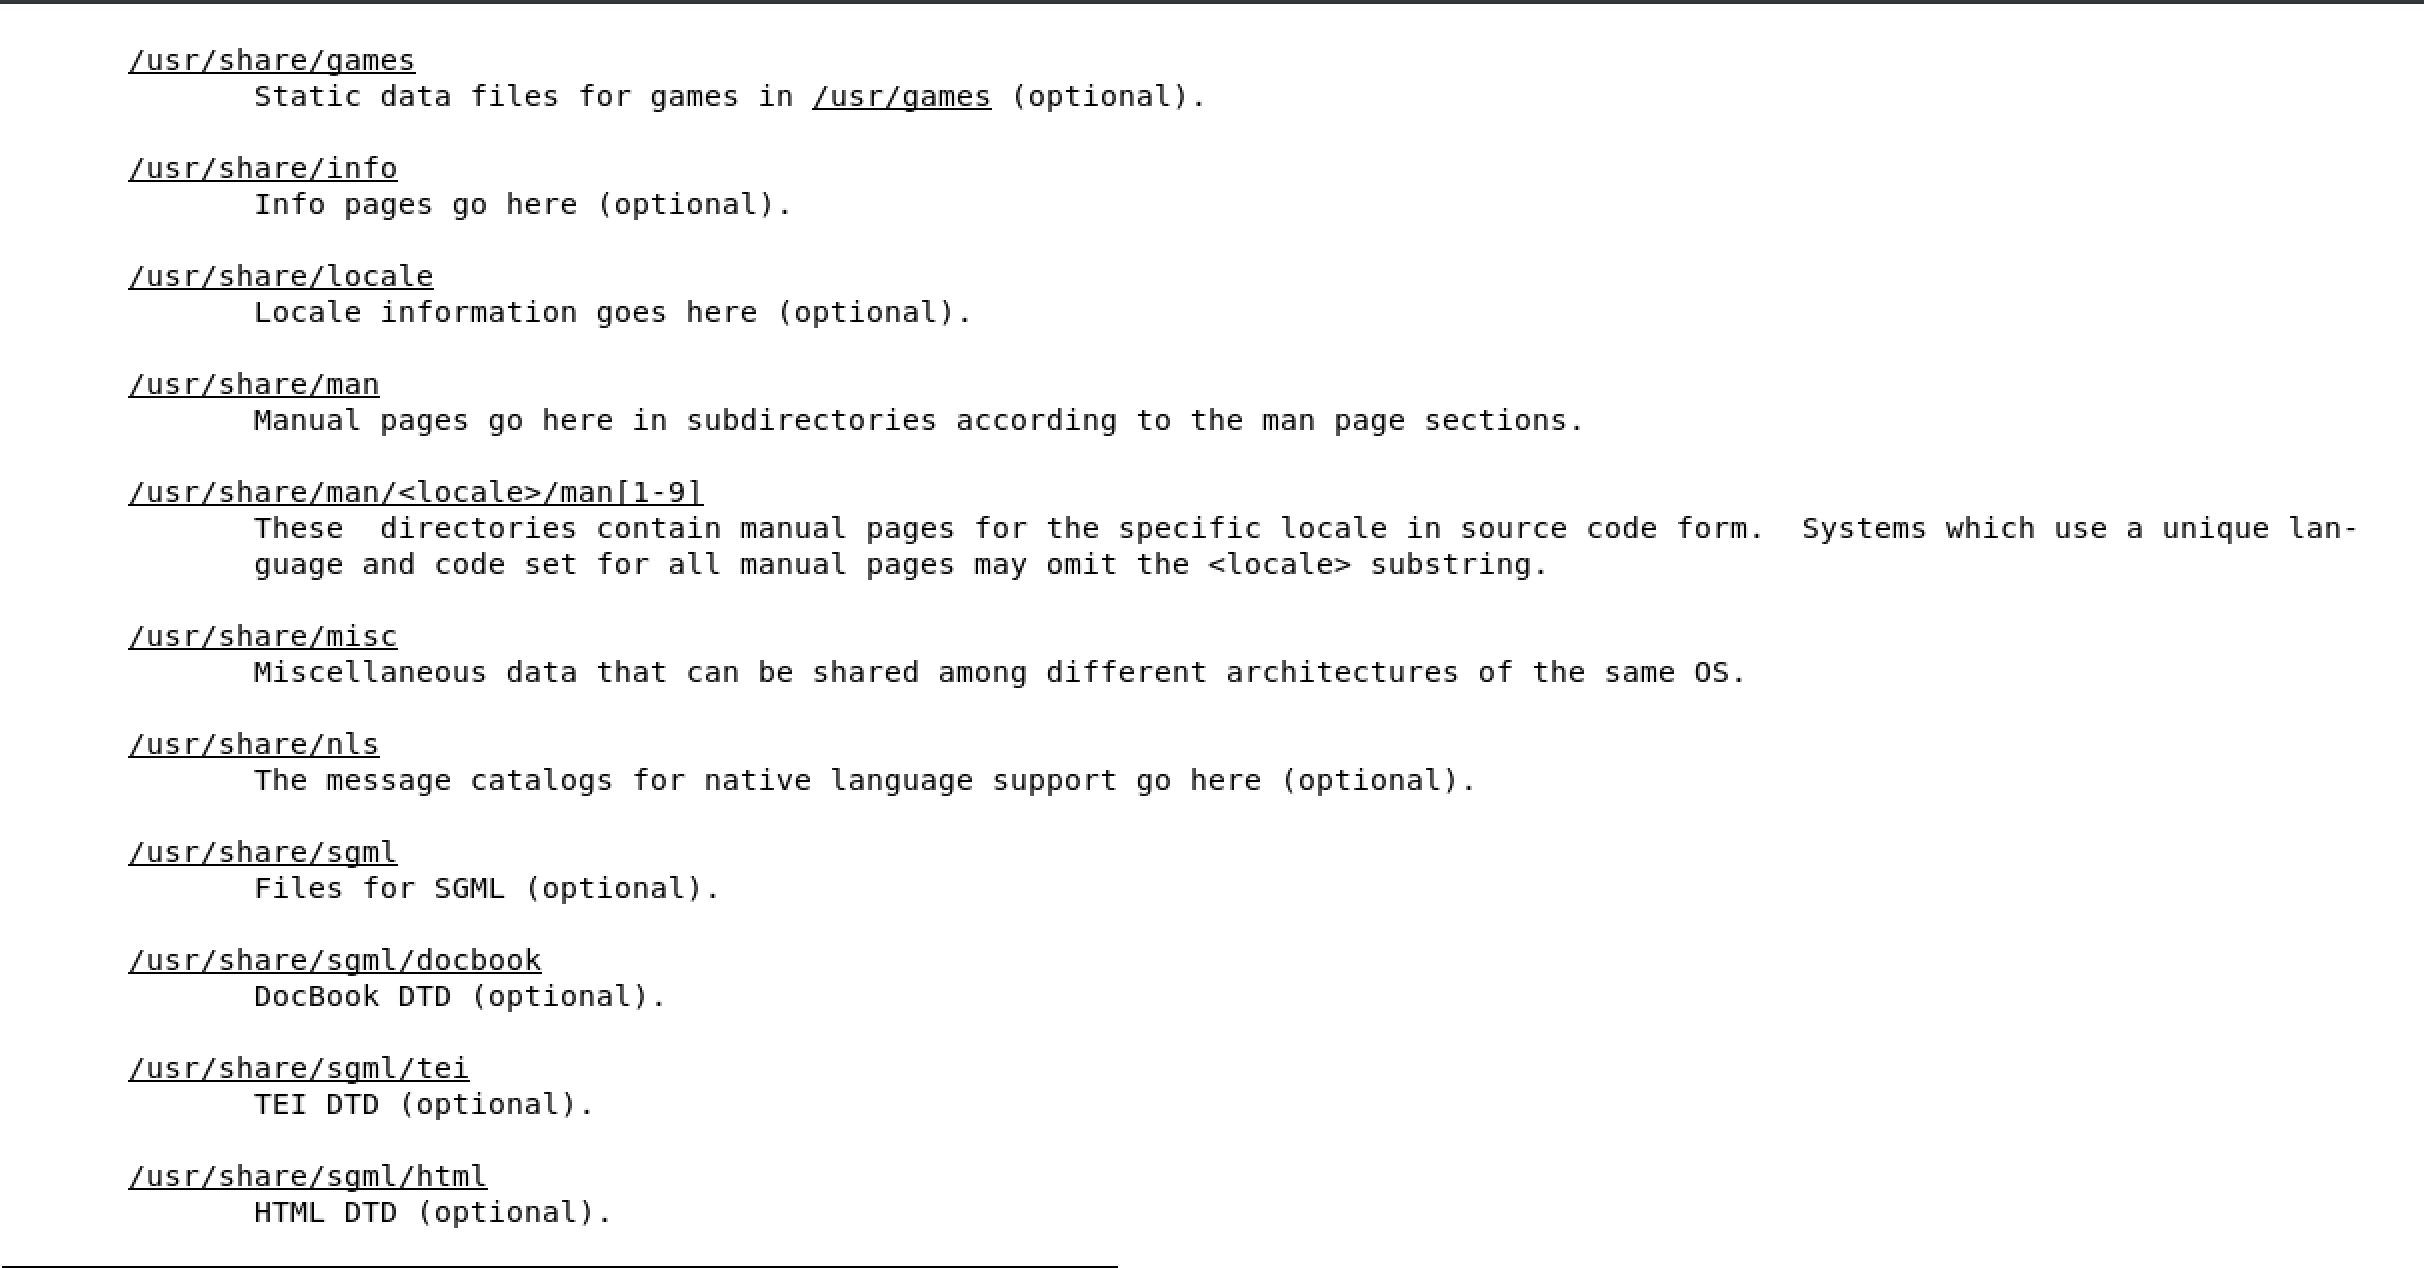
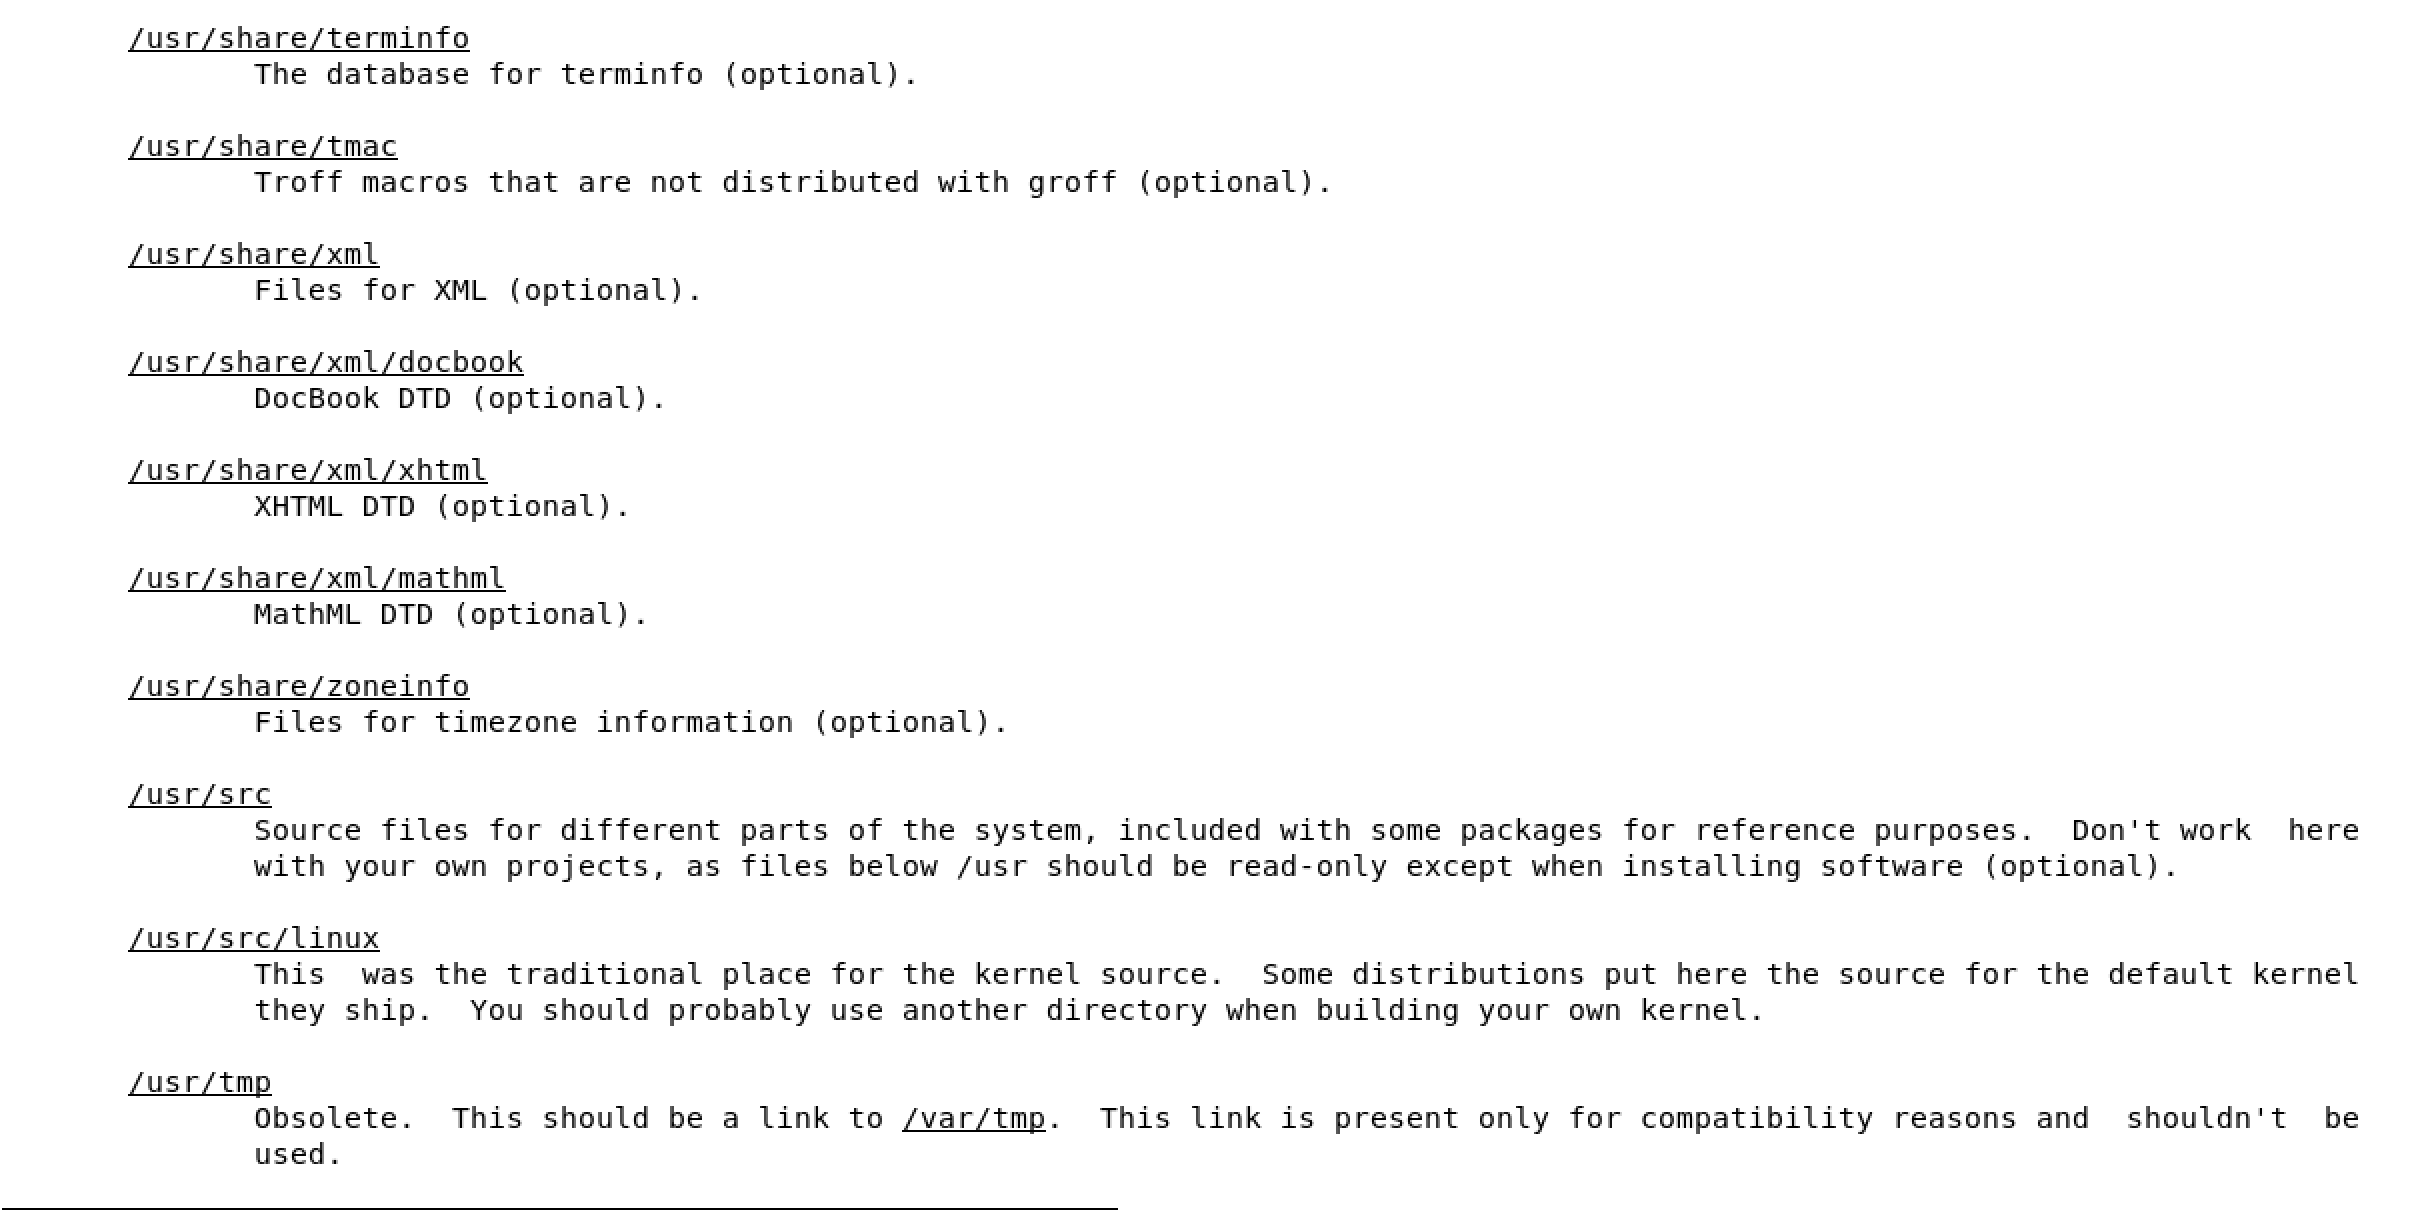
man hier will open the FHS man page of the full Linux FHS - see below
2.6 Using man
man best source to get extensive usage information
Sections define command types
- 1 Executable programs or shell commands
- 2 System calls (functions provided by the kernel)
- 3 Library calls (functions within program libraries)
- 4 Special files (usually found in /dev)
- 5 File formats and conventions eg /etc/passwd
- 6 Games
- 7 Miscellaneous (including macro packages and conventions), e.g. man(7), groff(7)
- 8 System administration commands (usually only for root)
- 9 Kernel routines [Non standard]
shift + G will bring you to the bottom of the page
/ to search for text
Synopsis is the summary of how to use the man page
[OPTION] upper case means it needs to be substituted, brackets [] means it’s optional, ... means it can be repeated ore than once
man 8 ls will take you straight to the system admin commands section of man pages
2.7 Finding the right man page
man pages are indexed in the mandb
use man -k or apropos to search the mandb based on keywords
Built through a cron scheduled task - if nothing shows you need to trigger a manual rebuild
nothing appropriate typically means you need to rebuild mandb
- Must be
root - see
man mandb mandb
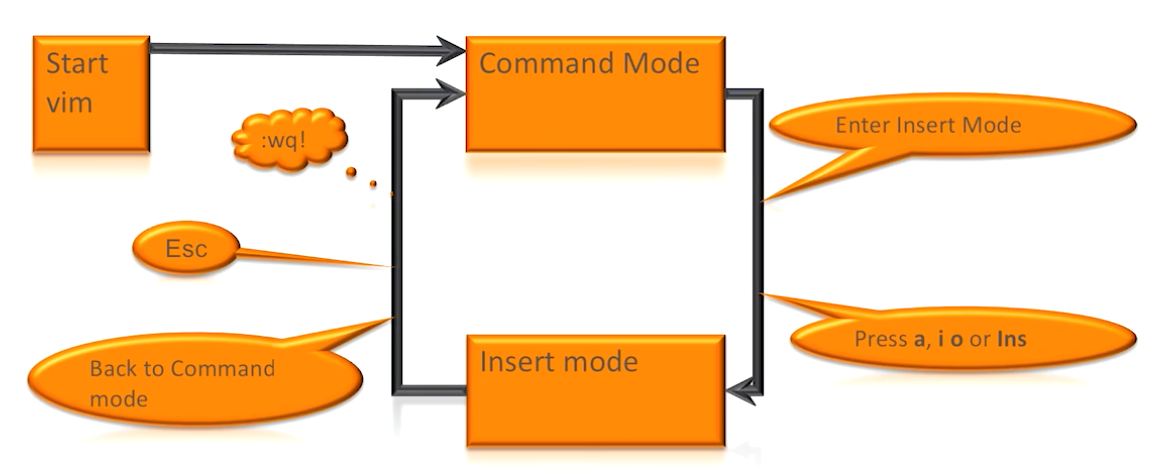
2.8 Understanding vim
vim is the default editor
vim is the enhanced version of vi
2.9 Using vim
esc takes you back to command mode
i insert
a append
o open a new line
:wq! write and quit from command mode
:w! write from command mode and stay in the file
:q! quit from command mode without saving
2 + dd deletes 2 lines
yy copies current line, or 2yy copies current and lower line
p will paste copied lines
d$ will delete until the end of the line
v visual mode, can use gg to highlight from the top of the document
u undo
r redo
G takes you to the end of the document
/text search from current text down
?text search from current text going up
^ bring cursor to the beginning of current line
$ bring cursor to the end of current line
:%s/old/new/g global substitute / old text / new text / global
2.10 Using Globbing and Wildcards
is a shell feature that helps matching filenames
not to be confused with regular expressions
ls host* search for any file that starts with host
ls ?ost searches for any file that matches the patter after the first letter
ls [hm]ost matches either h or m for the leading letter
ls script[0-9[0-9] show all files that match name and any trailing two digit number
touch filename{0..10} will create ten files as filename0, filename1, etc…
2.11 Using Cockpit
yum install -y cockpit cockpit-networkmanager cockpit-dashboard cockpit-storaged cockpit-packagekit
systemctl enable --now cockpit.socket
systemctl start cockpit
systemctl status cockpit
firewall-cmd --permanent --add-service=cockpit
firewall-cmd --reload
go to https://hostname:9090 to access the UI
Lesson3
Essential File Management Tools
Learning objectives
- 3.1 Essential file management tasks
- 3.2 Finding files
- 3.3 Understanding mounts
- 3.4 Understanding links
- 3.5 Working with links
- 3.6 Working with tar
- 3.7 Working with compressed files
3.1 Essential file management tasks
ls list files
mkdir create a directory
-p will create full directory path
cp copy command
-r recursive
mv move command
rmdir remove empty directory
rm can remove all directories
3.2 Finding Files
which looks for binaries in $PATH
locate uses a database, built by updatedb to find file sin a database
find most flexible tool
find / -type -f -size +100M searches for files from root that are 100M or greater
find / -user student find all files owned by student from /
find /etc -exec grep -l student {} \; will execute the grep command on all files in the /etc directory
can also redirect error messages to 2>/dev/null
-exec allows you to run almost any command based on the results of the find command
3.3 Understanding Mounts
to access a devices, it must be connected to a directory
in Linux, there are multiple mounts used
different types of data are on different devices
3.4 Understanding Links
a link is a pointer to a fil ein another location
similar to a shortcut on a Windows machine
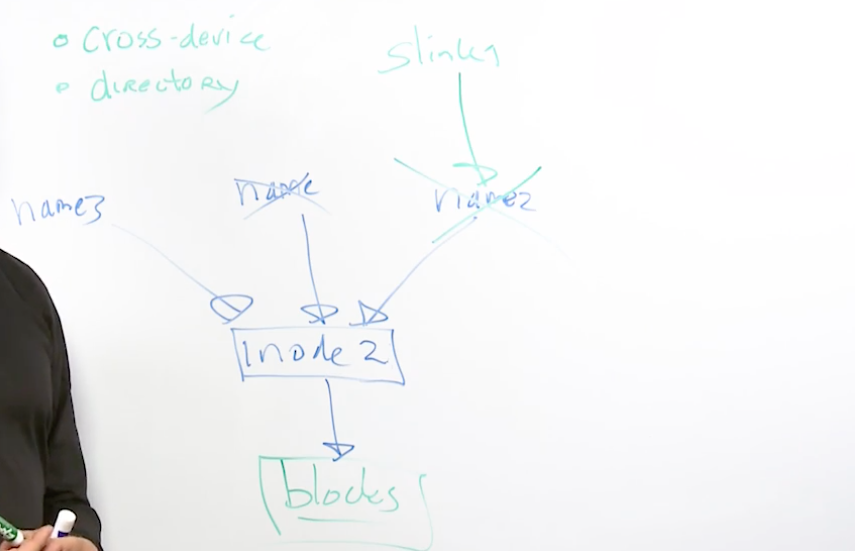
Two types of links, hard ln and symbolic ln -s
every file on linux is it’s own inode
every inode has a number
inode are kept in the inode table and every file system has it’s own table
each inode has a hard link counter
a symbolic link links to a hard link and not the inode
a symbolic link can lunk across devices and directories, hard links cannot
3.5 Working with Links
ls -il lists files with the unique inode number
3.6 Working with tar
tar is a tape archive
by default, it does not compress data
basic use, compress, extract, or list
tar -cvf my_archive.tar /home/etc will create an archive of /home/etc
tar -tvf will show contents of an archive
tar -xvf my_archive extracts to the current directory
-C will redirect output to another directory
to add compression use -z -j -J
file will tell you the kind of file
3.7 Working with Compressed Files
gzip most common used compression
bzip2 is an alternative utility
zip is also available and has Windows-compatible syntax
xz
Lesson4
Working with text files
Learning objectives
- 4.1 Using common text tools
- 4.2 Using grep
- 4.3 Understanding regular expressions
- 4.4 Using awk
- 4.5 Using sed
4.1 Using common text tools
Linux is all about working with text files
more original file pager
less more advanced features
to do more, use less
head to show first 10 lines of a text file
tail to show last 10 lines of a text file
-n nn to specify another number of lines
tail -f refresh, to view changes to a file
cat dumps text file contents on the screen
options
-Ashows all non-printable characters-bnumber of lines-ssuppresses repeated empty lines
tac is doing the same, but is reversed order
cut filter output
sort sort output
tr translates output
options
- tr [:lower:] [:upper:], will change text from lower to all upper case
4.2 Using grep
stands for general regular expression parser
grep is an excellent utility to find text in files or in and output
ps aux | grep ssh will search for and filter for all ssh processes
grep linda * search for files with the name linda in the current directory
grep -i linda * the -i flag will ensure it’s case insensitive
grep -A5 linda /etc/passwd print files after, use -B5 to print before
grep -R root /etc the -R is recursive
4.3 Understanding Regular Expressions
a regular expression is a text pattern that are used by tools like grep and others
Don’t confuse regular expressions with globbing
Globbing only applies to file names whereas regular expressions looks at files and the contents within a file
grep 'a* is a regular expression
good idea to put the regular expression search pattern between single quotes to ensure the shell will not interpret the regular expression
grep a* is globbing and searching for files starting with an ‘a’
regular expressions are not generic and must be used with tools such as grep, vim, awk, and sed
Extended regular expressions enhance basic regex features
Regular expressions are built around atomsl an atom specifies what text is to be matched
- Atoms can be single characters, a range of characters, or a dot
- Atoms can also be a class, such as [[:alpha:]], [[:upper:]], [[:digit:]] or [[:alnum:]]
Second is the repetition operator, specifying how often a character occurs
The third element is indicating where to find the next character
^ beginning of the line
$ end of line
\< beginning of word
\> end of word
* zero or more times
+ one or more times
? zero or one time
{n} exactly n times
4.4 Using awk
awk is a powerful text processing utility that is specialized in data extraction and reporting
It can perform actions based on selectors
awk -F : '/linda/ {print $4}' /etc/passwd
` awk -F : ‘{print $NF}’ /etc/passwd` print number of fields
ls -al /etc | awk '/pass/ { print }'
4.5 Using sed
stream editor
is the old version of vi
sed is a stream editor, used to search and transform text
It can be used to search for text, and perform an operation on matching text
options
-iwill write directly to the file-nnumber-epassing an edit command to set,2d, line two, delete
Lesson5
Connecting to a rhel server
Learning objectives
- 5.1 Understanding the root user
- 5.2 Logging in to the GUI
- 5.3 Logging in to the console
- 5.4 Understanding virtual terminals
- 5.5 Switching between virtual terminals
- 5.6 Using
suto work as another user - 5.7 Using
sudoto perform administrator tasks - 5.8 Using
sshto log in remotely
5.1 Understanding the root user
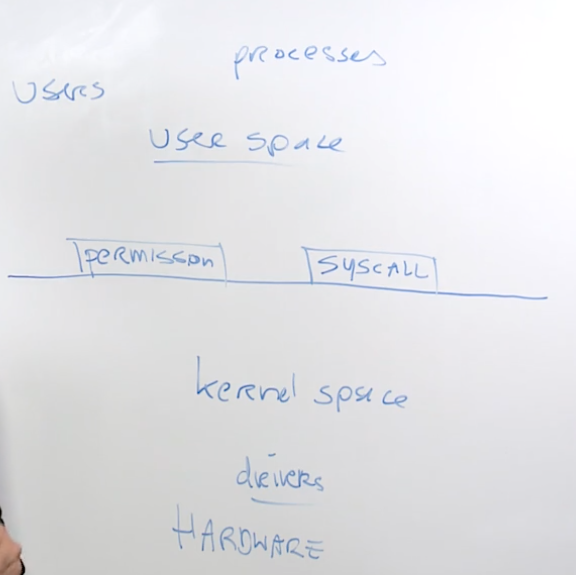
root users have unlimited access to the hardware, it’s an unrestricted account, different than an admin on a windows machine
user space, above the lines, where users run processes and make system calls
root user, or below the line, where only root has unrestricted access to the machine resources
5.2 Logging in to the GUI
no notes
5.3 Logging in to the console
95% of all linux servers do not have a GUI
5.4 Understanding Virtual Terminals
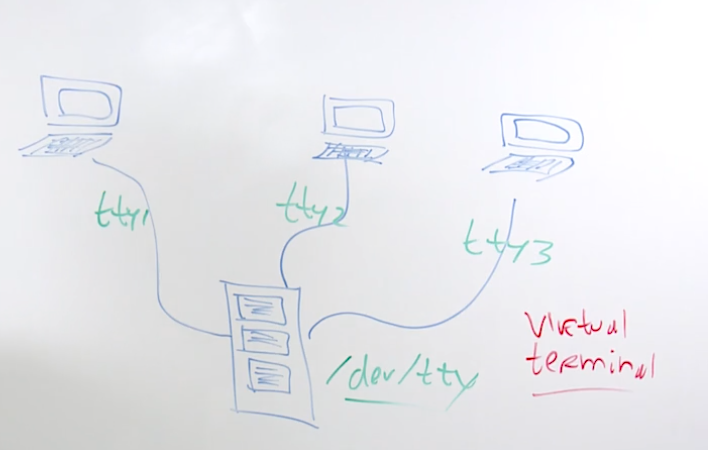
tty another term for a terminal
terminals were connected to /dev/tty*
5.5 Switching Between Virtual Terminals
tty1-tty6 are available for login
If installed and active, the GUI is on tty1
Use chvt to switch between terminals
for example, use chvt 4 to access the tty4 terminal
5.6 Using su to Work as Another User
su switch user
always use su - when switching accounts so you open all the environment variables
5.7 Using sudo to Perform Administrator Tasks
sudo used to run tasks as the root user
prompts for the password of the current user
must be prompted for users password
authorization through /etc/sudoers and /etc/sudoers.d/*
do not edit directly, use visudo to edit the file
you can configure the sudoers file to grant access to run all commands to one to many commands
%wheel ALL=(ALL) ALL anyone in the wheel group can run all commands with a password
%wheel ALL=(ALL) NOPASSWD: ALL anyone in the wheel group can run all commands without being prompted for a password
student ALL=/user/sbin/useradd, ALL=/user/sbin/passwd allows user student to create users and change passwords
id to see a users groups
usermod -aG wheel student to add user to the wheel group
5.8 Using ssh to Log in Remotely
ssh secure shell is used to establish a secured connection
after initial connection, host key is stored in ~/.ssh/known_hosts
ssh -X or ssh -Y to display graphical screen locally
Lesson6
Managing users and groups
Learning objectives
- 6.1 Understanding the need for user accounts
- 6.2 Understanding user properties
- 6.3 Creating and managing users
- 6.4 Managing users default settings
- 6.5 Understanding
/etc/passwdand/etc/shadow - 6.6 Understanding group membership
- 6.7 Creating and managing groups
- 6.8 Managing password properties
6.1 Understanding the need for user accounts
A user is a security principle, user accounts are used to provide people or processes access to system resources
processes are using system accounts, typically have a low user id
people are using regular accounts, usually a high user id
6.2 Understanding User Properties
looking at /etc/passwd
student:x:1000:1000:student:/home/student:/bin/bash
student is the user account name
x is the password as a placeholder
1000 uid, unique identifier for users
1000 gid, primary group identifier for groups (all users must be in at least one group)
student gecos, additional non-mandatory information about the user
/home/student home directory
/bin/bash default shell
6.3 Creating and Managing Users
useradd allows you to create user accounts
options
-mcreate home directory
usermod used to modify user account
options
-aGappend group to a user
userdel used to delete user accounts
options
-fwill force the removal of the user-rremove home directory
passwd used to set usr passwords
options
-llocks a users account-uto unlock
6.4 Managing User Default Settings
useradd -D to specify default settings
files in /etc/default/useradd apply to useradd only
write default settings to /etc/login.defs
this is an important configuration file for the exam
/etc/skel copies files to the users home directory upon creation
.bashrc configuration file that creates the users shell session
.bash_history logs history of shell commands the user ran
.bash_profile configuration file that is processes when the user logs in
6.5 Understanding /etc/passwd and /etc/shadow
/etc/passwd used to store main user properties
linux does not care about user ids, it’s based on UIDs
user accounts
roothas user id 0binis a system accountsyncsystem account that can run one account onlynobodyuser with no permissions
/etc/shadow stored the password properties
stores the hash of the encrypted password
student user account
long string is the hash of the user password
17912 is the number of days since Jan 1, 1970 - this day represents the begining of Linux and all time is calculated since that date
0 min amount of days the password must be used
999999 max number of days the password must be used
7 is the number of days the user will get a warning until their password expires
!! in the password field means the password is disabled
! in the beginning of the password field means the user account is locked
/etc/group used ofr group policies
root:x:0:student
root group
x group password placeholder
0 group id
student name of user account who are secondary members of the group
6.6 Understanding group membership
every user must be a member of at least one group
Primary group membership is managed through /etc/passwd
The user primary group becomes group-owner if a user creates a file
Additional secondary groups can be defined as well
Additional secondary group membership is managed through /etc/groups
id will show what groups a user if a member of
6.7 Creating and Managing Groups
groupadd used to add groups
groupdel delete a group
groupmod modify a group
lid kist all users tha are member of a group
lig -g wheel show all who are a member fo group wheel
6.8 Managing Password Properties
/etc/logins.defs hold basic password requirements
pam pluggable authentication modules, for advanced password properties
look for the pam_tally2 module
chage manage password aging
passwd for managing password properties
chage writes to the /etc/shadows file
Lesson7
Managing permissions
Learning objectives
- 7.1 Understanding ownership
- 7.2 Changing file ownership
- 7.3 Understanding basic permissions
- 7.4 Managing basic permissions
- 7.5 Understanding
umask - 7.6 Understanding special permissions
- 7.7 Managing special permissions
- 7.8 Understanding acls
- 7.9 Troubleshooting permissions
7.1 Understanding ownership
To determine which permissions a user has, linux uses ownership
Every file has a user-owner, a group-owner, and the others entity that is also granted permissions (ugo) user, group, other – also know as global permissions
Linux permissions are not additive, if you’re the owner, permissions are applied and that’s all
Linux first checks user permissions, then group permissions, then defaults to ugo if not in the first two
ls -al to see file and directory ownership settings
7.2 Changing file ownership
chown user:group to change ownership
chgrp group file to update group permission setting
7.3 Understanding basic permissions
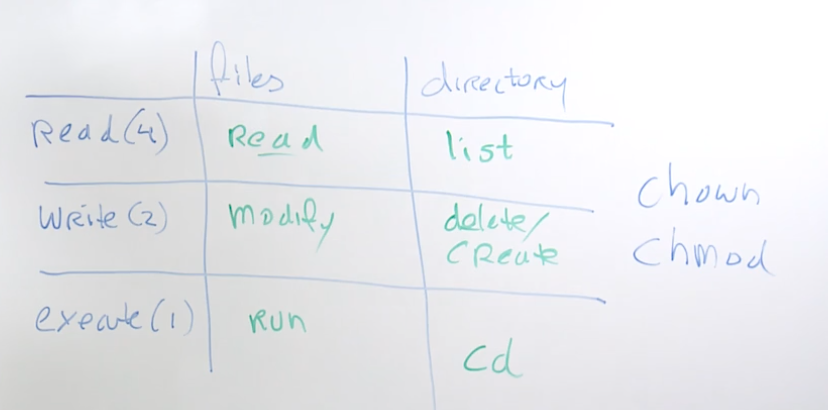
7.4 Managing Basic Permissions
chmod change mode is used to manage permissions
It can be used in absolute or relative mode
chmod 750 file to apply rwxr-x–x
chmod +x file to add execute
7.5 Understanding umask
umank is a shell setting that subtracts the umask from the default permissions
Default file permissions are 666
Default directory permissions are 777
umask 027 will result in a default permission setting on 640 for files and 750 for directories
/etc/profiles is where umask is set
can also directly edit ~/.bash_profile
7.6 Understanding Special Permissions
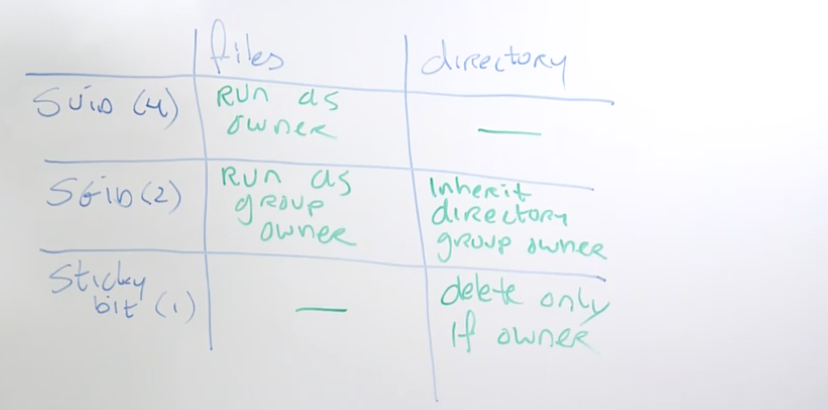
7.7 Managing special permissions
SUID - allows you to run files as the file owner rwsrwx—
chmod 4770 file
chmod u+s file
SGUI - allows anyone in the same group to manage and updates all files within a directory rwxrws—
chmod 2770 dir
chmod g+s dir
lid displays user’s group
Sticky bit - prevents a user with rwx from deleting a file rwxrwx—T
chmod 1770 dir
chmod +t dir
7.8 Understanding ACLs
ACLs are used to grant permissions to additional users and groups
Normal ACLs apply to existing files only
Us e default ACL on a directory if you want to apply to a new file
getfacl gets settings
setfacl -R -m g:somegroup:rx /data/groups
setfacl -m d:g:somegroup:rx /data/groups
7.9 Managing ACLs
7.10 Troubleshooting Permissions
write permission at the directory level will allow you to delete files within the directory, even if you are not the file owner or group owner
vim will delete and create a new file when you open a file that you are not the owner or in the group but have directory permissions
Lesson8
Configuring networks
Learning objectives
- 8.1 Understanding piv4 networking
- 8.2 Understanding NIC naming
- 8.3 Managing runtime configuration with
ip - 8.4 Understanding rhel 8 networking
- 8.5 Managing persistent networking with
nmcli - 8.6 Managing persistent networking with
nmtui - 8.7 Verifying network configuration files
- 8.8 Testing network connections
8.1 Understanding ipv4 networking
In ipv4, each node needs its own ip address, written in dotted decimal notation (192.168.4.200/24)
Each ip address must be indicated with the subnet mask behind it
The default router or gateway specifies which server to forward packers that have an external destination
The DNS nameserver is the ip address of a server that helps resolving to ip addresses and the other way around
ipv4 is still the most common ip version, but ipv6 addresses can be used as well
ipv6 addresses are written in hexadecimal notation (fd01::8eba:210)
ipv4 and ipv6 can co-exist on the same network interface
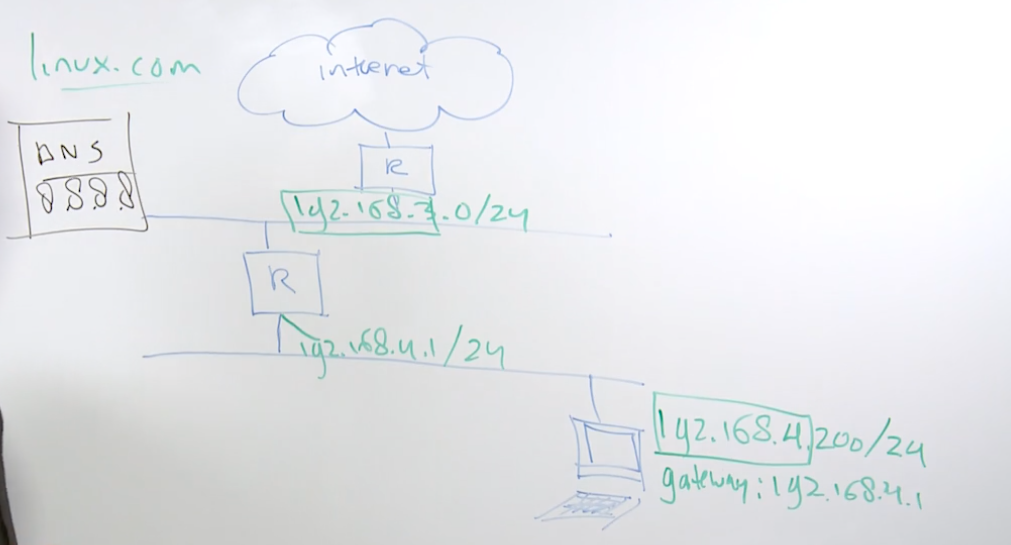
192.168.2.200/24 the network is expresses as 192.168.4 and the node as .200/24
8.2 Understanding NIC naming
ip address configuration needs to be connected to a specific network device
use ip link show to see current devices, and ip addr show to check their configuration
every system has an lo (loopback) device, which is for internal networking
apart from that, you’ll see the name of the real network device in the BIOS name
classical naming is using device names like eth0, eth1, etc…
these device names don’t reveal any information about the physical device location
BIOS naming is based on hardware properties to give more specific information in the device name
em[1-N]for embedded NICseno[nn]for embedded NICsp<slot>p<port>for NICs on the PCI bus
if the driver doesn’t reveal network device properties, classical naming is used
8.3 Managing Runtime Configuration with ip
runtime configurations are not persisted across reboots
the ip tool can be used to manage all aspects on ip networking
the only thing it can do is persist across reboots
it replaces the legacy ifconfig tool, no NOT use ifconfig anymore
use ip addr to manage address properties
use ip link to show link properties
useip route to manage rout properties
rx stands for received packets
tx stands for transmitted packets
ipv6 inet6 addresses that start with fe80 means it’s a private ipv6 and you cannot get out to the internet
scope global means the ip address is linked to the internet
scope link means the ip is local only, you cannot go out to the internet
dynamic means the ip was assigned via a dhcp server
valid_lft valid lifetime is the valid length of time the dhcp server will assign the ip
ip addr add dev ens33 10.0.0.10/24 to add an ip address
adding a secondary ip is helpful for container environments, or cloud hosts
ifconfig cannot show secondary ip addresses
ip route show will show the current route table
ip route del default via 192.168.4.2 will delete the specified route
ip add default via 192.168.4.2 will reset default route
dns configuration is set in /etc/resolve.conf
options
-sto show statistics, e.g.,ip -s link show
8.4 Understanding RHEL 8 Networking
rhel stores the nic configurations in /etc/sysconfig/networkscripts/ifcfg-ens33
nmcli (network comandline utility) and nmtui (network manager text user interface) to interact with the rhel network manager
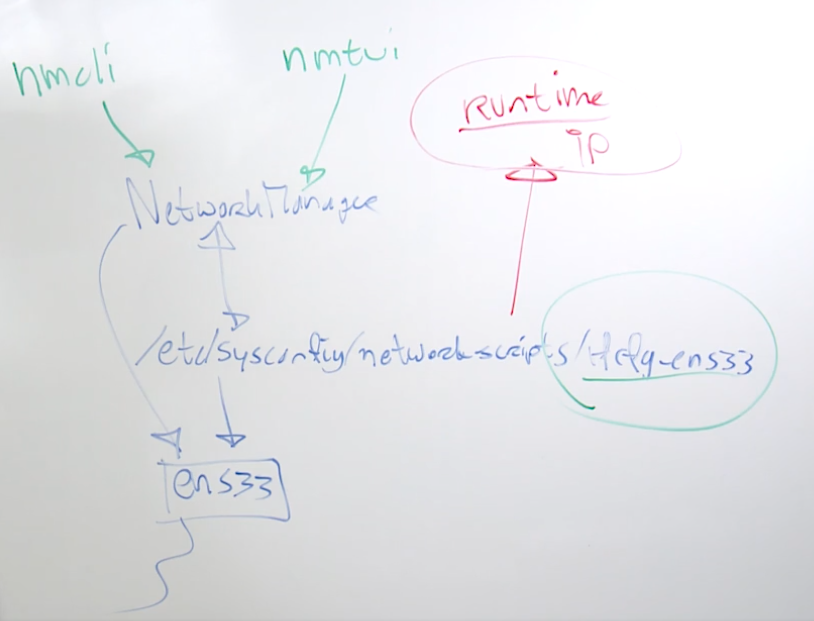
8.5 Managing Persistent Networking with nmcli
an nmcli connection is a configuration that is added to a network device
conections are stored in confoguration files
the network manager service must be running to manage these files
ensure the bash-completion RPM package is installed when working with nmcli
man nmcli-examples to see example configurations
nmcli con add con-name my-con-em1- iframe em1 type ethernet \
ip4 192,168.100.100/24 gw4 192.168.100.1 ip4 1.2.3.4 ip6 abbe::cafe
con connection
add add a connection
con-name connection name
a connection is just a configuraton file
ifname is the name of the nic you want to configure
type ethernet is the type of nic
gw4 gateway
ip4 1.2.3.4 secondary ip address
ip6 abbe::cafe apply a ipv6 address as well
8.6 Managing Persistent Networking with nmtui
DOS lik einterface, good for use on servers without a GUI
able to set hostname
8.7 Verifying Network Configuration Files
/etc/sysconfig/network-scripts is where the network configuration files are stored
network config files will follow the following naming convention ifcfg-device. for example, ifcfg-ens33, ifcfg-ethernet-ens33
Important parameters
BOOTPROTOboot protocol, scan set it to dhcpIDADDRGATEWAYDNS1|2ONBOOT
you will need to reload the configuration if any chages are made, run nmcli connection up ens33 will bring connectivity up on device ens33
8.8 Testing Network Connections
ping used to test network connectivity
ctl+c to stop
options
-c 1to send one ping-fflood
ip addr show
ip route show
dig can test DNS nameserver working
NXDOMAIN the service does not exist
troubleshooting
ping google.com
if you get a Name or service not known error, this is a DNS error
then see if you can ping the DNS server
ping 8.8.8.8
if you get Network unreachable, then there is a connectivity problem
look at your ip address and the routing
if the server was previously had conenctivity, look in the network config file
/etc/sysconfig/network-scripts/ifcfg-ens33
check the GATEWAY
Module2
Lesson9
Managing Processes
Learning objectives
- 9.1 Understanding jobs and processes
- 9.2 Managing shell jobs
- 9.3 Getting process information with
ps - 9.4 Understanding memory usage
- 9.5 Understanding cpu load
- 9.6 Monitoring system activity with
top - 9.7 Sending signals to processes
- 9.8 Managing priorities and niceness
- 9.9 Using tuned profiles
9.1 Understanding jobs and processes
all tasks are started as processes
processes have a PID
common process management tasks include scheduling priority and sending signals
some processes are starting multi threads, individual threads cannot be managed
tasks can be started in the foreground and background
9.2 Managing Shell Jobs
use command & to start a job in the background
you can move a job to the background
- first stop the job using
ctrl+z - Then type
bgto move it to the background
jobs to view all running jobs
fg [n] to move the last job back to the foreground
ctrl+c will stop a job in the foreground
dd if=/dev/zero of=/dev/null & infinite loop
while true; do true; done infinite loop
9.3 Getting Process Information with ps
ps process
ps command has two different dialects, BSD and SystemV
therefore ps -L and ps -L are different commands
ps shows an overview of current processes
ps aux for an overview of all processes
ps -fax shows hierarchical relations between processes
ps -fU student shows all processes owned by student
ps -f --forest -C sshd shows a process tree for a specific process
ps L shows format specifiers
ps -eo pid,ppid,user,cmd uses some of these specifiers to show a list of processes
pid 1 should always belong to systemd
pids between [] are kernel processes
ps aux will list processes in order, so the latest processes will be at the end of the document
9.4 Understanding Memory Usage
linux places as many files as possible in cache to guarantee fast access to the files
for that reason, linux memory often shows as saturated
swap is used as an overflow buffer of emulated RAM on disk
the inux kernel moves inactive memory to swap first
free -m to get details about current memory
9.5 Understanding CPU Load
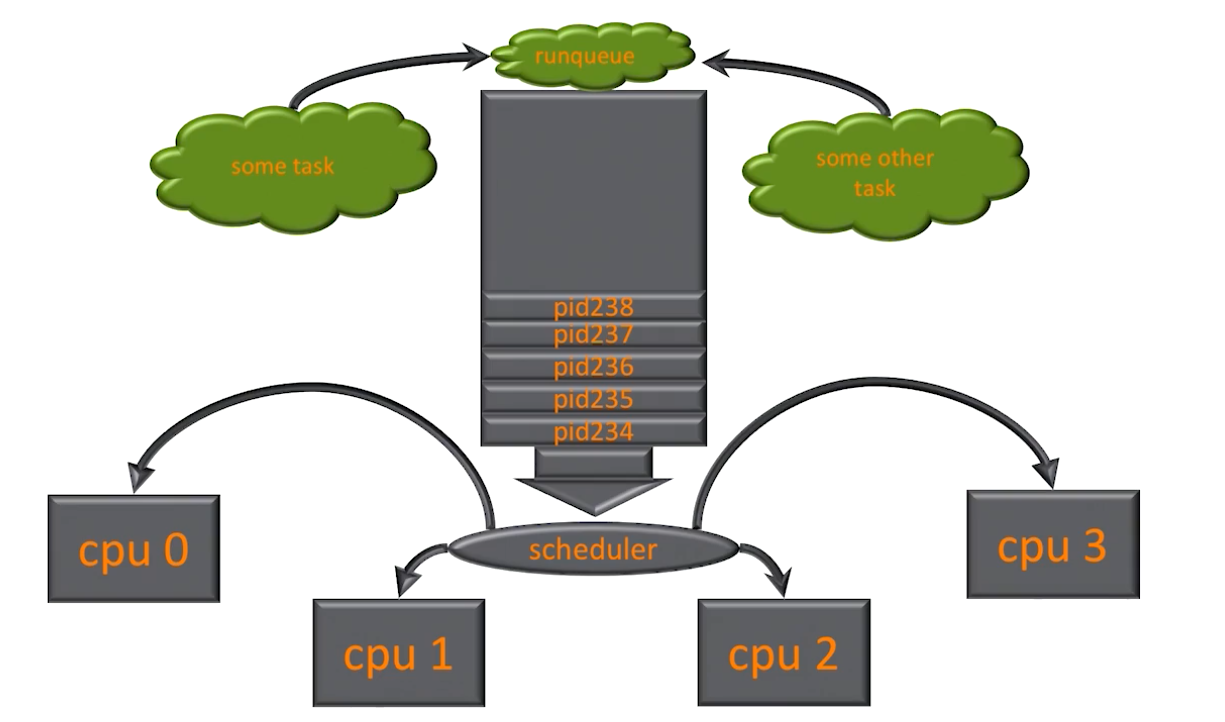
uptime how long system is up and the load average
load average is by last [1 minute], [5 minutes], [15 minutes]
load average is the average amount of runnable processes, which are processes waiting in the runqueue or processes currently running
use watch to monitor command over time, it refreshes every two seconds
lscpu to check cpu specs to help determine load averages
9.6 Monitoring System Activity with top
top is a dashboard that allows you to monitor current system activity
line 1: uptime command shows how long the system has been up and the load averages
line 2: Tasks how many tasks running on system, running how many tasks actively running, sleeping how many tasks are sleeping and was not processes by the cpu on the prior cycle, stopped tasks that were stopped by ctrl+z, zombie tasks that can no longer communicate with the parent process
line 3: CPUs shows what all the system cpus are doing, us load for processes running in the user space, sy load for processes running in system space, kernel processes, ni processes that have been changes by the nice command, id percentage of time the cpu is doing nothing, wa waiting for IO, hi hardware interrupt, amount of time the system is waiting for a hardware device, si software interrupt, st stolen time
line 4: displays free -m results
you can display and manage your system using top
option keys
fto show and select from available display fieldsMto filter on memoryWto save new display settings1to see cpu load for each cpukto send signal to a processrrenice a process
9.7 Sending Signals to Processes
a signal allows the operating system to interupt a process from software and ask it to do something
interputs are comparable to signals but are generated from hardware
a limited amount of signals can be used and is documented in man 7 signals
not all signals work in all cases
the kill command is used to send signals to the PIDs
you can alo use k in top
different kill-like commands exits, like pkill and killall
man 7 signal will give you an overview of signals
kill -15 pid will appropriately shutdown process
kill -9 pid will force kill the process
signal 9 will just stop everything, avoid using it
pkill you can use patterns
killall can kill processes based on a name
9.8 Managing Priorities and Niceness
by default, all processes are started with the same priority
in kernel-land, real-time processes can be started, which will always be handeled with highest priority
to change priorities of non-realtime processes, the nice and renice commands can be used
nice values range from -20 to 19
the higher the number the nicer the process with exist with other processes, meaning it will use less cpu time
negative numbers will use more cpu time
uers can set their processes to a lower priority level, meaning set their nice level to a higher number. users cannot lower their priority without root access
nice --help | less to see help information
renice --help to see help information
9.9 Using tuned profiles
tuned is a service that allows for performance optimization in an easy way
different profiles are provided to match specific server workloads
to use them, ensure the tuned service is enabled and started
tuned-adm list will show a list of profiles
tuned-adm profile [name] will set a profile
tuned-adm active will show the current profile
Lesson10
Managing Software
Learning objectives
- 10.1 Understanding RPM packages
- 10.2 Setting up repository access
- 10.3 Understanding modules and application streams
- 10.4 Managing packages with
yum - 10.5 Managing modules and application streams
- 10.6 Using
yumgroups - 10.7 Managing
yum updatesandyum history - 10.8 Using RPM
- 10.9 Using red had subscription manager
10.1 Understanding RPM packages
RPM red hat package manager, is a package format to install software, as well as a database of installed packages on the system
the package contains an archive of files that is compressed with cpio, as well ad metadata and a list of package dependencies
RPM packages may contain scripts as well
to install, repositories are used
individual packages may be installed, but this should be avoided
10.2 Setting up Repository Access
create a local repository so that we can install packages from the rhel 8 installation disk
create an iso image: dd if=/dev/sr0 of=/rhel8.iso bs=1M
create directory /repo
exit the /etc/fsab
add /rhel8.iso /repo iso9660 defaults 0 0
run systemctl daemon-reload
then mount -a
create the file /etc/yum.repos.d/appstream.repo with the following content
[appsream]
name=appstream
baseurl=file:///repo/AppStream
gpgcheck=0
you also need to create a baseos repo
[BaseOS]
name=BaseOS
baseurl=file:///repo/BaseOS
gpgcheck=0
10.3 Understanding Modules and Application Streams
rhel 8 introduces application streams and modules
application streams are used to separate user space packages from core kernel operations
using application streams allows for working with different versions of packages
base packages are provided through the baseOS repository
AppSteam is provided as a separate repository
application streams are delivered in two formats, 1) traditional rpms and 2) new modules
modules can contain streams to make multiple versions application available
enabling a module stream gives access to rpm packages in that stream
modules can also have profiles, a profile is a list of packages that belong to a specific use-case
the package list of a module can contain packages outside the module stream
use the yum module commands to manage modules
10.4 Managing Packages with yum
yum wa created to be intuitive
yum search
yum install
yum remove
yum update
yum provides goes beyond what yum search can provide
yum info
yum list
10.5 Managing Modules and Application Streams
yum module list to view all available modules
yum module provides httpd searches the module that provides a specific package
yum module info php
yum module info --profile php shows profiles
yum module list php shows which streams are available
yum module install php:7.1 or yum install @php:7.1 will install and enable a specififc module stream
yum module install php:7.1/devel installs a specific profile
yum install httpd will have yum automatically enable the module stream this package is in before installing this package
yum module enable php:7.1 enables the module but doesn’t install anything yet
yum distro-sync will update or downgrade packages from a previous module stream
10.6 Using yum Groups
yum groups are provided to give access to specific categories of software
yum groups list gives a list of the most common yum groups
yum groups list hidden shows all yum groups
yum groups info [groupname] shows which packages are in a group
yum groups install [groupname] will install a specific yum group
yum groups install --with-optional "Directory Client" will install the default and optional packages in a group
10.7 Managing yum updates and yum history
yum history gives a list of recently issues commands
yum history undo allows you to undo a specific command, based on the history information
yum update will update all packages on your system
yum update [packagename] will update one package only, including it’s dependencies
yum history undo id# will undo a prior command
10.8 Using RPM Queries
rpm is the legacy command to manage packages
rpm does not install package dependencies very well
good source of information about packages that have already been installed on the system
rpm is useful for package queries
rpm queries by default are against the database of installed packages, add -p to query package files
rpm -qf /any/file
rpm -ql mypackage
rpm -qc my package
rpm -qp --scripts mypackage-file.rpm
10.9 Using Red Hat Subscription Manager
to work with rhel repos you need a subscription
subscription-manager register will register yur system
subscription-manager attach --auto to connect your subscription
does not work on CentOS
Lesson11
Working with systemd
Learning objectives
- 11.1 Understanding systemd
- 11.2 Managing systemd services
- 11.3 Modifying systemd service configuration
11.1 Understanding systemd
Systemd is the manager of everything after the start of the linux kernel
Managed items ae called units
Different unit types are available
- services
- mounts
- timers
- …
systemctl is the management interface to work with systemd
Managing services is the most important systemd related task for an admin
systemctl -t help to see the types of available units of the system
systemctl list-unit-files to see a list of services and their status
systemctl list-units to see a list of units
11.2 Managing Systemd Services
system admins must be able to manage the state of modules
disabled / enabled determine if a module should be automatically started while booting
start / stop is managing runtime state of a service
systemctl status|start|stop|reload [service] to manage service runtime
systemctl enable [service] will automatically start when the system restarts - a symbolic link is created in /etc/systemd/*
11.3 Modifying Systemd Service Configuration
default system-provided systemd unit files ar ein /usr/lib/systemd/system
custom unit files are in /etc/systemd/system
run-time automatically generated unit files are in /run/systemd
while modifying a unit file, do not edit the file in /usr/lib/systemd/system but create a custom file in /etc/systemd/system that is used as an overlay file
better, use systemctl edit unit.service to edit unit files
use systemctl show [service] to show available parameters
using systemcl-reload may be required
systemctl cat httpd will show the contents of the unit file
systemctl edit [service] to create an over ride file
systemctl daemon-reload will read new settings into the runtime
Lesson12
Scheduling Tasks
Learning objectives
- 12.1 Understanding
cronandat - 12.2 Understanding
cronscheduling options - 12.3 Understanding
anacron - 12.4 Scheduling with
cron - 12.5 Scheduling tasks with systemd timers
- 12.6 Using
at - 12.7 Managing temporary files
12.1 Understanding cron and at
cron is a daemon that triggers jobs on a regular basis
It works with different configuration files that specify when a job should be started
Use it for regular re-occurring jobs, like backup jobs
at is used for tasks that need to be started once
systemd timers provide a new alternative to cron
12.2 Understanding cron Scheduling Options
crontab -e will create a cron job for the current user
stored in /etc/cron.d
scripts, executed on an hourly, daily, weekly, monthly basis – do not have a specific time indication
generic time-specific cron jobs in /etc/crontab deprecated
12.3 Understanding anacron
is a service behind cron that takes care of jobs that are executed on a regular basis but do not specify a time
it takes care of jobs in /etc/cron.hourly|daily|weekly|monthly
configuration is in /etc/anacron
12.4 Scheduling with cron
crontab -e as a specific user
create a cron tim ein /etc/cron.d
crontime specification:*/10 4 11 12 1-5
*/10minute, every ten minutes4hour11day of month12month,1-5day of week, specifies weekdays
cron does not have stdout, so any command that writes to stdout will fail
use * to specify every instance of the time specification
Exam Tip
man 5 cronis useful
12.5 Scheduling Tasks with Systemd Timers
systemd timers also allows for scheduling jobs at a regular basis, cron is still the standard
read man 7 systemd-timer for more information about systemd timers
read man 7 systemd-time for specification of the time format to be used
12.6 Using at
at developed to run a job at a specific time
the atd service must be running to run once-only jobs
use at [time] to schedule a job
-
type one or more specifications in the
atinteractive shell -
use
ctrl+dto close this shell
use atq for a list of jobs currently scheduled
use atrm to remove jobs from the list
12.7 Managing Temporary Files
the /usr/lib/tmpfiles.d directory manages settings for creating, deleting and cleaning up of temporaty files
the systemd-tmpfiles-clean.timer unit can be configured to automatically clean up temporary files
-
it triggers the
systemd-tmpfiles-clean.service -
this service runs
systemd-tmpfiles --clean
the /usr/lib/tmpfiles.d/tmp.conf file contains settings for the automatic tmp file cleanup
when making modifications, copy the file to /etc/tmpfiles.d
after making modifications to the file, use systemd-tmpfiles --clean /etc/tmpfiles.d/tmp.conf to ensure the file does not caontain any errors
in tmp.conf you’ll find lines specifying which directory to monitor, which permissions are set on what directory, which owners, and after how many days of not being used will the tmp file be removed
different actions can be performed on the directories and files that are managed
consult man tmpfiles.d for more detais
Lesson13
Configuring logging
Learning objectives
- 13.1 Understanding rhel 8 logging options
- 13.2 Configuring rsyslog logging
- 13.3 Working with
systemd-journald - 13.4 Preserving the systemd journal
- 13.5 Configuring logrotate
13.1 Understanding rhel 8 logging options
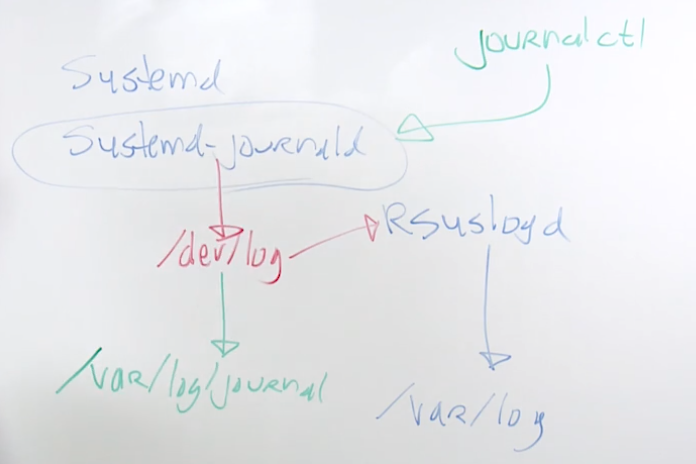
rsyslogd has been around since the late 1970s
systemd-journald is not peristent by default and it’s in memory only
can make it persistent by creating /var/log/journald and rebooting systsem
13.2 Configuring Rsyslog Logging
rsyslogd needs the rsyslogd service running
the main configuration file in /etc/rsyslog.conf, specifies the rules for what and where services are logged
snap-in files can be placed in /etc/rsyslog.d
each logger line contains three items
-
facilitythe specific facility that the log is created for -
severitythe severity from which should be logged -
destinationthe file or other destination the log should be written
log files normally are in /var/log
use the logger command to write messages to rsyslog manually
rsyslogd is and must be backward compatible with the archaic syslog service
in syslog, a fixed number of facilities was defined, like kern, authpriv, crom, and more
to work with services that don’t have their own facility, local{0…7} can be used
becasue of the lack of facilities, some services take care of their own logging and don’t use rsyslog
13.3 Working with systemd-journald
systemd-journald is the log service that is part of systemd
logs everyting from the start of the system
it integrates well with systemctl status [unit]
journalctl can be used to read log entries
messages are logged also to rsyslogd using the rsyslogd imjournal module
to make journal persistent, use mkdir /var/log/journal
13.4 Preserving the Systemd Journal
the journal is written to /run/log/journal which is automatically cleared on system reboot
edit /etc/systemd/journald.conf to make the journal persistent across reboots
set the storage parameter in the file to one of three values
persistentwill store the journal in the/var/log/journaldirectory. the directory will be created if it doesn’t exist
volatile stores the journal only in /rin/log/journal
auto will store the journal in /var/log/journal if that directory exists, and in /run/log/journal if no /var/log/journal exists
built-in log rotation runs monthly
journal cannot grow beyond 10% of the size of the filesystem it is on
the journal will also make sure at least 15% of its file system wil remain available as free space
these settings can be changed through /etc/systemd/journald.conf
systemctl status systemd-journald to check service status
use -l option to show file size
13.5 Configuring Logrotate
logrotate is started through cron.daily to ensure that log files don’t grow too big
main configuration is in /etc/logrotate.conf snap-in files can be provided through /etc/logrotate.d/
deafult logrotate is every 4 weeks
Lesson14
Managing storage
Learning objectives
- 14.1 Understanding disk layout
- 14.2 Understanding linux storage options
- 14.3 Understanding gpt and mbr partitions
- 14.4 Creating partitons with
parted - 14.5 Creating mbr partitions with
fdisk - 14.6 Understanding file system differences
- 14.7 Masking and mounting file systems
- 14.8 Mounting partitions through
/etc/fstab - 14.9 Managing persistent naming attributes
- 14.10 Managing systemd mounts
- 14.11 Managing xfs file system
- 14.12 Creating a swap partition
14.1 Understanding disk layout
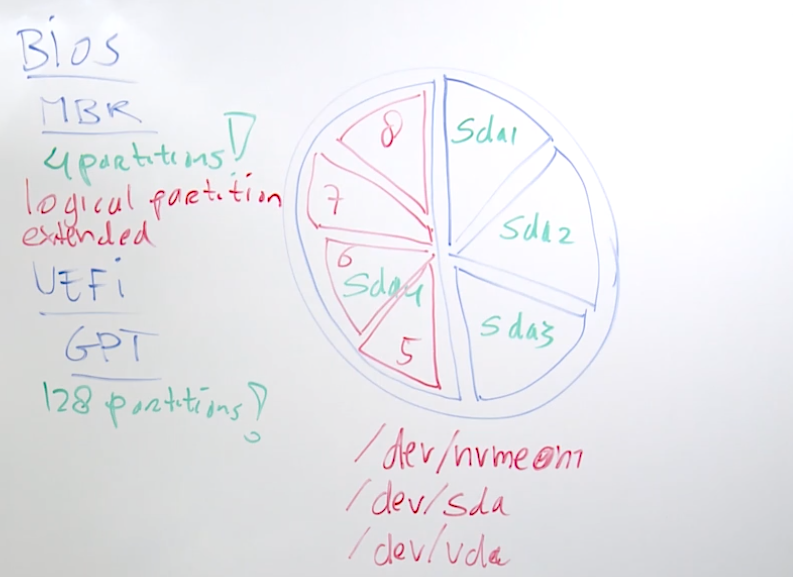
lsblk lists all disks attached to the computer
parted is the preferred partitioning utility in rhel
cat /proc/partitions to show a list of partitions on the system
14.2 Understanding Linux Storage Options
partitions are the classic solution, us ein all cases
used to allocate dedicated storage to specific types of data
partitions are used to segment the systems data
lvm logical volumes
used as the default installation in rhel
add flexibility to storage (resize, snapshots and more)
stratis is the next generation volume managing filesystem that used thin provisioning by default
implimented is user space, which makes api access possible
vdo - virtual data optimizer
focused on storing files in the most efficient way
manages deduplicated and compresses storage pools
14.3 Understanding GPT and MBR Partitions
mbr - master boot record is part of the 1981 pc specification
- 512 bytes to store boot information
- 64 bytes to store partitions
- place for 4 partitions only with a max size of 2TB
- to use more partitions, extended and logical partitions must be used
gpt - guid partition table
- more space to store partitions
- used to overcome mbr limitations
- 128 partitions max
- developed to work with uefi - universal extendable firmware interface
4.4 Creating Partitions with parted
while creating a partition, you do not automatically create a filesystem
the parted file system attribute only writes some unimportant file system metadata
in rhel 8, parted is the default utility
alternatively, use fdisk to work with mbr and gdisk to use guid partitions
parted /dev/sdb
print wil show if there is a current partition table
mklabel msdos|gpt
mkpart part-type name fs-type start end
part-typeapplies to the mbr only and sets primary, logical, or extended partitionnamearbitrary name, required for gptfs-typedoes not modify the filesystem but sets some irrelevant system dependent metadatastart endspecify start and end, counting from the begining of the disk- for example,
mkpart primary 1024 MiB 2048MiBwill create a 1 GiB primary partition - you can use
mkpartin interactive mode
rhel defaults to KiB, MiB, GiB, etc.. and not KB, MB, GB
KiB is expressed as 1024 KB is expressed as 1000
print to verify creation of new partition
quit to exit parted she;;
udevadm settle to ensure that the new partition device is created
cat /proc/partitons to verify the creation of the partition
14.5 Creating MBR Partitions with fdisk
fdisk /dev/nvme0n[n] to start shell
partprobe recent changes to disk are updated to the kernel partition table
14.6 Understanding File System Differences
you will need to apply a filesystem after making a partition
xfs is the default rhel filesystem
- fast and scalable
- used copy on write (CoW) to guatentee data integrity
- size canbe increased but not decreased
ext4
- default in rhel 6 and is still used
- backward compatible to ext3
- uses jornal to guarantee data integrity
- size can be increased and decreases
btrfs rhel decided not to move forward with this file sysytem
14.7 Making and Mounting File Systems
mkfs.xfs creates an xfs file system
mkfs.ext4 creates an ext4 file system
use nkfs.tab.tab to show full list
do not use mkfs as it will default to creating an ext2 file system
after making the files system, you can mount it in runtime using the mount command
use umount before disconnecting a device
mkfs.xfs /dev/nvme0n1p1 to make an xfs file system on partition one on disk nvmen1
mount /dev/nvme0n1p1 /mnt to mount the partition on the /mnt directory
you can run mount to see all the mounted filesystems
mount | grep '^/' to show only mounts that start with a /
umount /dev/nvme0n1p1 to disconnect the partition
lsof /mnt will show open files that will need to be closed if you ar eunable to umount
can also use umount /mnt
mkfs.vfat will create a windows compatible 32 bit filesystem
14.8 Mounting Partitions through /etc/fstab
/etc/fstab is the main configuration file to persist mount partitions
/etc/fstab content is used to generate systemd mounts by the `systemd-fstab-generator utility
| name of device | mount point | file system type | default mount options | dump | filesystem check |
|---|---|---|---|---|---|
| /dev/nvme0n1p1 | /mnt | xfs | defaults | 0 | 0 |
| LABEL=mnt | /mnt | xfs | defaults | 0 | 0 |
| UUID=”856916af-0e43-44d5-a280-090ba8470970” | /mnt | xfs | defaults | 0 | 0 |
to update systemd, make sure to use systemd demon-reload after editing /etc/fstab
mount -a to mount all file systems specified in /etc/fstab
14.9 Managing Persistent Naming Attributes
why do we need persistent nameing?
in datcenter ebvironments, block device names may chnage. Different solutions exist for persistent naming
uuid - universal unique id, and is automatically generated for each device that contains a file system or anything similar
label - while creating the file system, the option -L can be used to set an arbitraty name that can be used for mounting the file system
unique device names are created in /dev/disk
blkid block id, provides the uuid
tune2fs to set label
tune2fs -L articles /dev/nvme0n191 to set a label
ll /dev/disk/by-uuid/ to also see disk names, uuids, etc…
14.10 Managing Systemd Mounts
/etc/fstab mounts already are systemd mounts
mounts can be created using systemd .mount files
using .mount files allows you to be more specific in defining dependecenies
use systemctl cat tmp.mount for an example
| what | where | type | options |
|---|---|---|---|
| tmpfs | /tmp | tmpfs | Options=mode=1777,strictatime,nosuid,nodev |
copy file as a template and chnage settings
cp /usr/lib/systemd/system/tmp.mount /etc/systemd/system/example.mount
run systemd demon-reload after configuring the file
systemctl enable --now example.mount
14.11 Managing XFS File Systems
utilities for managin gxfs file system
xfsdump used for creating backups of xfs formatted devices and considers specific xfs attributes
xfsdumponly works on a complete xfs devicexfsdumpcan make full backups (-l O) or different levels of incremental backupsxfsdump -l ) -f /backupfiles/data.xfsdump /datacreates a full backup of the contents of the /data directory
the xfsrestore command is used to restore a backup that was made with xfsdump
xfsrestore -f /backupfiles/data.xfsdump /data
the xfsrepair command cna be manually started to repair broken xfs file systems
14.12 Creating a Swap Partition
swap is ram emulated on disk
linux kernel is smart with dealing with swap
all linux systems should have at least some swap
the amount of swap depends on the use of the server
the amount of swap is related to the amount of ram you have on the server
264GB of ram, 64gb of swap
swap can be created on any block device, including swap files
while creating swap with parted, set file system to linux-swap
after creating the swap partition, use mkswap to create the swap file system
activate using swapon /dev/nvme0n2p2
add a line to /ect/fstab to make it persistent
swap is not mounted on a directory, it is mounted on the swap kernel interface
Lesson15
Advanced storage
Learning objectives
- 15.1 Understanding lvm, stratis, and vdo
- 15.2 Understanding lvm setup
- 15.3 Creating an lvm logival volume
- 15.4 Understanding device mapper and lvm device names
- 15.5 Resizing lvm logical volumes
- 15.6 Understanding stratis setup
- 15.7 Creating stratis storage
- 15.8 Managing stratis storage features
- 15.9 Understanding vdo
- 15.10 Configuring vdo volumes
15.1 Understanding lvm, stratis, and vdo
lvm logical volumes
- used during default installations of rhel
- adds flexibility to storage (resize, snapshots, and more)
stratis
- next generation volume managing filesystem
- implemented in user space, which makes api access possible
vdo - virtual data optimizer
- focuses on storing files in the most efficient way
- manages deduplication and compressed storage pools
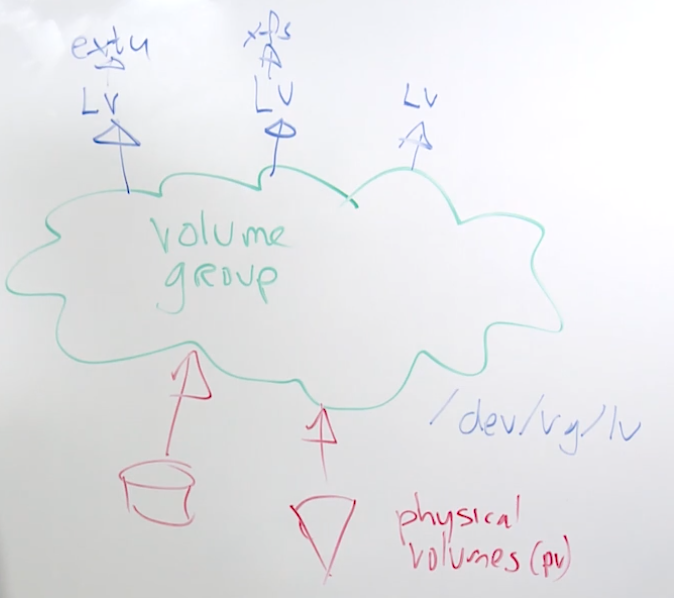
15.2 Understanding LVM Setup
15.3 Creating an LVM Logical Volume
create a partition frm parted use set n lvm on
use pvcreate /dev/sdb1 to create the physical volume
use vgcreate vgdata /dev/sbd1 to create the volume group
use lvcreate -n lvdata -L 1G vgdata to create the locigal volume
use mkfs /dev/vgdata/lvdata to create a file system
put in /etc/fstab to mount it persistently
use pvs after creating the physical volume to verify creation
vgs will print volume group information
lvs will print logical volume information
findmnt will find existing mounts
15.4 Understanding Device Mapper and LVM Device Names
device mapper is a system that the kernel uses to interface storage devices
device mapper generates meaningless names like /dev/dm-0 and /dev/dm-1
meaningful makes are provided ads symbolic links through /dev/mapper
/dev/mapper/vgdata-lvdata
alternatively, use the lvm generated symbolic links
/dev/vgdata/lvdata
never use the /dev/dm-0 names as they change, use the symbolic link names
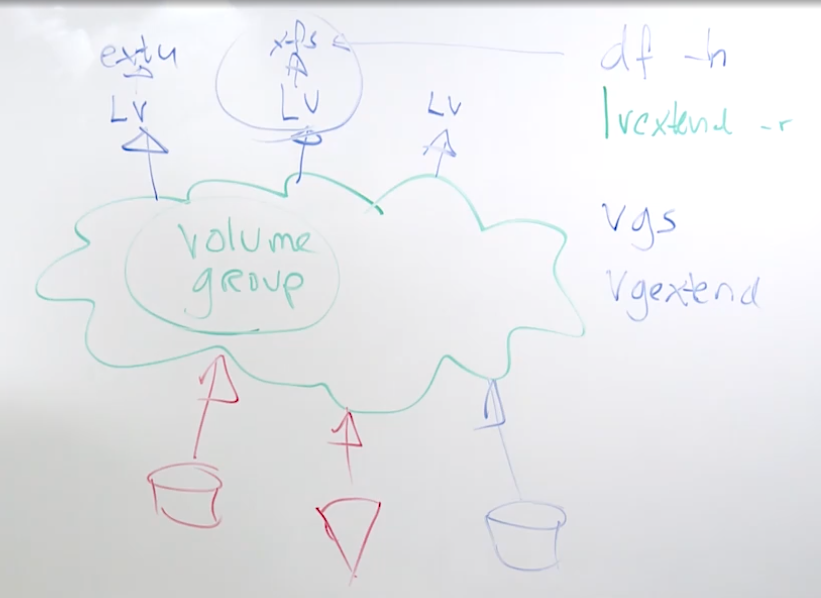
15.5 Resizing LVM Logical Volumes
vgs to verify availability in the volume group
vgextend to add new physical volumes to teh volume group
lvextend -r -L +1GiB to resize filesystem
-rmakes sure the file system is resized in the logical volume
e2resizeis an independent resize utility for ext file systemsxfs_growfscan be used t grow an xfs file system
you cannot shrink an xfs file system
you can shrink an ext4 filesystem
15.6 Understanding Stratis Setup
volume management file system and red hat’s answer to btrfs and zfs
- on top of stratis a regular file system is needed: xfs
it is built on top of any block device, including lvm devices
it offers advanced features
- thin provisioning
- snapshots
- cache tier
- programmatic api
- monitoring and repair
staratis architecture
the stratis pool is created from one or more storage devices (blockdev)
- stratis creates a /dev/stratis/my-pool directory for each pool
- this directory contans links to devices that represent the file systems in the pool
- block devices in a pool may not be thin provisioned
the xfs file system is put in a volume on top of the pool and is an integrated part of it
- each pool can contain one or more file systems
- file systems are thin provisioned and do not have a fixed size
- the thin volumewhich is an integrated part of the file system automatically grows as more data is added to the file system
15.7 Creating Stratis Volumes
part one
yum install stratis-cli stratisdsystemctl enable --now stratisd-
stratis pool create mypool /dev/nvme0n2- add new block devices later using
stratis blockdev add-data - partitions are not supported
- note that the block device must be at least 1GiB
- add new block devices later using
stratis poolto see pool information-
stratis fs create mypool myfs1- note this will create an xfs file system; xfs is the only file system option with startis
stratis fs list mypoolwill show all file systems in the pool
part two
mkdir /myfs1mount /dev/stratis/mypool/myfs1 /myfs1stratis pool liststratis filesystem liststratis blockdev list mypoolblkidto find the stratis volume uuid- mount by uuid in /etc/fstab
15.8 Managing Stratis Storage Features
pools can be extended by adding additional blocks devices
use stratis pool add-data mypool /dev/nvme0n3 to add another block device
standard linux tools don’t give accurate sizes as stratis volumes are thin provisioned
use stratis blockdev to show information about all block devices used for stratis
use stratis pool to show information about all pools
- note that physical used should not come too close to physical size
use stratis filesystem to monitor individual filesystem
a snapshot is an individual file system that can be mounted
after creation, snapshots can be mounted
a snapshot and its origin are not lonked, the snapshotted file system can live longer than the file system it was created from
each snapshot needs at least half a gigabyte of backing storage for the xfs log
stratis fs snapshot mypool myfs1 myfs1-snapshot
- changes to the original fs will not be reflected in the snapshot
- use
mount /stratis/mypool/my-fs-snapshot /mntto mount it
revert the original volume to the state in the snapshot
umount /myfs1stratis fd destroy mypool myfs1stratis fs snapshot mypool myfs1-snap myfs
Note that this appreach wouldn’t work on lvm
stratis filesystem destroy mypool mysnapshot will delete a snapshot
a similar procedure is used for destroying file systems stratis filesystem destroy mypool myfs
when there are no more file systems in a pool, use stratis pool destroy mypool to delete the pool
15.9 Understanding VDO
virtual data optimizer is used to optimize how data is stored on disk
it is used as a separate volume manager on top of which file systems will be created
provides thin-provisioned storeage
- use a logical size 10 times the physical size for vms and containers
- use a logical size 3 times the physical size for object storage
used in cloud/container environments
it manages deduplicated and compressed storage pools in rhel 8
15.10 Configuring VDO Volumes
ensure the the underlying block device are > 4GiB
yum install vdo kmod-kvdo
vdo create --name=vdo1 --device=/dev/nvme0n2p1 --vdoLogicalSize=1T
mkfs.xfs -K /dev/mapper/vdo1
udevadm settle will wait for the system to register the new device name
in /etc/fstab, include the x-systemd.requires=vdo.service and the discard mount options or use the systemd example file
monitor using vdostats --human-readable
run systemctl daemon-reload
systemctl enable --now vdo1.mount
make sure to reboot to ensure auto remounting
stop at grub boot menu adn press e
remove rhgb quiet
ctrl-x
15.11 Understanding LUKS Encrypted Volumes
15.12 Configuring LUKS Encrypted Volumes
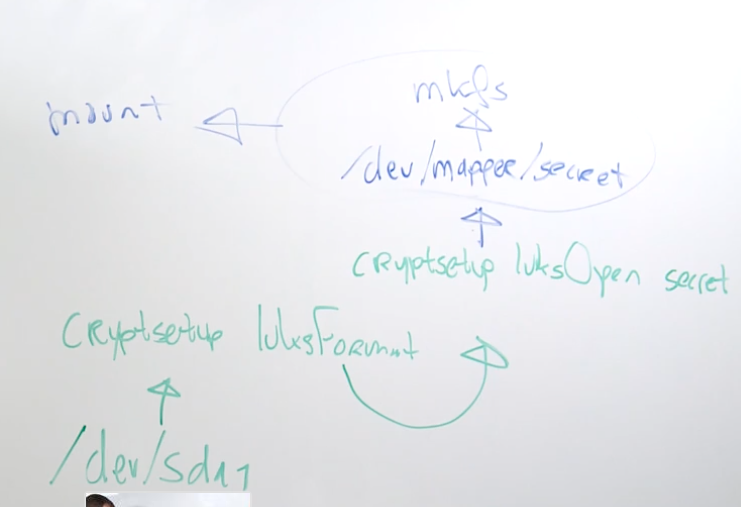
use parted to create the partition
cryptsetup luksFormat will format the luks device
cryptsetup luksOpen will open it and create a device mapper name
mount the resulting device mapper device
to automate the cryptsetup luksOpen, use /etc/crypttab
to automate mounting the volumes, use /etc/fstab
Module3
Performing Advanced System Administration Tasks
Lesson16
Basic kernel management
Learning objectives
- 16.1 Understanding the linux kernel
- 16.2 Working with kernel modules
- 16.3 Using
modprobe - 16.4 Using /proc to tune kernel behavior
- 16.5 Updating the kernel
16.1 Understanding the linux kernel
the linux kernel is the heart of the linux operating system
it needs to address hardware devices
drivers in linux are called modules
use modprobe to manually load drivers
16.2 Working with Kernel Modules
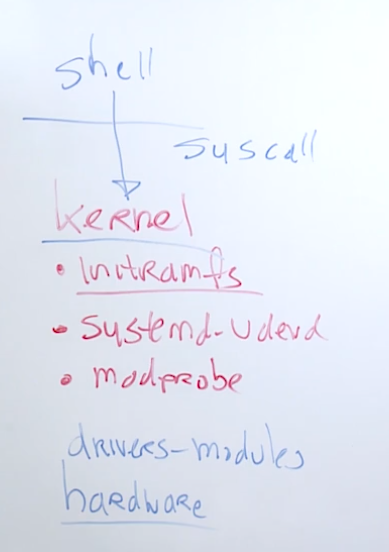
linux drivers are implemented as kernel modules
most kernel modules are loaded automatically through initramfs or systemd-udev
use modprobe to manually load kernel module
use lsmode to list currently loaded kernel modules
modprobe vfat to load the vfat module
modprobe -r vfat to unload module
16.3 Using modprobe
use modprobe to load a kernel module and al it’s dependencies
modprobe -r to remove module
modinfocan show module parameters
to load, specify kernel module parameters, edit /rtc/modprobe.conf or the files in /etc/modprobe.d
16.4 Using /proc to Tune Kernel Behavior
/proc is a file system that provides access to kernel information
- pid directories - contains information about running processes
- status files
- tunables in /proc/sys - change kernel behavior in realtime
use echo to write to any file in /proc/sys to change kernel performance parameters
write the parameters to /etc/sysctl.conf to make them persistent
use sysctl -a to show a list of all current settings
echo 1 > ip_forward to overwrite current value
check status with sysctl -a | grep forward
16.5 Updating the Kernel
linux kernels are not technically updated, a new kernel is installed besides the old kernel
this allows admins to boot the old kernel in case anything goes wrong
use either yum update kernel or yum install kernel to update kernel
Lesson17
Managing the boot process
Learning objectives
- 17.1 Understanding the boot procedure
- 17.2 Modifying grub2 runtime parameters
- 17.3 Modifying grub 2 persistent parameters
- 17.4 Managing systemd targets
- 17.5 Setting the default systemd targets
- 17.6 Booting into a specific target
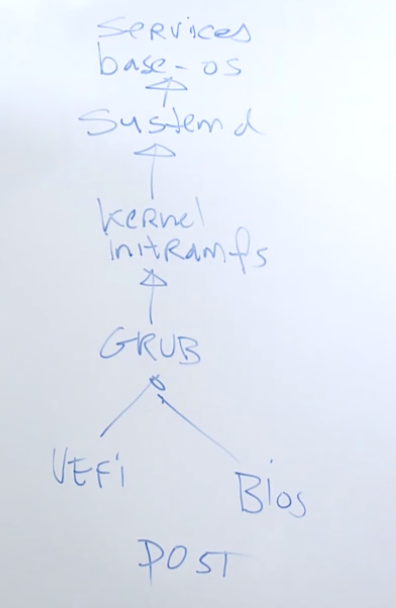
17.1 Understanding the boot procedure
| Boot process | |||||||
|---|---|---|---|---|---|---|---|
| ———–> | POST | uefi or bios | grub(2) | initramfs | kernel | systemd | |
17.2 Modifying grub2 runtime parameters
from the grub2 boot menu, press e to edit runtime boot options
press c ro enter the grub2 command mode
- from command line mode, type
helpfor an overview of available options
the rescue kernel boots with limited options and performance - will seldomly be used
| grub2 options | |
|---|---|
| option | description |
| load video | loading the video driver |
| set gfx_payload=keep | setting a specific module |
| insmod gzio | loading a module that provides compression functionality |
| linux ($root)/vmlinux-4.18.0-32* | the linux kernel (rhgb quit, remove when rebooting so you can see all boot up dumps) |
| initrd ($root)/initramfs-4.18.0-32.* | name of the initrd that will be loaded, will never need to change |
17.3 Modifying Grub2 Persistent Parameters
to edit persistent grub2 parameters, edit the configuration fil ein /etc/default/grub
after writing changes, compile changes to grub.cfg
grub2-mkconfig -o /boot/grub2/grub.cfgfor bios systemsgrub2-mkconfig -o /boot/efi/EFI/redhat/grub.cfgfor uefi systems
never edit the /boot/grub2/grub.cfg file directly, the grub.cfg file is recompiled after a new kernel update is installed. Any settings or edits will be lost.
17.4 Managing Systemd Targets
a systemd target is a group of unit files
some targets are isolatable, which means that they define the final state a system is starting in
- emergency.target
- rescue.target
- multi-user.target - no GUI
- graphical.target
When enabling a unit, it is added to a specific target
systemd enable httpd will add the httpd service to the systemd directory /usr/lib/systemd/system.httpd.serve
go to /etc/systemd/system/multi-user.target.wants to see a list of services that will boot up in the multi-user.target mode
systemctl list-dependencies to view dependency relationship
17.5 Setting the Default Systemd Target
use systemctl get-defaultto see the current default target
use systemctl-default to set a new default target
use systemctl start [name].target to switch into the target state
17.6 Booting into a Specific Target
on the grub2 boot prompt, use systemd.unit=xxx.target to boot into a specific target
to change targets on a running system, use systemctl isolate xxx.target - is a better solution because it isolates running services
Lesson18
Essential troubleshooting skills
Learning objectives
- 18.1 Understanding troubleshooting modes
- 18.2 Changing the root password
- 18.3 Troubleshooting filesystem issues
- 18.4 Troubleshooting networking issues
- 18.5 Troubleshooting performance issues
- 18.6 Troubleshooting software issues
- 18.7 Troubleshooting memory issues
- 18.8 Consulting red hat website for troubleshooting tips
18.1 Understanding troubleshooting modes
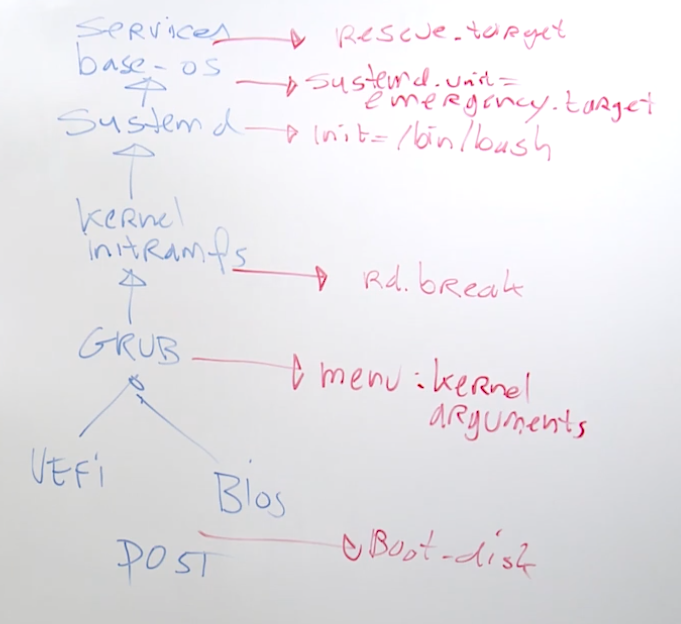
rd.break is the earliest stage you can ger into your system
18.2 Changing the Root Password
important for the exam, you do not know the root password of the VM machines
Process:
- enter the grub menu while booting
- find the line that loads the linux kernel and add
rd.breakto the end of the line mount -o remount,rw /sysrootchroot /sysrootecho password | password --stdin roottouch /.autolabelfor selinux, reboot will fail if file is not presentctrl-dctrl-d
root filesystem is in /sysroot
18.3 Troubleshooting Filesystem Issues
real file system corruption does occur, but often, and is automatically fixed
problems occur when making typos in /etc/fstab
to fix, if necessary, remount filesystem in read/write state and edit /etc/fstab
fragmentation can be an issue, different tools exist to fix
xfs_fsris the xfs file system reorganizer, it optimizes xfs file systemse4defragcan be used to defragment ext4
if you are presented with a prompt to give the root password during boot up, often times it’s because there is something wrong with /etc/fstab
the root mount in /etc/fstab is not critical since the root filesystem is loaded as a kernel argument in grub
18.4 Troubleshooting Networking Issues
common network issues
- wrong subnet mask
- wrong router
- dns not working
troubleshooting tools
ping google.com if you get a Name or service not known` error then there might be a DNS issue
to get to dns you need a working ip address and proper routing
ip a to show a printout of the system’s network configuration
check that the ip was assigned with a proper subnet mask
wrong: 192.168.4.235/32
correct:` 192.168.4.235/24
repair in runtime, delete ip address: ip a d 192.168.4.235/32 dev ens160
ip a a dev ens160 192.168.4.235/24
rerun ping, if you get a network unreachable error then check your routing
run ip route add default via 192.168.4.2 to add the default gateway
make sure you make the networking updates persistent with nmtui
you can also use dhclient to reset ip
18.5 Troubleshooting Performance Issues
troubleshooting performance is an art on its own
focus on four key areas of performance
- memory
- cpu load
- disk load
- network
best tool to use is top
If there is a process overloading cpu (or one cpu) you can kill the process or renice it to a lover value so that other processes can run
18.6 Troubleshooting Software Issues
dependency problems in rpms
- should not occur when using repositories
Library problems
- run
ldconfigto update the library cache
18.7 Troubleshooting Memory Shortage
first, always check that the system has sufficient swap space available
If there is no swap then add it
you can also kill processes
last option is to reboot
18.8 Consulting Red Hat Websites for Troubleshooting Tips
use customer portal or the developer portal to search knowledge base for examples and how to guides
use content filters to specify versions and specific information
Lesson19
Introducing bash shell scripting
Learning objectives
- 19.1 Understanding bash shell scripts
- 19.2 Essential shell script components
- 19.3 Using loops in shell scripts part 1
- 19.4 Using loops in shell scripts part 2
19.1 Understanding Bash Shell Scripts
a shell scripts can be as simple as a number of commands that are sequentially executed
scripts normally work with variables to make them react differently in different environments
conditionals statements such as for, if, case, and while can be used
shell scripts are common as they are easy to learn and implement
also, a shell will always be available to interpret code from shell scripts
if scripts use internal commands only, they are very fast as nothing needs t be loaded
there is no need to compile anything
there ar eno modules to be used in the bash scripts, which makes them rather static
bash shell scripts are not idempotent - which means if you run a command more than once then you will get the same results. this is not always the case with bash scripts
19.2 Essential Shell Script Components
shell scripts have to be executable
chmod +x script.sh
./script.sh to run the script
cannot run the script as a file since linux uses $PATH to find binaries
script layout
#!/bin/bash -- the shebang line
# scripts should have comments

echo which directory do you want to activate?

read DIR

cd $DIR
pwd
ls
scripts start a sub shell and execute the script. when the script completes you are returned back to the directory where you ran the script - or the parent shell
to persist the script path you will need to run in the current shell by sourcing the script
. script.sh
19.3 Using Loops in Shell Scripts Part 1
different conditional statements are available in bash
- if…then…fi
- while…do…done
- until…do…done
- case…in…esac
- for…in…do…done
use man test to see all the conditional test operators
#!/bin/bash

if [ -z $1 ]
then
    echo you have to provide an argument
    exit 6
fi

echo the argument is $1
$1 is the first argument that can be passed to the script
exit stop the script immediate, if you do not specify an exit code the default is 0 and 1
0 = script ran 1 = script dod not run
19.4 Using Loops in Shell Scripts Part 2
you can run calculations with the echo command
echo $(( 2 + 6 ))
Module4
Managing network services
Lesson20
Managing ssh
Learning objectives
- 20.1 Understanding ssh key-based login
- 20.2 Setting up ssh key-based login
- 20.3 Changing common ssh server options
- 20.4 Securely copying files
- 20.5 Securely synchronizing files
20.1 Understanding ssh key-based login
ssh-keygen generates a private and public key pair
ssh-copy-id to copy public key to target server
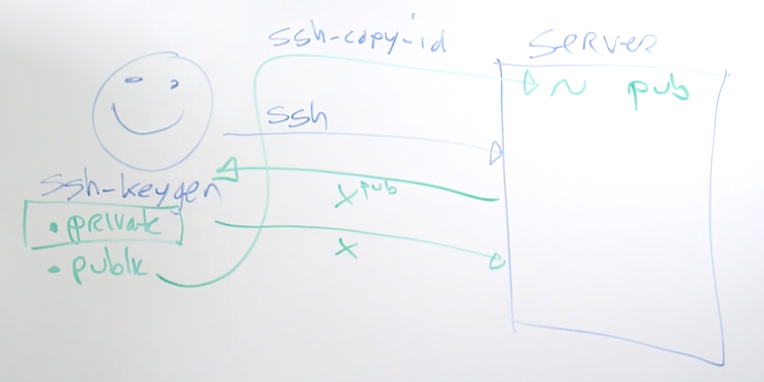
20.2 Setting up SSH Key-based Login
ssh-keygen creates a public/private key pair for the current user
- setting a passphrase for the private key makes it more secure but less convenient
ssh-copy-id target.server copies the public key over to the target server
ssh-agent /bin/bash allocates space in the bash shell to cache the private key phrase
ssh-add adds the current passphrase to the cache
20.3 Changing Common SSH Server Options
server options are set in /etc/ssh/sshd_config
client options can be set in /etc/ssh/ssh_config
- port 22
- PermitRootLogin
- PubkeyAuthentication
- PasswordAuthentication
- X11Forwarding
use AllowUsers to further limit access
20.4 Securely Copying Files
scp can be used to securely copy files over the network, using the sshd process
scp file1 file2 student@remoteserver:/home/studentscp -r root@remoteserver:/tmp/files .
sftp offers an ftp client interface to securely transfer files using ssh
- use
put /my/fileto upload a file - use
get /your/fileto download a file to the current directory - use
exitto close ansftpsession
options
lpwdlist local working directorypwdlist remote working directorylcdto change local directory
20.5 Securely Synchronizing Files
rsync is using ssh to synchronize files
if source and target file already exists, rsync will only synchronize their differences
the rsync command can be used with many options, of which the following are most common
options
-rwill recursively synchronize the entire directory tree-lsynchronizes symbolic links-ppreserves symbolic links-nwill do a dtry-run before actually synchronizing-auses archive mode, which is equivalent to-rlptgoD-Auses archive mode and also synchronizes ACLs-Xwill synchronize SELinux context as well
Lesson21
Managing http services
Learning objectivesset
- 21.1 Understanding apache configuration
- 21.2 Creating a basic website
21.1 Understanding apache configuration
apache httpd is a leding web server on linux
nginx is another leading web servr
the main httpd configuration file is /etc/httpd/conf/httpd.conf
additional snap-in files can be stored in /etc/httpd/conf.d/
the default DocumentRoot is /var/www/htdocs
apache looks for a file with the name index.html in this directory
systemctl enable --now httpd will ensure the services is started on boot up
use curl to interact with service, it is a command line web client
getsebool -q will list all selinux booleans
setsebool -P [bool name] on to set rule to on and off
Lesson22
Managing selinux
Learning objectives
- 22.1 Understanding the need for selinux
- 22.2 Managing selinux modes
- 22.3 Understanding selinux context labels and booleans
- 22.4 Using file context labels
- 22.5 Analyzing selinux log messages
- 22.6 Resetting the root password and selinux
- 22.7 Troubleshooting selinux
22.1 Understanding the need for selinux
linux security is built on unit security
unix security consists of different solutions that were never developed with current IT security needs in mind
most of these solutions focus on a part of the operating system
selinux provides a complete and mandatory security solution
the principles is that if it isn’t specifically allowed, it will be denied
as a result, “unknown” services will always need additional configuration to enable them in an environment where selinux is enabled
22.2 Managing SELinux Modes
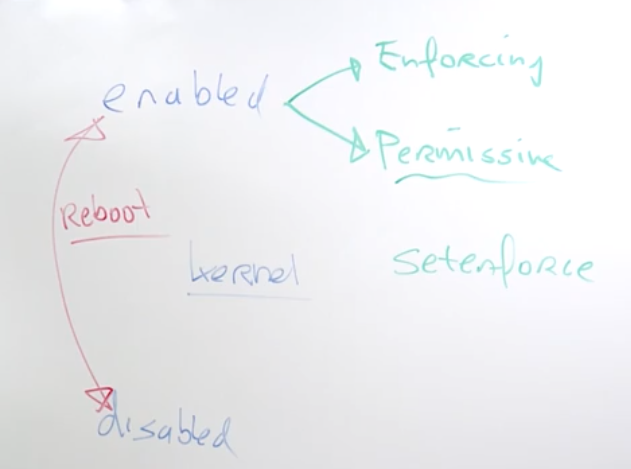
getenforce will show the current state
setenforce 0|1 toggles between enforcing and permissive
edit /etc/sysconfig/selinux to manage the default state of selinux
never set to disabled if this is meant as a temporary measure only
you have to reboot if switching selinux from enforcing to disabled (and vis versa). selinux is set at the kernel and is why a reboot is required
22.3 Understanding SELinux Context Labels and Booleans
every object is labeled with a context label
user:user specific contextrole:role specific contexttype:flags which type of operation is allowed on this object
many commands support a -Z option to show current context information
context types are used in the rules in the policy to define which source objects has access to which target object
a boolean is an /on/off switch
use it to enable or disable specific categories of functionality altogether
ps auxZ will show a list of processes with selinux context
| context labels consists of 3 parts | |
|---|---|
| system_u | user |
| system_r | role |
| service_t | context type |
22.4 Using File Context Labels
use semanage fcontext to set the file context label
this will write the context to the selinux policy
to enforce the policy setting on the file system, use restorecon
alternatively, use touch /.autorelabel to relabel all files to the context that is specified in the policy
22.5 Analyzing SELinux Log Messages
selinux uses auditd to wrote log messages to the audit log
messages in the audit log may be hard to interpret
ensure that sealert is available, it interprets messages from the audit log, applies selinux AI, and writes meaningful messages to /var/log/messages
run the sealert command, including the uuid messages to get advice on how to troubleshoot specific issues
grep AVC /var/log/audit/audit.log to see selinux messages
- AVC = access vector cache, how selinux logs to the audit log
22.6 Resetting the Root Password and SELinux
reboot system
-e on the grub menu
add rd.break to the linux kernel line
mount -o remount,rw /sysroot
chroot /sysroot
passwd to update password
ls -Z you will see a ?
load_policy -i
re-run ls -Z, you will see selinux context
restorecon -v /etc/shawod to
22.7 Troubleshooting SELinux
scenario: changed httpd port to 83
edit /etc/httpd/conf/httpd.conf
update Listen 83
systemctl status httpd
log message: (13)Permission denied: AH00072: make_sock: could not bind to address [::]:83
httpd will start without error
now look at the selinux messages
grep sealert /var/log/messages
sealert -l 5c9596cb-61f8-4253-a848-0ec998bde966 | less
run semanage port -a -t http_port_t -p tcp 83 to open and listen on port 83
setenforce 1 to reset selinux to enforcing mode
Lesson 23: Managing network security
Learning objectives
- 23.1 Understanding rhel 8 firewalling
- 23.2 Understanding firewalld components
- 23.3 Configuring a firewall with
firewall-cmd - 23.4 Using
firewall-config
23.1 Understanding rhel 8 firewalling
firewall starts at the kernel
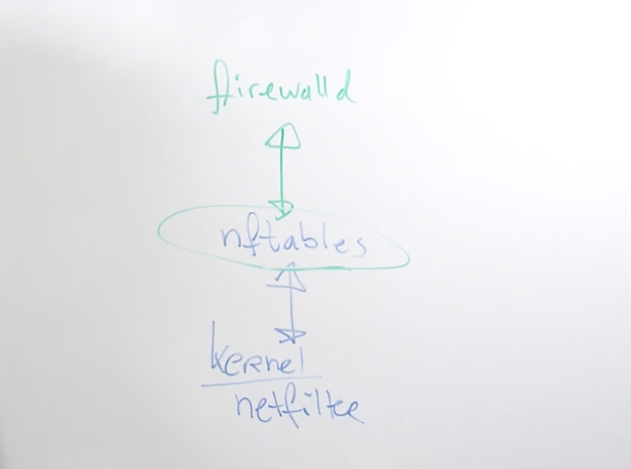
23.2 Understanding Firewalld Components
firewalld is using different components to make firewalling easier
service: the main component, contains one or more ports as well as optional kernel modules that should be loaded
zone: a default configuration to which network cards can be assigned to apply specific settings
ports: optional elements to allow access to specific ports
additional components are available as well, but not frequently used in a base firewall configuration
firewall-cmd --list-all to list firewall settings
firewall-cmd --get-services to print list of services
firewall-cmd --add-service service_name to add service
firewall-cmd --reload to reload firewall service
23.3 Configuring a Firewall with firewall-cmd
the firewall-cmd command is used to wrote firewall configuration
use the option --permanent to write to persistent (but not to runtime)
without --permanent the rule is written to runtime (but not to persistent)
you have to run both to if you want to test in the current runtime and persist the setting
Using firewall-config
you need to install before using
search package name yum search firewall-config
yum install firewall-config -y
Lesson24
Automated installations
Learning objectives
- 24.1 Understanding automated installation solutions
- 24.2 Creating a kickstart file
- 24.3 Using the kickstart file for automatic installation
- 24.4 Using `kickstart files in fully automated data centers
- 24.5 Using vagrant to set up virtual machines
24.1 Understanding automated installation solutions
Several solutions exit for performing automated installation
- vagrant is used for automatic deployment of virtual machine s- not included in rhcsa
- cloud-init and other templates can be used in cloud environments
- kickstart can be used with the pxe-boot server to provide instructions for the automatic installation of rhel
A kickstart file contains all the installation instructions to set up a rhel instance. It can be used to easily reproduce installations
24.2 Creating a kickstart file
after installation, a file named anaconda.ks.cfg is crated to the root user home directory
edit this file manually to make changes that are required
files are anaconda-ks.cfg and initial-setup-ks.cfg
24.3 Using the Kickstart File for Automatic Installations
typically, the kickstart file is provided on an installation server
before starting the installation, the client indicates where to get the kickstart file from
- use
ks=http://somewhere/ks.cfg - or provide interface provided by the installation program (as in virtual machine manager)
on the install prompt screen, hit tab and enter the url of the ks.cfg file as outlined above
24.4 Using Kickstart Files in Fully Automated Datacenters
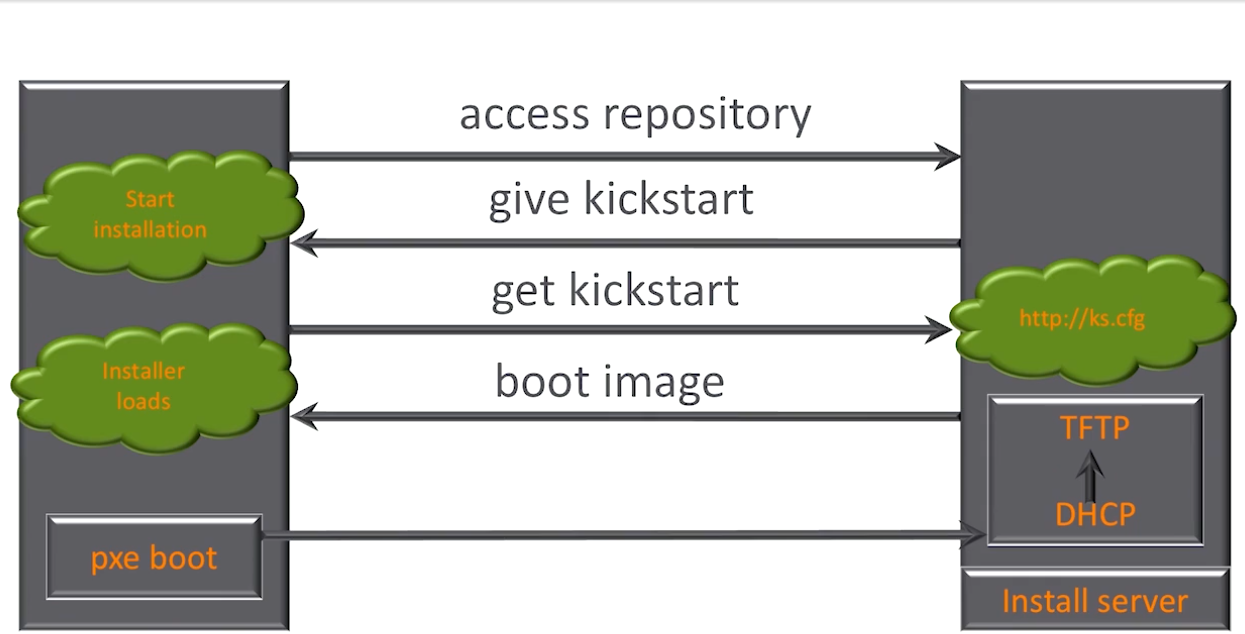
won’t need to setup for the rhcsa exam
24.5 Using Vagrant to Set Up Virtual Machines
vagrant is a solution to automate installing virtual machines
vagrant works with a box, which is a tar file that contains a vm image
pre-configured boxes are available at the vagrantcloud.com
administrators can create their own boxes
provides allow vagrant to interface with the underlying host platform
- supported platforms are virtualbox, vmware, hyper-v and kvm
providers can be used to further configure a vagrant-configured vm
- bash and ansible are common provisioners
the vagrantfile is a text file containing the instructions for creating the vagrant environment
vagrant is not included in rhel 8 and must be installed from epel
Lesson25
Configuring time services
Learning objectives
- 25.1 Understanding linux time
- 25.2 Setting time with timedatectl
- 25.3 Setting up an ntp client
25.1 Understanding linux time
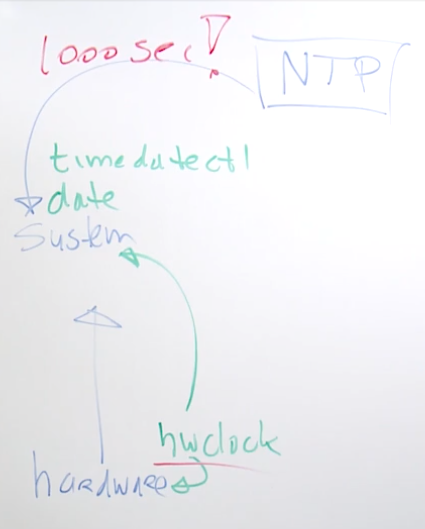
25.2 Setting time with timedatectl
linux time related commands
hwclockset hardware and synchronize with system timedateset current time and display formattzselectallows to selct the current time zonetimedatectlnew utility to manage all aspects of time
timedatectl --help to see list of options and commands
timedatectl list-timezones to printout list of timezones
timedatectl set-timezone America/Los_Angeles to set timezone to LA
timedatectl show to see current timezone
25.3 Setting up an NTP Client
ntp is managed by the chronyd service
/etc/chrony.conf contains the configuration parameters
make the following updates to the config file
# Serve time even if not synchronized to a time source
local stratum 5 change from 10, the lower the number the more in-sync the time
comment out # pool 2.centos.pool.ntp.org iburst
restart chrony service systemctl restart chronyd
open firewall firewall-cmd --add-service ntp
and make permanent firewall-cmd --add-service ntp --permanent
chronyc sources to view ntp server synchronization
Lesson26
Accessing remote file systems
Learning objectives
- 26.1 Configuring a base nfs server
- 26.2 Mounting nfs shares
- 26.3 Configuring a base samba server
- 26.4 Mounting samba shares
- 26.5 Understanding automount
- 26.6 Configuring automount
- 27.7 Configuring automount for home directories
26.1 Configuring a base nfs server
CONFIGURING NFS
you do not have to configure a base nfs server for the rhcsa
run the nfs-server service
create a directory you want to share: /data
edit /etc/exports to contain the following line
/data *(rw,no_root_squash)
configure the firewall
RUNTIME
firewall-cmd --add-service nfs
firewall-cmd --add-service mountd
firewall-cmd --add-service rpc-bind
ADD TO SYSTEMD
firewall-cmd --add-service nfs --permanent
firewall-cmd --add-service mountd --permanent
firewall-cmd --add-service rpc-bind --permanent
26.2 Mounting NFS Shares
MOUNTING NFS SHARES
use showmount -e nfs-server to show exports
use mount nfsserver:/share /mnt to mount
while mounting through /etc/fstab, include the _netdev mount option
| /etc/fstab | |||||
|---|---|---|---|---|---|
| 192.168.4.210:/data | /nfs | nfs | _netdev | 0 | 0 |
26.3 Configuring a Base Samba Server
samba implements the windows sharing file server
do not need to know how to setup a samba for the rhcsa
CONFIGURING A BASE SAMBA SERVER
install the samba server package
create a directory to share
create a local linux user
set linux permissions
use smbpasswd -a to add a samba user account
enable the shared in /etc/samba/smb.conf
use systemctl start smb to start the service
use firewall-cmd --add-service samba --permanent; firewall-cmd --reload to open the firewall
26.4 Mounting Samba Shares
MOUNTING SAMBA SHARES
install the cifs-utils and samba-client rpm packages
use smbclient -L //smbahost to discover shares
use mount -o username=sambauser //smbaserver/share /somewhere tp mount the share
make mount persistent through /etc/fstab, using the _netdev, username= and password= mount options
cifs and samba are the same service
good idea to reboot to ensure auto remounting once you’ve completed configuration
26.5 Understanding Automount
mount shares only when you need it
UNDERSTANDING AUTOMOUNT
in /etc/auto.master you’ll identify the directory that automount should manage, and the file that is used for additional mount information
in /etc/auto/data you’ll identify the subdirectory on which to mount and what to mount exactly
files -rw nfsserver:/data/files
/etc/auto.misc has examples
ensure autofs service is started
26.6 Configuring Automount
showmount -e to print available mounts
install sudo yum install autofs -y
/net and /misc directories are managed by automount
26.7 Configuring Automount for Home Directories
ldap user home directories can go on one server
edit /etc/exports
/home/ldap *(rw)
restart nfsserver systemctl restart nfs-server
run showmount -e servername to print nfs exports list
edit /etc/auto.master
- add
/home/ldap /etc/auto.ldap
edit /etc/auto.ldap
* -rw labipa:/home/ldap/&to match on any user
restart systemctl restart autofs
Lesson27
Running containers
Learning objectives
- 27.1 Understanding containers
- 27.2 Running a container
- 27.3 Managing images
- 27.4 Managing containers
- 27.5 Attaching storage to containers
- 27.6 Managing containers as service
27.1 Understanding containers
a container is a complete package to run an application, which contains all application dependencies
containers make it easy to run different versions of application dependencies side-by-side
containers run on top of a container engine that is offered by the host operating system
the operating system kernel is not included in the container, but offered by the host
by using this approach, containers are more efficient than virtual machines
to start a container, container images are used - a read only instance
the purpose of a container is to run an isolated process
to do so, container images are configured to run a standard application
once that application is finished, the container is done
application containers are used to run common applications
system containers are used as the foundation to build custom images, and son’t come with a standard application
containers are linux and rely heavily on features provided by the linux operating system
- namespace for isolation between processes - for example,
chroot - control groups for resource management, aka as
cgroups - selinux to ensure security
one container runs one application
multiple applications can be connected in microservices
to manage containers at the enterprise level, orchestration is needed
red hat has Open Shift to provide orchestration
you can also use kubernetes
different solutions for managing containers exist
these solutions are highly compatible and interchangeable because of the open container initiative
on previous versions of rhel, red hat was offering docker support
in rhel 8, red hat is offering some new utilities
podmanis used to manage containers and container imagesbuildahis used to create new container imagesskopeois used to inspect, delete, copy and sign images
if containers need to run a process on a privileged port, they need to run with root privilege
rootless containers will run as a non-root user
running containers as root is more dangerous
running containers is an enterprise environment requires a solution that offers additional features
- ensuring scale container up and down
- ensure container availability
- offer a developer workflow to make it easy to get source code to running container
kubernetes is the common orchestration standard that is used to manage containers in a cluster environment
red hat open shift is the ed hat kubernetes distribution; it offers additional features to kubernetes
27.2 Running a Container
to star with, container management tools need to be installed: yum module install container-tools
after installing, you can immediately start running containers from the docker registry: podman run -d nginx
the red hat registries are registry.redhat.io for official red hat products, and registry.connect.redhat.com for third-party products
red hat registries require authentication using podman login, where the red hat account name and password are provided
registries are processes in order as in /etc/containers/registries.conf
to get a specific container, use complete name reference: podman pull registry.access.redhat.com/ubi8/ubi:latest
use podman pull to pre-pull the image from the registry to the local system
use podman run to pull the container, id necessary, and run it
- will run container in foreground
- use
podman run -dto run in detached mode - use
podman run -itto run in interactive tty mode - consider using the option
--rmto remove the container after using it
detach from the container tty using ctrl-p, ctrl-q
exit from the primary container application using exit
podman ps to list running containers
podman ps --all to see previously running containers
27.3 Managing Images
the image is a read-only runnable instance of a container
images are obtained from registries, which are specified in /etc/containers/registries.conf
additional registries can be added in the [registries.search] section in this file
use podman info to see which registries are currently used
insecure registries are not protected with tls encryption and must be listed on [registries.insecure]
podman search searches all registries
podman search --no-trunc registry.redhat.oi/rhel8 searches specific registry on the rhel8 string
use filter to further limit the search result
--limit 5shows a maximum of 5 images per registry--filter starts=5shows images with 5 stars or more--filter is-official=trueshows official images only
web search is available through https://access.redhat.com/containers or https://hub.docker.io
use skopeo to inspect images before pulling them
`skopeo inspect docker://registry.redhat.io/ubi8/ubi
use podman to inspect images that are locally available
podman imagespodman inspect registry.redhat.io/uni8/ubi
notice that some docker images are designed to run as root, they won’t run in podman without sudo
use complete urls to the image you want to install to increase your chnace of being successful
podman run -d registry.access.redhat.com/rhscl/httpd-24-rhel-7
when newer versions of images become available, the old version will be kept on your syatem as well
use podman images to get a list of all images
use podman rmi to remove images
for advanced image management the buildah utility is provided
this tool can be used to create your own custom images and ofers different ways to do so
- based on a dockerfile with
buildah bud - by running
buildahcommands directly against an image usingbuildah run
use podman info to see current distribution version information, runtime, and registries
podman images can also allow for house cleaning
then use podman rmi
27.4 Managing Containers
map a host port to the container application port to nake it reachable from the outside
podman run -d -p 8000:80 nginx will map host port 8000 to container port 80
podman port -a will show all current container port mappings
do not forget to open these ports in the host firewall: firewall-cmd --add-port=8000/tcp --permanent
containers running without root privileges can bind to a non-privileged host port only
some containers require environment variables to run them
if a container fails because of this requirement, use podman logs containername, it shows the application log telling you why it failed
alternatively, use podman inspect and look for a usage line
use -e VAR=value while starting the container to pass variable values:
podman run -d --name mydb -e MYSQL_ROOT_PASSWORD=password -e MYSWL_USER=bob -e MYSQL_PASSWORD=password -e MYSQL_DATABASE=books -p 3306:3306 mariadb
podman ps shows currenlty running containers
podman ps -a shows container in a stopped state
podman stop mycontainer stops a container gracefully sending SIGTERM, if that doesn’t work after 10 seconds the container receives SIGKILL
`podman kill mycontainer sends SIGKILL to the container
podman rm mycontainer removes a container, including all file modifications written to the container writable layer
podman restart mycontainer restarts a container that was previously stopped
podman exec mycontainer uname -r runs an additional process inside a running container
podman exec -it mycontainer /bin/bash access an interactive shell
podman exec -l cal /etc/redhat-release runs the command on the last container that was used in any command
by default, podman runs non-root containers
non-root containers cannot did to a privileges port and do not have a ip address
the only was to access their application is by using port forwarding
if you need a container that has an ip address, you need to run it as root container: sudo podman run -d nginx
root containers will only show if you use sudo podman ps
after starting a root container, on the host operating system a bridge device is created that works like NAT to make sure the root container can access the external network
27.5 Attaching Storage to Containers
container storage is ephemeral
modifications are written to the container writable layer and stay around for the container lifetime
persistent storage keeps files externally
use bind mounts to connect a directory inside the container to a directory on the host
ensure that the user account used in the container has access to the host directory, and set the SELinux context type to container_file_t
if the container user is owner of the host directory, the Z: option can be used: podman run -d -v /webfiles:/webfiles:Z nginx
using selinux is essential, without it all root containers would have full access to the host filesystem
mounting storage inside the container
sudo mkdir /dbfilessudo chmod o+w /dbfilessudo semanage fcontext -a -t container_file_t "/dbfiles(/.*)?"podman run -d --name mydb -v /dbfiles:/var/lib/mysql:Z -e MYSQL_USER=bob -e MYSQL_PASSWORD=password -e MYSQL_DATABASE=books mariabd -e MYSQL_ROOT_PASSWORD=password
27.6 Managing Containers as Services
AUTOSTARTING CONTAINERS
to automatically start containers in a stand-alone situation, you can create systemd user unit files for the rootless container and manage them with systemctl
if kubernetes or openshift is used, containers will be automatically started by default
RUNNING SYSTEMD SERVICES AS A USER
systemd user services start when a suer session is opened, and close when the user session stopped
use loginctl enable-linger to change the behavior and start user services for a specif user (requires root privileges)
loginctl enable-linger lindaloginctl show-user lindaloginctl disable-linger linda
MANAGING CONTAINERS USING SYSTEMD SERVICES
create a regular user account to manage all containers
use podman to generate a user systemd file for an existing container
notice the file will be generated in the current direcotry
podman generate systemd --name myweb --files
to have systemd create the container when the service starts, and delete it again when the service stops, add --new
podman generate systemd --name ephemeral_ellie --files --new
to generate a service file for a root container, do it from /etc/systemd/system as the current directory
CREATING USER UNIT FILES
create user specific unit files in ~/.config/systemd/user
manage then using systemctl --user
systemctl --user daemon-reloadsystemctl --user enable myapp.service(requires linger)systemctl --user start myapp.service
systemctl --user commands only work when logging in on console or ssh and do not work in the sudo su session
Comments